 Video on Patreon
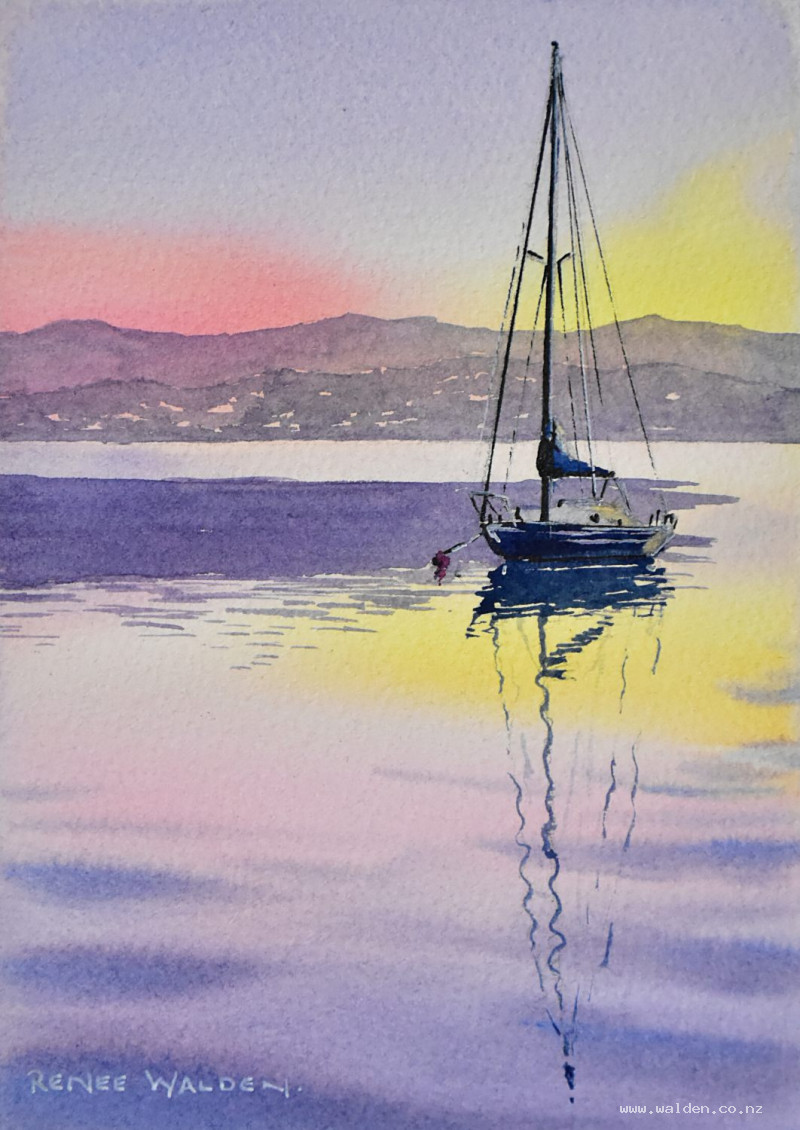
Yacht at sunrise
12 December 2024
Video - Level ◆◆◆
Such a pretty scene for this lesson. Very calm and peaceful too. It's an opportunity to use lovely pastel colours, and a light touch when painting, so that the paper shines through and your painting glows.
I noticed when I took the final photos that I had forgotten to paint in the little buoy the boat was anchored to, so I added that in with a dull pink mix.
Happy painting!
Video run-through...
About This Painting
A moored sailing boat at sunrise or sunset — a glowing sky reflected in calm water, distant hills with the warmth of the light behind them, and a dark boat silhouette with all its rigging. The mood is peaceful and luminous. The key quality to aim for throughout is a light touch: muted, clean washes with the paint floating on the paper rather than being pushed into it.
Painted in portrait format with the boat moved to one side so it looks into the painting rather than out of it.
A traceable drawing is available in the lesson description.
Colour Palette
Warm glow: Hansa yellow medium (golden streak), quinacridone rose (pinkish-orange). Both kept very dilute — quinacridone colours are intense and need a lot of water to stay muted.
Sky grey-purple: Cobalt blue and quinacridone rose mixed to a cool purple, then a small amount of burnt sienna to neutralise slightly. Three colours mixed together so they separate on the paper.
Background hills: The same grey-purple mix, slightly adjusted — more blue for the back hills (since so much pink is already in the undertone), slightly darker and warmer for the closer shore.
Water ripples and mid-ground: The grey-purple mix with a touch more blue.
Boat and reflections: Ultramarine blue with a small amount of Payne's grey — a deep navy that doesn't go too bright or too warm.
Pen work: Black ink (not brown — the blue undertone throughout the painting means warm ink would clash).
Painting Order
- Sky and water — full-page wash, painted upside down for the water
- Soft foreground ripples — while still wet
- Background hills
- Mid-ground water ripples around the boat (hard-edged)
- Boat hull and reflections — painted together
- Light details and lifting
- Pen work — rigging and highlights
Step 1: Sky and Water — Full-Page Wash
Wet the entire page with clean water, let it settle, then wet again so the paper is evenly damp but not pooling.
Mix the warm colours first (yellow, then the pink) before touching any blues, so there's no contamination. Apply the yellow streak across the horizon area (over where the mountains will be) and the pink-orange through the mid-sky. Clean the brush thoroughly, then apply the grey-purple along the top, working carefully to avoid it running into the yellows and making mud. Let the water on the paper carry the paint where it wants to go — don't push.
Turn the painting upside down and repeat for the water: grey-purple at the bottom (which will become the far edge of the water), then yellow streak matching the horizon, then pink-orange filling the middle of the water. The sky and its reflection should feel like a continuous glowing band from top to bottom.
Step 2: Soft Foreground Ripples
While the page is still wet, switch to a round brush and apply a few horizontal streaks of the grey-purple mix (very thick, almost dry paint) across the foreground water. Keep them horizontal — painting standing up helps avoid curved strokes. Make marks larger in the foreground, smaller further back. If the paper has started to dry, stop — forced marks on drying paper will look wrong.
Let dry naturally until almost touchable, then finish with a hairdryer.
Step 3: Background Hills
Use the same grey-purple mix, adjusted slightly. The back hills should be very pale — the sky undertone is already there, and going too dark will overpower the glow. Lean more blue since the underlying warm colour provides enough warmth. Keep the horizon line interesting with a few small bumps rather than a flat line.
For the closer shore, darken the mix slightly and use a broken wash — leave small irregular gaps suggesting buildings, jetties, or a waterfront.
Step 4: Mid-Ground Water Ripples
These are hard-edged (unlike the soft foreground ripples done wet-into-wet). Use a slightly more blue version of the grey-purple mix. Paint the calm dark area behind the boat, shaping roughly around the hull but not fussing over every detail since the boat is dark anyway. For the ruffled water further out, use the tip of a fine brush to paint short, flat, irregular horizontal marks. These can suggest reflected hills broken up by a patch of wind on the water.
Step 5: Boat and Reflections
Mix a deep navy: ultramarine blue with a touch of Payne's grey. Mix generously — you need enough for the hull, masts, rigging lines, and all their reflections.
Paint the hull and its reflection in one continuous pass — the paint running from the bottom of the hull straight into the water below is what places the boat convincingly on the surface. Use a dagger brush or rigger for the mast reflection: start relatively straight just below the hull, then make it progressively more wobbly as it extends into the rippled foreground. Fine rigging reflections follow the same principle — very faint and wobbly where they hit the ripples.
Give the white parts of the hull (stripes, cabin) a very light glaze of dilute blue — they shouldn't read as pure white in this golden light.
Step 6: Light Details and Lifting
With a clean, almost-dry brush, lift out a small amount of colour from the back edge of the hull where the light catches it. Drop a small amount of yellow here and along the top of the sail and cabin. These warm highlights are the focal point's most luminous detail.
Step 7: Pen Work
Black ink throughout — brown ink would add unwanted warmth to the cool palette.
Use a ruler (or an old credit card held at a slight lift) for the straight rigging lines. The main mast is thicker than expected — don't make it too fine. The boom and spreader arms are also substantial.
Finer rigging lines: Draw them in black first, then immediately run a line of white ink alongside on the sunlit side. The white narrows the apparent line and adds a highlight, making the rigging look fine and lit at the same time. A broken line also reads as more naturally fine than a solid one.
Guardrails, windows, and other small boat details can be suggested with a few careful marks.
White gel pen or white ink: Highlights on the sunlit left-hand side of the mast, hull edges, and any other surfaces catching the light.
A Note on Light Touch
Throughout this painting, the aim is to keep washes clean and luminous. This means: mixing enough colour before starting each section, not scrubbing paint into the paper fibres, keeping the brush loading generous so the paint flows rather than drags, and stopping before fussing. The glow of a sunrise or sunset comes from the transparency of the layers — overworking kills it.
Resources...
* Reference photo
* Drawing to trace
Join me on Patreon
Join my Adventures in Colour Tier for $16 to access this post and my full library of over 200 others including deep-dive videos and step-by-steps.