 Video on Patreon
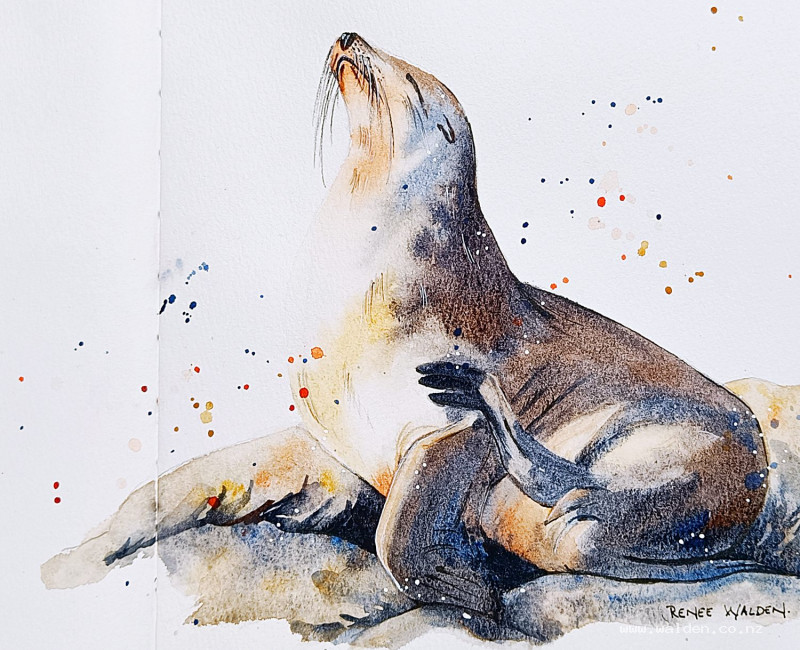
A seal
30 January 2025
Video - Level ◆◆◆
Such a wonderful content pose. I couldn't resist painting this bliss ;-)
I really enjoy sketching animals. It's so much about observation, right from the pencil drawing through to the brush strokes. And in a sketch, rather than a painting, we're after capturing the character and pose with a minimal of fuss and detail.
In this lesson we play with the light against shadow, creating form with both hard and soft edges. We also look carefully at all the colours in that silky fur, so that the seal looks natural - it's not just one, single grey or brown.
Happy painting!
Video run-through...
About This Painting
A contented-looking seal on rocks — the challenge and pleasure of this lesson is capturing both the silky sheen of the fur and the transition between warm sunlit areas and cool blue-grey shadows. The approach is methodical: a fully wet-into-wet first layer establishes soft edges and colour throughout, a second targeted layer adds structure, and then rocks, details, and pen bring everything together.
A traceable drawing is available in the lesson description.
Drawing tip: Once the drawing is complete, step away for a few hours (or overnight) and return with fresh eyes to check accuracy before painting.
Before painting: Use a kneadable eraser to soften the pencil line along the chest/belly highlight — this creates a deliberate lost edge that makes the seal look shiny and round in that area.
Colour Notes
Seals are not just brown and grey. Look carefully at the reference:
- Chest and belly (sunlit): yellowy-brown (natural sienna)
- Under the chin and along flippers (sunlit): reddish-brown (quinacridone sienna or burnt sienna)
- Deeper warm areas: burnt umber
- Shadow on the head and back: blue-grey (ultramarine blue)
- Shadow transitioning towards belly: brown-grey (ultramarine with burnt umber)
The shadow shifts from more blue at the top to more brown lower down.
Colour Palette
Warm lights: Natural sienna (or raw sienna/yellow ochre), quinacridone sienna (or burnt sienna), burnt umber.
Shadows/greys: Ultramarine blue on its own (cooler areas), ultramarine and burnt umber mixed (warmer shadow areas).
Rocks: Same palette — ultramarine and burnt umber for the dark areas, sienna tones for lighter patches.
Painting Order
- Seal — first layer, fully wet-into-wet
- Rocks — first layer, wet-into-wet with bloom texture
- Seal — second layer, targeted hard and soft edges
- Rocks — shadow pass
- Assess and adjust
- Detail pass with fine brush
- Optional splatter
- Pen work
Step 1: Seal — First Layer (Wet-into-Wet)
Wet the entire seal with clean water. Let it settle into the paper, then re-wet if it has dried too much before you've finished mixing. The paper should be evenly damp but not pooling.
Work from the lightest areas outward. Leave the chest highlight completely free of paint. Drop in the warm yellowy sienna across the belly area, shifting to the richer quinacridone sienna at the chin and where flippers catch the light. Let the colours merge without scrubbing — particularly be careful where warm brown meets the blue-grey shadow, as blue and yellow can make green.
Apply the blue-grey (more blue at the top, more brown lower) to all shadow areas. The whole seal should be covered in one session with everything still soft and blended.
While still damp, lift out highlights with a clean dry brush where needed. Let dry almost completely naturally before using the hairdryer.
Step 2: Rocks — First Layer (Wet-into-Wet with Blooms)
Wet all the rock areas. Drop in the grey-brown (ultramarine and burnt umber) for the darker areas, keeping the area behind the seal lighter so the animal stands out from the background. Drop in sienna tones for the sunlit rock patches. Vary the colour.
When the rocks have just lost their sheen (the "damp is dangerous" stage), flick clean water droplets across the wet surface. This creates controlled blooms that give the rocks texture contrasting with the smooth silkiness of the seal. Let the blooms develop naturally before using the hairdryer.
Make sure the seal is completely dry before applying this water flick, or the blooms will spread into the seal.
Step 3: Seal — Second Layer (Targeted Hard and Soft Edges)
Study the reference photo to identify which transitions are soft (head/chest area — shadow melts gently into light) and which are hard (flippers and rear fins — sharp shadow edge against light).
Soft transition areas: Re-wet very gently with clean water, taking care not to lift the first layer. Then drop in the grey-brown mix and let it blend.
Hard transition areas: Leave dry and apply paint wet-on-dry for a crisp edge.
Apply the shadow mix (ultramarine and burnt umber in varying proportions — sometimes bluer, sometimes browner) across the shadow side of the body, deepening towards the back. The rear flipper can nearly disappear into the shadow — let it be almost lost. Maintain the highlights.
Step 4: Rocks — Shadow Pass
Work with darker versions of the same mixes. Darken the rock area immediately adjacent to the belly highlight and the lit flipper — high contrast here is essential for those areas to read as bright. Lose the less important flippers into the surrounding shadow. Use the tip of the brush to suggest cracks and fissures, then soften some of them with a clean brush — not all rock edges are the same hardness.
Step 5: Assess and Adjust
Step back and look critically. Common issues:
- Any edge that feels too sharp away from the focal point can be softened by scrubbing lightly with a damp stiff brush
- Lost highlights can be lifted out (note: quinacridone colours are staining and may resist lifting)
- Any area that feels too light where it should recede can be darkened
Step 6: Detail Pass with Fine Brush
Use a very small brush (number zero or similar). Start away from the focal point to warm up before working towards the head.
Mark in the body folds, starting with those further back (reddish-brown tones), then working towards the belly folds (yellower), and finally the chin dimples, nose, and mouth. Vary the colour for each fold to match what's underneath. Apply marks then immediately soften them — no hard individual lines. The seal should still look silky and smooth, not textured.
Add whisker lines with the fine brush (these will receive a white gel pen pass on top to make them round and shiny).
Keep it minimal. The first-layer washes are doing the heavy lifting. Don't cover them with detail.
Step 7: Optional Splatter
Using a large brush loaded with the existing palette colours (blues and browns), splatter loosely around the seal to suggest the seal's environment without painting a full background. Clean water splatters alongside the colour create larger, lighter marks. Crossing the seal is fine.
Step 8: Pen Work
Dark brown ink: Shadow sides and fine structural details — claws, folds around the face, faint edge lines where needed. Apply very gently; a solid outline will make the seal look cut out. The focal point (face) gets the most attention. The whiskers get a fine brown ink line first to give them a shadow underside.
White gel pen: Whiskers (over the brown ink to create a rounded, shiny appearance), highlights on the nose and eye, any other areas catching direct light.
White Posca marker (optional): A few scattered dots suggesting water droplets in the shadow area.
If at any point the question "what should I add next?" arises, the answer is to stop.
Resources...
* Reference photo
* Drawing to trace
Join me on Patreon
Join my Adventures in Colour Tier for $16 to access this post and my full library of over 200 others including deep-dive videos and step-by-steps.