 Video on Patreon
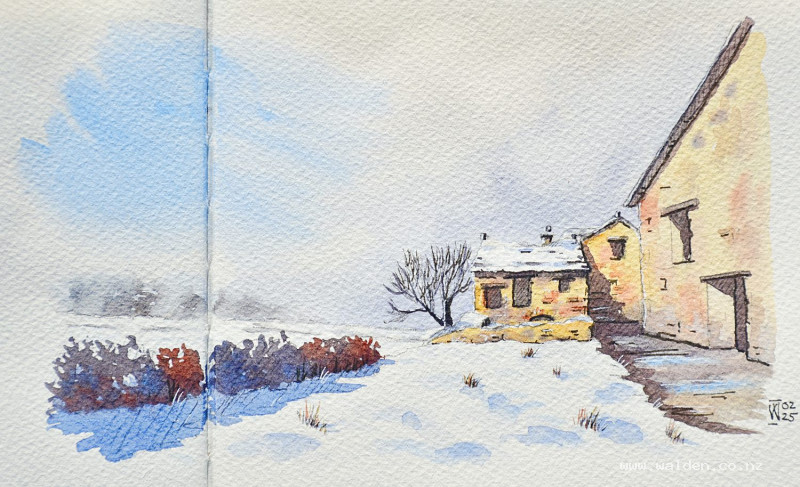
Snowy ruin
13 February 2025
Video - Level ◆◆◆
In this lesson we sketch a scene from the little village where I live in the Spanish Pyrenees. It's of one of my favourite buildings, which I've sketched many, many times. The other day it was covered in snow, which gave it a whole new story to tell.
This is a quick sketch, just like one I would do if I was painting on location. The idea is to capture the feeling of the scene with minimal detail and not worrying too much about careful washes or tiny details. Sketches, for me, are more about capturing a memory, in an immediate way. That freshness can have a charm all it's own.
I'm looking forward to sharing a little of my village with you.
Happy painting!
Video run-through...
About This Painting
A snowy alleyway in a French village — an old, partially ruined stone building catching the winter sun, a misty line of trees behind, bramble bushes framing the sides, a wet reflective alleyway leading the eye straight to the focal point, and a bare tree against the sky. The scene is built around beautiful one-point perspective, with multiple diagonals converging on the lit building. The mood is quiet and wintry — a mostly neutral palette with warm golden stonework reserved for the focal point.
This is painted as a sketchbook spread without tape, so the edges are loose. If you prefer clean edges, tape all four sides before starting.
A traceable drawing is available in the lesson description.
One-Point Perspective
The alleyway, the bramble lines, and the sky diagonal all converge on the same focal point — the sunlit building. When painting the shadow across the snow, make sure it follows the same one-point perspective: wide in the foreground, narrowing to almost a triangle shape as it recedes.
Colour Palette
Sky and mist: Cobalt blue (clear sky streak), cobalt blue with burnt umber and a touch of ultramarine violet (grey-purple mist). Keep mist colours cool and not too brown or they'll jump forward.
Misty background trees: The sky mix with a little more burnt umber — warm enough to read as trees but still very muted.
Foreground brambles: Cobalt blue, burnt umber, quinacridone sienna — more saturated and warmer than the background, with colour variation throughout.
Sunlit stonework: Natural sienna (or raw sienna/quinacridone gold) as the base, with quinacridone sienna and the bramble dirty mix dropped in for texture.
Wet alleyway: Cobalt blue (sky reflection) merged with the dark grey bramble mix.
Snow shadows: Cobalt blue and ultramarine violet, dulled slightly with burnt umber — blue-leaning, not grey.
Building shadows: The snow shadow mix with more burnt umber added — richer and browner for shadows on stone.
Tree and dark details: Cobalt blue and brown (more blue than brown) — never black paint alone.
Painting Order
- Sky — dry-on-damp technique
- Snow shadows — first pass, light
- Misty background trees
- Background bramble lines
- Foreground bramble bushes
- Sunlit stonework of buildings
- Wet alleyway — sky reflection plus dark stone
- Small details — tree, grasses, lintels, stones
- Shadows — snow and buildings
- Pen work
Step 1: The Sky
Wet the sky area — but less wet than usual. For this painting, the technique is closer to dry-on-damp than wet-into-wet: the paper should be just barely shiny, not glossy. This keeps the sky streaks from spreading too far and allows the diagonal directional marks to stay more defined.
Apply cobalt blue in directional streaks pointing towards the focal point — this blue diagonal subtly reinforces the one-point perspective. Then add the grey-purple mist mix around and below, leaving some white paper. Go slightly darker immediately around the roof of the focal building so the snow-covered roof reads as bright white against a darker background.
Do not use a hairdryer while the sky and the adjacent snow area are still softly bleeding together.
Step 2: Snow Shadows — First Pass
While waiting for the sky to dry, apply the first, lighter pass of snow shadows using the same sky colours (diluted further). Vary the marks — some with hard edges suggesting sharp mounds, some softened to suggest rounded snow. Larger marks in the foreground, smaller towards the back for depth. Soften some marks immediately with a clean damp brush but leave others crisp. A combination of hard and soft edges is what makes snow look real.
Add very light marks along the roof to suggest the uneven stone tiles, and a hint of form in the far field.
Step 3: Misty Background Trees
Wet a band above the tree line with clean water and bring that wet area down to the horizon line in a few places (but not everywhere). Paint the trees in the grey-brown mix and let them bleed upward into the wet area — this creates the misty softening effect where the trees dissolve into the sky. The trees should be barely visible. Lift out colour in places to increase the sense of mist.
Step 4: Background Bramble Lines
The distant lines of bushes and brambles are painted in the same grey mix as the trees — cool, muted, soft. Keep them light to maintain their position in the background.
Step 5: Foreground Bramble Bushes
The foreground brambles are the closest major element aside from the building, so use more saturated, warmer colour — cobalt blue, burnt umber, and quinacridone sienna, varied as you go. Hold the brush at the back of the handle and use the tip for a natural, unpredictable edge. Vary the colour throughout: sometimes more brown, sometimes more blue. Settle the base into the snow.
Dry thoroughly with a hairdryer before painting the buildings.
Step 6: The Sunlit Buildings
Use a flat or filbert brush for crisp edges. Apply the natural sienna base wash over each building section, avoiding snow areas. While still wet, drop in quinacridone sienna and the dirty grey-brown mix to suggest stone texture and age. Make the lower parts of walls slightly darker to give them weight and groundedness. Less colour variation in the buildings further from the focal point; more in the main building. A few specific details — the chimney, prominent stone tiles — can be added with a smaller brush.
Step 7: The Wet Alleyway
Wet the alleyway area with clean water. Drop in cobalt blue in horizontal strokes as a sky reflection — horizontal marks only, since the surface is flat. Then bring in the dark grey-brown mix and let it merge with the blue. Lift out some areas with a clean, almost-dry brush to create shiny, reflective patches. The goal is the impression of wet stone catching the sky.
Step 8: Small Details
Use a dagger brush, rigger, or fine round for: the bare tree (start from the base, working upward, using the same near-black blue-brown mix — no pure black), grasses sticking out of the snow (larger in foreground, smaller further back), wooden lintels, and a few selectively chosen stones on the main building. Don't overdo it — the pencil drawing underneath is already doing structural work. A few well-placed marks suggest the rest.
Step 9: Shadows
Make sure the painting is completely dry. Two shadow colours:
Snow shadows (second pass, darker): Cobalt blue and ultramarine violet with a touch of burnt umber — blue-leaning. The cast shadow follows the one-point perspective, widest in the foreground and narrowing towards the building. Tease it into the base of the bramble bushes and grasses to give them weight. A few additional marks on snow humps can suggest more form.
Building shadows: Take the snow shadow mix and add more burnt umber — richer and warmer. Apply under eaves, inside doorways, and anywhere one building sits in front of another (these shadow relationships are what creates depth). The shadow bringing the front building forward from the one behind is particularly important.
Cast shadow along the wet alleyway as well.
Step 10: Pen Work
Keep this minimal and focused on the focal building.
Dark brown ink: Shadow sides and underneath — right-hand sides of the main building, under eaves, tight corners. Use the pen upside down for finer marks. Branches on the tree, starting from the base. Don't outline — just tighten shadow edges.
White gel pen: Anything catching the sun — left-hand sides of the building, snow resting on tree branches, a few highlights on the roof edge.
It should be almost imperceptible. If it reads as outlining, it's too much.
Resources...
* Reference photo
* Drawing to trace
Join me on Patreon
Join my Adventures in Colour Tier for $16 to access this post and my full library of over 200 others including deep-dive videos and step-by-steps.