 Video on Patreon
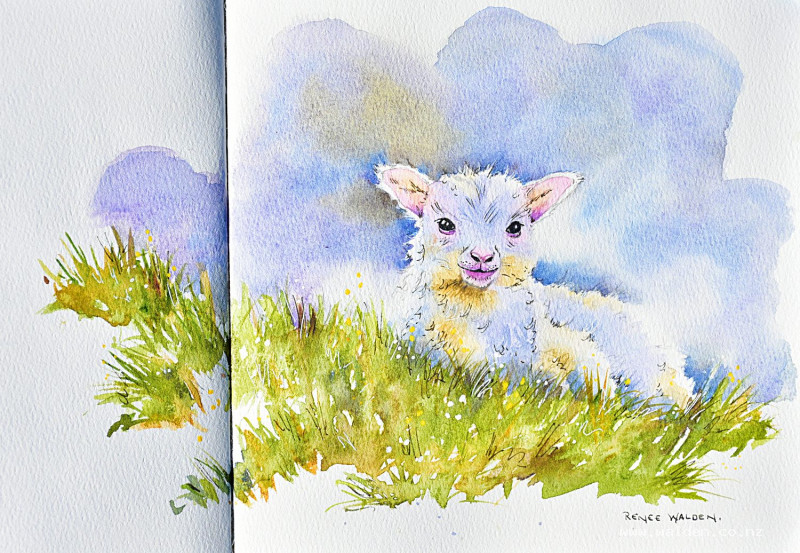
A lamb
27 February 2025
Video - Level ◆◆◆
Spring is just starting and there are quiet signs everywhere - bulbs popping up, blossoms appearing, and tiny flowers. And not so quiet signs too - little white lambs and baby kids and lots of lots of birds building nests. It really is a wonderful time of year!
In this lesson I've chosen this cute little lamb. It's wonderfully fluffy and white and backlit. So we get to play with interesting shadow colours and negative painting to capture the glow of all the pretty wool.
Happy painting!
Video run-through...
About This Painting
A newborn spring lamb with beautiful backlighting — impossibly fluffy, glowing at the edges, with warm and cool colour shifts playing through the shadows. The painting uses negative painting throughout to create the effect of soft wool against the background, and the technique of losing edges intentionally makes the lamb feel truly luminous rather than cut out. A white gel pen and dark brown ink add the final details.
A traceable drawing is available in the lesson description.
The Pencil Drawing
Draw the lamb large on the page so you can work with a good-sized brush and keep the washes free and simple — this is not a painting for tiny detail brushes. Mark in the shadow areas clearly so you have a guide when painting.
Before you start painting, use a kneadable eraser to remove the pencil lines in two or three areas around the edges of the lamb — particularly where the wool catches the backlight and where you want the figure to dissolve softly into the background. This is a deliberate choice: rather than a hard cutout all the way around, some edges will be lost into the background, which makes the wool look as though it's genuinely glowing. A kneadable eraser is ideal here as you can shape it to a point for accuracy.
Colour Palette
The shadows on a white subject are rarely grey — look carefully at the reference and you'll find warm and cool colours shifting throughout. For this lamb, the warm reflected light from the grass underneath uses natural sienna (yellow ochre or raw sienna also work), and the cool shadow areas use cobalt blue (chosen because it's soft and doesn't granulate, which suits the fluffy texture).
Mixing a warm yellow and a cool blue risks producing green, so add a small amount of ultramarine violet (or permanent violet) to knock the mix back towards grey when needed. Do a few swatches before you start to check your colour combination — if it's going too green, a touch of orange or purple will correct it.
Painting Order
- Lamb — wet-into-wet shadow wash, with warm and cool colours
- Foreground grasses — negative painting
- Background — negative painting to cut in around the lamb's edges
- Details — pen and ink, white gel pen
Step 1: The Lamb's Shadows
Wet the entire lamb — body, legs, ears, everything — with clean water. Check from the side that there are no dry patches and no pools; you want a uniform sheen. Let the water settle into the paper for a moment before adding colour.
Drop in the warm sienna first in the areas where reflected light from the grass hits the underside — beneath the chin, around the belly, and into any warm shadow areas. Then, with a clean brush, bring in the blue and violet mix for the cooler shadow areas. Don't scrub the two colours together — place them separately and let the water on the paper carry them where they need to go. Some green where they meet is fine; it reads as reflected light from the grass.
Leave the edges and brightest highlight areas completely unpainted — these will be pure white paper. Be especially careful to leave light along the outer edges where the backlight catches the wool.
While the paper is still wet, drop in a little pink for the nose, the inner ears, and around the eyes.
If paint goes somewhere unwanted, lift it out immediately with a clean dry brush or paper towel.
Step 2: The Foreground Grasses
Use the same shadow colours from the lamb to keep colour harmony throughout. Work wet-on-dry with loose, gestural marks suggesting grass. Vary the colour as you go — sometimes more sienna, sometimes more blue-grey.
Use negative painting to cut in between grass blades, suggesting the grasses rather than painting each one individually. Tease the edges softly so nothing feels too rigid.
Step 3: The Background
The background is the most important stage for making the lamb glow. Use the same colours as the lamb's shadows — cobalt blue, ultramarine violet, and a little of the neutral mix — so the whole painting feels harmonious.
Work in two stages: large brush first for the broad wash, then immediately switch to a smaller brush for the negative painting that defines the lamb's fluffy outline. Because everything is wet, you have time to work carefully. Cut in around the edge of the wool to suggest individual tufts — you don't need to paint every curl, just enough to read as texture.
In the areas where you erased the pencil drawing, keep the background pale or even white — this is where the edge is intentionally lost. Don't add colour there.
Keep varying the colour across the background — it doesn't need to be a flat wash. Let it have life.
Once dry, step back and assess the contrast. It is very common to need to go darker. If the lamb isn't standing out enough, re-wet the whole background area carefully (trying not to disturb what's underneath) and drop in another layer of colour, then cut in again with the small brush where needed. Go slowly and don't rush to full darkness in one pass — you can always add more, but it's difficult to fix an overly dark background.
Step 4: Details
Additional shadow modelling: Once the background is dry, if the nose or ears look flat, mix a slightly dulled pink (add a little blue to knock it back) and add soft modelling around the mouth, the top of the nose, inside the ears, and around the eyes. Keep everything soft.
Dark brown ink (fountain pen held upside down for a fine line): Start with the nostrils and define them gently. Then the eyes — animals come alive the moment the eyes go in. Add small eyelashes and any other marks needed around the face. Keep pen work minimal and concentrated at the focal point; a few scattered marks elsewhere is enough. The goal is for the ink to feel like it belongs rather than sitting on top.
White gel pen: Add fluffy marks along the edges of the wool, especially where the backlight catches it. This is where you can really push the sense of softness and glow. A highlight dot in the eye brings it fully to life.
Use Posca markers (white and yellow, or your choice of colours) to dot in small wildflowers in the foreground grass if you'd like to add a sense of spring.
Resources...
* Reference photo
* Drawing to trace
Join me on Patreon
Join my Adventures in Colour Tier for $16 to access this post and my full library of over 200 others including deep-dive videos and step-by-steps.