 Video on Patreon
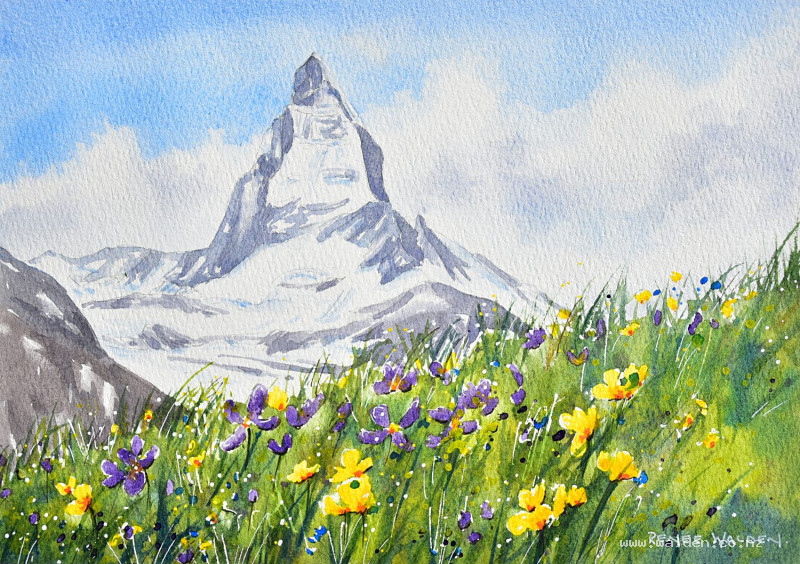
Matterhorn in spring
6 March 2025
Video - Level ◆◆◆
Let's take a trip to Switzerland and paint the iconic Matterhorn in spring :-)
There's lots to have fun with in this lesson - big cumulus clouds, a soaring snowy mountain and a meadow full of flowers.
I used masking fluid to protect the flowers so that I could paint the grasses on top, but you don't have to. I explain what to do if you'd prefer not to use it.
Happy painting!
Video run-through...
About This Painting
The Matterhorn in springtime — the iconic mountain soaring above a meadow full of wildflowers, with big puffy cumulus clouds framing the peak. This painting covers several techniques at once: painting cumulus clouds with lifted highlights, layering a complex background, and working a riot of foreground texture using masking fluid, wet-into-wet washes, and finishing with pens and splatter. Every meadow will look a little different, which is part of the charm.
A traceable drawing and two reference photos are available in the lesson description — one with the flowers in focus and one with the mountain.
The Pencil Drawing
Start with a light line indicating the slope of the meadow and the top of the mountain, just to confirm everything fits on the page. Then draw the mountain first as the main subject. A simple placement tip: make sure the mountain sits a different distance from each of the four edges of the paper — this alone creates a more interesting composition without needing to think about rules of thirds or golden ratios.
Add the foreground flowers facing in all different directions — some open, some closed, different sizes, with smaller ones further back.
Masking Fluid
Masking fluid is used to preserve the white flowers in the foreground. Apply it with an old ruling pen rather than a brush to avoid ruining anything. Dots, squiggles, and simple flower shapes are enough — you don't need to be overly precise. Allow it to dry fully before painting (usually about an hour, though leaving it overnight is ideal).
If you prefer not to use masking fluid, small pieces of tape work as an alternative, or you can simply paint around the flower shapes freehand and soften any hard edges later.
Painting Order
- Sky — wet-into-wet with cumulus clouds
- Mountain
- Background hills and trees
- Foreground meadow — green underwash
- Remove masking fluid, paint flowers
- Final details — pens, splatter
Step 1: The Sky and Clouds
Have pieces of soft tissue (or paper towel) scrunched into interesting shapes ready before you start — you'll need them quickly.
Wet the entire sky with clean water using a flat brush, cutting carefully around the mountain edges. Check from the side for dry patches. While the water settles, mix cobalt blue for the mid-sky and ultramarine for the upper sky — the warmer ultramarine at the top gives the sky a sense of depth.
Working quickly with a large brush, paint the cobalt blue in the main sky area with irregular cloud shapes — vary the humps so they're all different sizes. Add a band of ultramarine along the top. Then scrunch the tissue into a clean shape and dab out the tops of the cloud humps to lift colour and create soft, fluffy edges. Only do this in some places — a mix of hard and soft edges is more interesting than all-soft. Keep reshaping the tissue to a clean area for each dab.
For the cloud shadows, mix a very pale purplish-grey from ultramarine violet and a little burnt umber, well diluted. Drop this in along the bottom of the clouds and on their right-hand sides (light is coming from the left). Soften immediately with a clean brush. If any shadow looks too dark, dab it out with a fresh piece of tissue. Be aware that anywhere you dab with tissue will resist further paint, so use it deliberately.
Let the sky dry naturally to allow the colours to separate and the edges to develop, then finish with a hairdryer. Any colour that has overlapped the mountain can be lifted out with a stiff brush once it's completely dry.
Step 2: The Mountain
Keep the mountain lighter than you might expect — it needs to read as distant. Use cool, muted colours and restrained detail. The sense of scale comes from the composition and the clouds around it, not from dark heavy tones.
Step 3: Background Hills and Trees
Build up the background in layers, keeping everything soft and receding. Cool blue-greens for the distant hills, slightly warmer and darker as you come forward. Negative painting works well here for suggesting tree lines and ridges.
Step 4: The Foreground Meadow Underwash
Wet the foreground area and drop in a rich, varied green wash — warm greens, cool greens, some areas darker than others. Work loosely. This layer sets the mood for the whole meadow and the flowers will sit on top of it, so don't be timid. Let it dry completely before the next step.
Step 5: Removing Masking Fluid and Painting the Flowers
Once everything is thoroughly dry, remove the masking fluid by gently rubbing with a clean finger or soft eraser. Check with your hand that all of it is gone. The flowers will appear as stark white shapes against the green.
Soften the edges first. Masking fluid leaves hard edges, and not all of them should stay hard. With a clean damp brush, soften some of the flower shapes into the surrounding green so they look as though they're moving in a breeze rather than sitting like cutouts. Be selective — some hard edges are fine, but vary them. This step is worth taking slowly.
Now paint the flowers:
Yellow buttercups: Use a mid yellow for the base of each flower, varying the shapes — some open and facing you, some side-on, some nearly closed. Leave a small white highlight (buttercups are shiny). While still damp, drop in a deeper yellow on the shadow side (right-hand side, as the light comes from the left). Make flowers progressively smaller as they recede. A touch of orange added to some of the buttercups adds variety and warmth.
Purple flowers: Check your brush is clean of yellow — yellow and purple are complementary colours and will make mud. Paint the petals in a mid purple, again varying the shapes. Once nearly dry, drop in a darker permanent violet for shadows, and then small yellow centres.
Gentians: A few intense dots of phthalo blue scattered through the meadow. Keep these minimal — just enough to suggest a third flower type.
Once the flowers are dry, add stalks to some of them to anchor them into the ground. Use grasses painted over the flowers in places to make everything feel natural. Cover up any awkward shapes or marks with a light green wash.
Step 6: Final Details
Pens and markers: Use white and yellow acrylic markers (Posca or similar) for dots and dashes of light throughout the meadow. Have dots going into the lower sky as well. A dark brown ink pen can be used sparingly on the shadow sides of stems. A white gel pen adds catching highlights on individual grass blades. Keep pen marks varied and loose — it's easy for penwork to look too controlled and static.
Splatter: Cover the mountain and sky carefully with paper before splattering. Flick yellow, purple, and a touch of blue paint across the foreground with a loaded brush. Splatter adds the randomness that's difficult to achieve with a pen, and ties the whole foreground together. Remove the paper carefully.
Remove the tape — the clean edge will immediately lift the whole painting.
Resources...
* Drawing to trace
Join me on Patreon
Join my Adventures in Colour Tier for $16 to access this post and my full library of over 200 others including deep-dive videos and step-by-steps.