 Video on Patreon
Ideas to improve your pen work
27 March 2025
Video - Level ◆◆◆
In most of the tutorials that you do with me, we add a bit of pen work at the end. Have you thought about why you add the pen? Do you have a plan for where to add the pen and how much? This lesson is about thinking a bit more about the pen work stage and there are some ideas that will help you make this part of your painting more effective.
Happy painting!
Video run-through...
About This Lesson
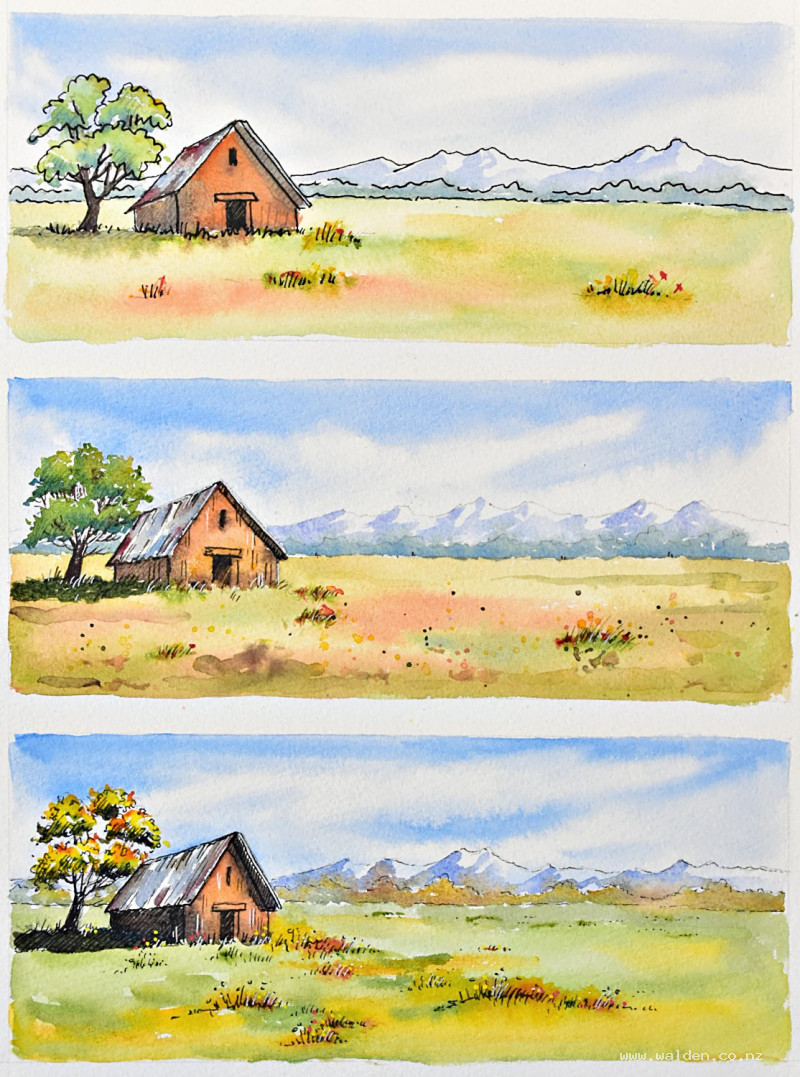
A skills lesson entirely dedicated to the pen work stage of a watercolour sketch — one of the most common places where a painting can go wrong right at the end. The lesson paints the same landscape scene three times to demonstrate three different approaches: one where the pen work undermines the painting, one where the watercolour washes are dominant, and one where the pen work is dominant. The goal is to understand what pen work is actually for, and to make a deliberate choice rather than just outlining everything out of habit.
The Problem: What Goes Wrong
The most common pen work mistake is picking up the pen at the end of a painting without thinking about why, and simply outlining every element with a continuous, uniform black line.
This approach tends to create several problems:
It kills the washes. All the subtlety, depth, and soft merging of colour that made the painting interesting gets pushed into the background. The eye goes straight to the pen lines and can't see the watercolour beneath.
It flattens depth. If the background elements get the same weight of line as the foreground, the sense of recession disappears. Everything reads at the same distance.
It cuts elements out. A solid outline around every shape separates them from each other — the scene starts to feel like individual cut-out pieces rather than a unified landscape.
It creates a no-man's-land. When watercolour washes and pen lines are given equal weight, neither is dominant and neither looks intentional. The painting doesn't know what it wants to be.
This isn't wrong as such — it's a valid approach if handled well — but it's worth understanding these effects before reaching for the pen.
The Solution: Make a Deliberate Choice
There are two clear, effective approaches:
1. Watercolour washes dominant — pen as a subtle supporting role
2. Pen work dominant — watercolour as a light supporting wash
The key is to decide which one you're going for before picking up the pen, not halfway through.
Approach 1: Washes Dominant
In this approach, the watercolour does the work and the pen simply tightens a few key areas. The aim is for the pen to be almost invisible — someone looking at the painting shouldn't immediately notice it was used at all.
How to approach the pen stage:
- Use brown ink rather than black — it's warmer, less harsh, and blends better with watercolour tones.
- Work on the shadow sides only — left-hand sides and underneath elements.
- Use a broken, varied line rather than a continuous solid one. Lift the pen, change pressure, leave gaps.
- Concentrate at the focal point. The main subject gets the most attention; the background gets almost none.
- Start tentatively. Add a little, stand back, decide if more is needed. You can always add more; you can never take it away.
- Use a white gel pen for light catches on the sunlit side, not the brown ink.
- Nothing in the distant background — leave that completely soft.
The test: step back and ask whether the pen feels like a natural part of the painting or like it's sitting on top of it.
Approach 2: Pen Dominant
Here the pen drawing is the main event and the watercolour washes are light, transparent, and secondary. The structure comes from the ink; the colour just fills it in.
How to approach the painting stage:
- Keep washes very light and transparent so the pen lines always show through clearly.
- Don't worry about painting precisely within the pen lines — the wash can break out of the structure slightly. It looks more natural and avoids the cut-out effect.
- Use horizontal strokes for flat areas like fields and meadows.
- Vary colour within each area (mix warm and cool, light and dark) but keep overall tones pale enough that the pen remains dominant.
- Save the brightest, most saturated colours for the foreground — the background should be cooler and more muted so it recedes.
How to approach the pen stage:
- The pen lines are already in place from the beginning (drawn before the washes), but you can go back over them after painting if the washes have softened or obscured them.
- In this approach, you can be more expressive with the pen — cross-hatching for shadows, texture marks for foliage, lots of detail in the focal point.
- Add extra pen marks after the washes to reinforce shadow areas and add texture — hatching in shadow zones, marks suggesting grasses or foliage in the foreground.
- Posca markers or coloured pens can add flowers, colour accents, or foreground detail.
- Still keep the background relatively simple — even in a pen-dominant painting, the sense of depth comes from doing less in the distance.
Finishing touches for pen-dominant paintings: Splatter paint into the foreground to add texture and visual interest. The splatter marks can be pulled into more defined shapes (bushes, flowers) with a small brush while still wet.
Summary
| Washes Dominant | Pen Dominant | |
|---|---|---|
| Ink colour | Brown | Black or brown |
| Line quality | Broken, varied, minimal | Expressive, detailed |
| Where to use pen | Shadow sides, focal point only | Throughout, with most detail at focal point |
| Wash lightness | Full tonal range | Very light and transparent |
| Background pen work | None | Minimal |
The key principle in both cases: the background always gets less pen work than the foreground. Recession and depth depend on restraint at the back, regardless of which approach you choose.
Resources...
* Worksheet
Join me on Patreon
Join my Adventures in Colour Tier for $16 to access this post and my full library of over 200 others including deep-dive videos and step-by-steps.