 Video on Patreon
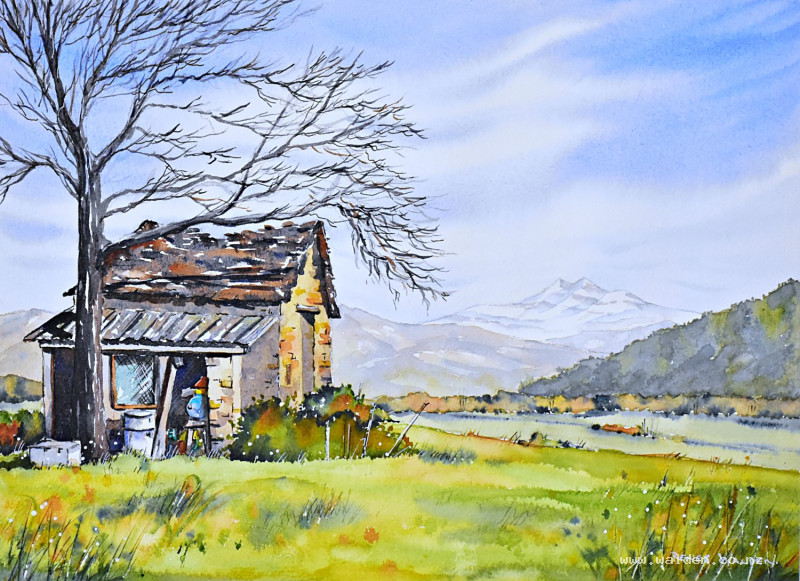
Old ruined barn - part 1
3 April 2025
Video - Level ◆◆◆
We're just outside my house for this lesson, painting my neighbours old barn. It's a wonderful scene with the ruined barn and the gorgeous mountain view.
This is our first long lesson that many of you asked for. It's broken into 2 parts. Part 1 we'll do the drawing, sky, background and foreground. And in part 2 we'll finish the painting.
If you've been saving some bigger paper somewhere, then now's the time to get it out :-)
Happy painting!
Video run-through...
About This Painting
A ruined stone barn tucked into a mountain landscape, with a tree wrapping around it, warm light spilling into the open interior, and an overgrown foreground full of texture. This is a longer project split into two parts — Part 1 covers the planning, drawing, sky, background, and foreground. Part 2 covers the barn, the tree, shadows, and finishing details.
This is also a good opportunity to work on a larger sheet of paper than usual — full watercolour sheets are much more economical per sheet and can be torn down to whatever size you need.
Before You Start: Thumbnail Sketches
For a complex scene like this, spending time on small thumbnail sketches before touching the main paper is well worth it. Thumbnails help you work out the composition, decide what to include and leave out, and — crucially — get familiar with the drawing so that when you move to the larger sheet you can draw with confidence.
A few things to work through in your thumbnails: where to place the barn, which sides of the building to show (seeing two sides gives the building form), what to do about elements you want to leave out from the reference, and where the darkest darks and lightest lights fall. Once you've settled on a composition, note down the shadow positions so you have a reference for the later stages.
The painting order for this scene is: sky → background → foreground → barn → tree → details, shadows, and pen work.
The Drawing
Work on a larger sheet than usual, taped firmly to a board set at a slight angle. Painting standing up is recommended for larger work — it lets you use your whole arm and saves your neck.
Start with the barn, not the background. Drawing the main subject first ensures it ends up the right size and in the right place on the page — there's nothing worse than working background to foreground only to find the building runs off the edge. Mark a few positioning dots first so you know roughly where everything will sit, and make sure it's a different distance from each edge.
Draw the whole barn as though the tree isn't there, then add the tree on top. Keep the drawing light and focus on the big shapes — roof angles, the lean-to, the main walls. Use a ruler on the reference photo to check the angle of the roofline and apex if needed. Don't worry about internal details at this stage.
Once the barn is in, add the background mountains, middle ground trees, and foreground grasses. Keep it all simple — you're establishing shapes and positions, not finalising detail.
Step 1: The Sky
Wet the sky area thoroughly with a flat brush, cutting around the mountain edges carefully. Check from the side for dry patches.
Drop in your sky colours wet-into-wet, keeping it interesting but not overworked. The sky should feel airy and light — it sets the key for the whole painting. Let it dry naturally, then finish with a hairdryer.
Keep a piece of clean paper handy to cover the sky during later stages — it's easy to accidentally flick splashes up there.
Step 2: The Background
The background covers everything behind the main subject — mountains, distant hills, mid-ground trees. Keep these cool and restrained so they recede. The barn and tree will be warmer and darker, which will naturally pull them forward.
Use indigo for darker, cooler shadow areas in the background. Vary the colour as you move across the background — not everything the same tone or temperature. Keep edges soft where things meet the sky.
Leave the background to dry before moving on. This is a good moment to take a break, clean your palette, and refresh your water.
Step 3: The Foreground
The foreground is all grass and ground cover — overgrown and abandoned-feeling, which suits the story of a ruined barn. This is a large area, so use a large brush. If you're not confident you can cover it quickly enough wet-on-dry, wet it first with clean water.
Colours: Sap green is the base — it has a warm yellow undertone that contrasts nicely with the cooler background greens. Mix up a generous amount. Have warmer, redder colours ready alongside it — a reddish colour (quinacridone sienna or burnt sienna) makes green look greener through complementary contrast. Natural sienna and yellow can also be dropped in for variety.
Cover the foreground quickly with loose green strokes, leaving gaps for the other colours. Immediately drop in the warmer reds and yellows into those gaps. Add some darker marks with indigo in the shadow areas, especially along the base of where the building will sit.
Texture: While the paint is still wet, work in the following order:
- Scratch out grass marks with an old credit card, ruler, or pointed tool. Make the marks larger in the foreground and smaller towards the back.
- Splatter clean water over the wet paint to create blooms and organic texture.
- Splatter colour — greens, then other colours — for additional texture. As the paper dries, the splatters will move less and become more defined, so you can layer them at different stages of dryness.
- Bramble-type marks with a rigger or fine calligraphy-style brush. Keep these soft since the paper is still damp — the hard, precise detail belongs around the building, not in the open foreground.
Composition note: Aim to keep the most visual activity in the corners and lower edges, with something resembling a calmer pathway through the middle. This gives the viewer a sense that they can walk into the painting rather than hitting a wall of texture.
Once happy, lift the covering paper from the sky and step back to assess. It can be hard to judge the foreground with the large white unpainted barn area still blank — don't over-do the foreground now; you can always add more after the building is in place.
Part 2 covers the barn, the tree, shadows, and all finishing details.
Resources...
* Drawing to trace
* Reference photo
Join me on Patreon
Join my Adventures in Colour Tier for $16 to access this post and my full library of over 200 others including deep-dive videos and step-by-steps.