 Video on Patreon
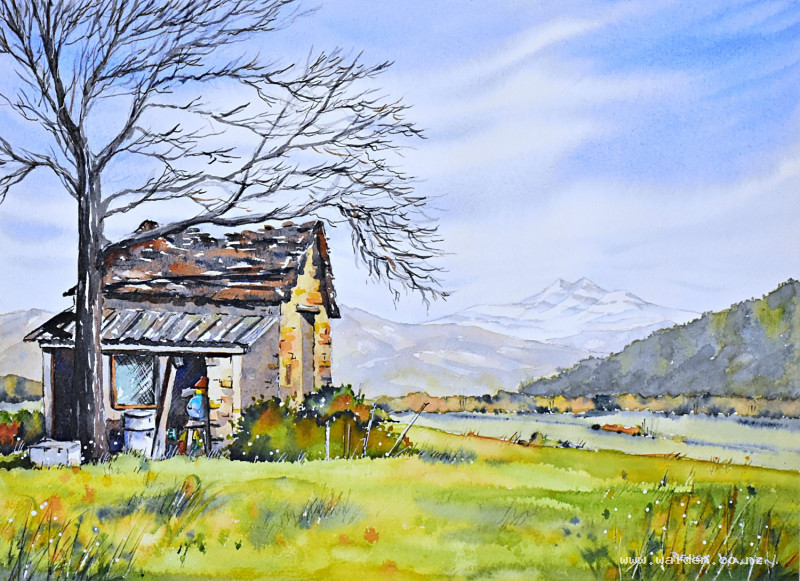
Old ruined barn - part 2
10 April 2025
Video - Level ◆◆◆
We're back for part 2 of my neighbours old barn. It's time to finish the painting :-)
Happy painting!
Video run-through...
Part 2: The Barn, Tree, Shadows, and Details
This continues from Part 1, which covered the planning, drawing, sky, background, and foreground.
Step 4: The Barn — First Pass
The priority at the start of this session is simply to get colour onto the large white barn shape — the unpainted area throws the whole composition off balance until it's covered.
Stone walls: The main colour for the sunlit stonework is natural sienna — it captures the warm golden tone of the rocks. Have a reddish brown (quinacridone sienna) and burnt umber ready alongside it for variety, and mix ultramarine with quinacridone sienna for a granulating grey for the pillars and more neutral stone areas. Work across the whole stone surface loosely, varying the colour as you go. Charge in different colours while the paint is wet so the stones read as varied in colour and texture rather than uniform. Don't create a pattern — avoid anything that looks too regular or polka-dotted.
Establish the basic light and shadow early: the sunlit wall is warm and light, the shadowed wall slightly darker. If anything goes too dark while still wet, lift it out with a clean dry brush. A concrete beam or lintel can be pulled in with a slightly cooler mix.
Wooden structures: Mix a brownish grey for any timber elements — old wood is rarely warm in colour.
The corrugated roof: Make this clearly different in character from the stone roof. Use a cool blue-grey (add blue to your browns) and paint the corrugations as shadow strips rather than as a solid flat wash — the ridges catch the light and the troughs fall into shadow. A touch of green suggests moss. Work with a large brush and don't worry about being overly tidy; the pen will sharpen things later.
The stone roof: Very dark, almost black in places — ultramarine and quinacridone sienna mixed thick. Paint in the direction of the flat rocks, varying between very dark near-black marks and browner ones. Leave some gaps where the rocks catch the light. Keep it organic and uneven.
Inside the barn: This is the focal point within the focal point — keep the most interesting colour and detail here. A blue barrel (painted with the sky colour to create a thread of colour through the painting), hints of a metal trunk catching the light, a mesh window in a greenish grey with thin streaks of white paper left to suggest the mesh pattern (or added later with white gel pen). Charge in various colours and let them merge — nothing inside should look new or shiny. Save any strong pops of colour for the very final detail stage.
Focal point note: Be thoughtful about where your strongest colour accent goes. A very bright warm colour near the entrance will immediately pull the eye there — which may be exactly what you want, or may compete with the composition.
Step 5: The Tree
The tree is an important structural element — it frames and softens the barn — so get it in before assessing what the painting needs.
Mix a range of greens for the foliage, keeping them varied and loose. Work from the outside edges inward, leaving irregular, interesting silhouettes. The trunk and major branches need both a shadow side (cool, dark) and a light side. Leave some gaps in the foliage where sky shows through — this stops the tree looking like a solid cut-out shape.
A bush or bramble in the foreground, treated the same way with negative painting, helps settle the building into the ground.
Step 6: Stone Detail and Interior Details
Before the shadows go in, add enough stone detail to read clearly as stonework — but resist the temptation to paint every rock. Pick out a selection in varying colours (using the underpainting as a guide), let some edges merge softly into each other and keep others hard. Follow perspective as you place the stones. The combination of a few described rocks and the suggestive texture underneath is more convincing than trying to paint every single one.
Add any remaining interior details now — window frames, the barrel in more considered colour, objects casting shadows onto each other inside the doorway. A small touch of orange as a complement to the blue barrel adds life to the focal point without fighting the rest of the painting.
Step 7: Shadows
This is the stage that pulls everything together and gives the building genuine three-dimensionality. Make sure everything is thoroughly dry before starting.
Mix ultramarine and quinacridone sienna into a rich dark — lean it towards blue or towards brown rather than a flat 50/50 mix, and keep the paint fairly thick with less water than earlier stages. Have a paper towel handy to dab off excess moisture.
Work across the whole painting looking for cast shadows: the shadow along the base of the walls, shadows cast by the roof overhang, shadows inside the doorway, and the tree's shadows falling across the barn. Try to connect the shadow shapes into one large unified form rather than lots of small separate patches. While still wet, vary the colour by charging in a little more brown or a little more blue — this keeps shadows from looking flat and dead.
A few specific areas to address: the corrugated roof casts distinctive parallel shadow shapes onto the wall below — paint these carefully as they immediately read as corrugation. The pillars cast shadows into the interior. Objects inside the barn cast shadows onto each other. A greenish tone works well for shadows falling onto grass.
After the main shadows, pick out smaller shadow details on individual rocks, along window frames, and in any areas where contrast is needed to separate elements.
Step 8: Pen Work and Final Details
Before picking up a pen, step back and decide whether the foreground needs anything more — additional splatter, a few more marks. Make this decision now, because once the pen work is done the painting starts to feel finished. Don't add so much to the foreground that it competes with the barn.
Dark brown ink (extra fine nib, held upside down for an even finer mark): Work only on the shadow sides of elements — shadow side of the barn walls, under the roof line, inside the doorway. The goal is for someone looking at the painting to not be able to tell you used any ink at all. Go slowly and build confidence before committing to more marks. Tighten up tree branches and trunk on the shadow side, following the direction of the bark. A few marks on the mesh window, kept to the shadow side only.
White gel pen: Work on the sunlit sides — catches of light on the top and right-hand side of the barn, highlights on individual rocks, small bright grasses overlapping the building and the tree. If any pen marks on branches look too heavy, a stroke of white gel pen over the top immediately thins them and breaks up the solid mass. A few grass blades flicking across the lower edge of the building help integrate the building into the ground.
Remove the tape — the clean edge transforms everything.
Resources...
* Drawing to trace
* Reference photo
Join me on Patreon
Join my Adventures in Colour Tier for $16 to access this post and my full library of over 200 others including deep-dive videos and step-by-steps.