 Video on Patreon
Flat brushes
1 May 2025
Video - Level ◆◆◆
How well do you know your flat brushes? Maybe they can do more than you think ;-)
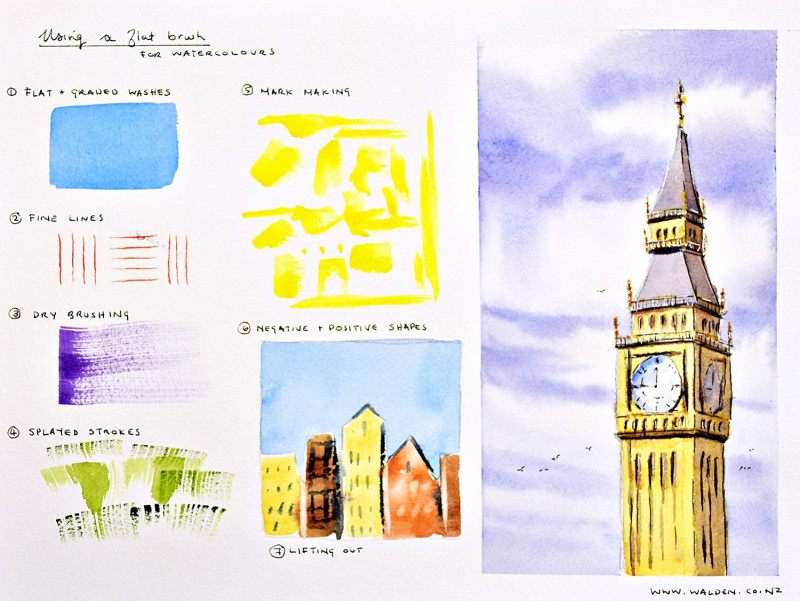
In this lesson we explore a number of different ways to use a flat brush with watercolours, and then we sketch Big Ben, adding the washes with only flat brushes. The sketch may look complicated, but I walk you through it slowly, from pencil sketch to the final details.
There's a downloadable worksheet attached that you can print out and keep.
Thanks to Pauline Fidget for the reference photo.
Happy painting!
Video run-through...
About This Lesson
A skills lesson dedicated entirely to flat brushes — what they can do, how to use them, and why they're more versatile than most people realise. The lesson builds a worksheet of mark-making techniques together, then puts everything into practice by painting Big Ben using flat brushes only, from the first pencil line to the final pen work.
A downloadable worksheet is available in the lesson description so you can print it out and keep it as a reference.
Flat Brushes: What to Have
You don't need many. The key workhorse is a one-inch flat — a good quality one will last years and is used constantly. A smaller cheap flat is useful for tighter work and also serves as a dedicated masking fluid brush. A larger flat (such as a size 21) is mainly for wetting large areas of paper at bigger scales.
Synthetic bristles are recommended throughout — they're robust, hold a good amount of water, and many have a sharp pointed end on the handle useful for scratching marks into wet paint.
Mark-Making Techniques
Flat Washes and Graded Washes
The most obvious use — a flat brush makes beautifully even flat marks and is ideal for laying in large washes smoothly.
Edge Marks (Using the Brush Upright)
Holding the brush upright and using just its edge produces surprisingly fine, precise lines — perfect for narrow architectural details like the edge of a fence post, the underside of eaves, or thin shadow lines along a wall. Load the brush with fairly thick paint (less water than usual) and hold it nearly vertical for the finest marks.
Dry Brushing
Load the brush with thick, almost dry pigment and drag it lightly across the paper surface. At the lightest touch on cold pressed or rough paper, the bristles skip across the texture and leave beautiful broken marks. This is actually easier with a flat brush than a round — with a round brush you'd have to use it on its side to achieve the same effect.
Splayed Fan Marks
Splay the bristles out with your fingers into a rough fan shape. This gives broken, irregular marks useful for suggesting grasses, foliage, or rough textures. Works best with thicker paint. You can load different parts of the brush with different colours for instant variation across a single stroke — something a fan brush can't do as easily.
Cutting Into Complex Shapes (Negative Painting)
This is where flat brushes really shine. The clean straight edge of a flat brush cuts precisely around angular shapes — architectural skylines, rooflines, cliff edges — in a way that is much harder to achieve with a round brush. Wet the sky area and use the flat brush to paint right up to the edge of buildings or mountains, creating clean, sharp silhouettes without masking.
Varying the Angle
Rotating the brush as you paint — 45 degrees, upright, horizontal — produces a whole range of mark shapes from a single brush. Experimenting with these variations on a scrap of paper before starting a painting pays off quickly.
Painting Big Ben: Step by Step
Big Ben is an ideal subject for this exercise because it's full of angular shapes, strong perspective, and architectural detail — everything that flat brushes handle well.
The Drawing
Start with a light pencil drawing. Keep your verticals truly vertical — it's easy to let the tower lean slightly without noticing, and once pen work goes on top it becomes very obvious. Check the perspective lines before starting to paint and again before picking up a pen.
The Sky
Wet the entire sky area including over the building — the building will be painted on top. Use the flat brush to drop in the sky colours wet-into-wet. Vary the angle of your strokes as you build the clouds: angled marks toward the top suggest movement, while strokes become flatter and lighter towards the horizon. Give the clouds some weight along their lower edges. Once the sheen has almost gone from the paper, dry with a hairdryer.
Before painting the building, use an almost-dry flat brush to clean up any areas where sky colour has strayed over the building outline, and to soften any unwanted white halos where the sky didn't quite meet the edges. Keep the brush nearly dry for this — adding water at this stage will cause cauliflowers.
The Building — First Wash
Paint the entire sunlit face of the building with quinacridone gold (or natural sienna / yellow ochre if you don't have it) as a warm, unified base wash. Use the full range of angles the flat brush offers — cutting in around the clock face and balconies with the brush edge rather than switching to a round. While still wet, drop in touches of burnt umber in the shadow areas to break up the flat wash and add a sense of age and texture. The tiled roofs read slightly bluer than the main stonework — mix a brownish blue (quinacridone sienna added to the sky colour) and keep them clearly distinct from the gold.
Shadows
Once dry, mix ultramarine blue and quinacridone sienna for the shadow colour — lean the mix towards more sienna than blue so the warmth of the building isn't lost. Apply shadows to the right-hand sides of all forms and underneath any overhanging elements. Try to join the shadow shapes up into one connected form as you work across the building — this is what makes the structure suddenly feel three-dimensional and alive. Add a second, darker pass of shadows on the deepest shadow areas once the first is dry.
Pen Work
Check perspective lines one final time before picking up a pen.
Dark brown ink (extra fine nib): Shadow sides only — tighten edges, add fine architectural details like railings that were too small for even the brush edge. Keep it minimal; the brush has already done most of the work and the pen should be almost invisible.
White gel pen: Highlights on the sunlit side to suggest the stone catching the light. A few small birds in the lower sky add life and a sense of scale.
Resources...
* Worksheet
* Reference photo
Join me on Patreon
Join my Adventures in Colour Tier for $16 to access this post and my full library of over 200 others including deep-dive videos and step-by-steps.