 Video on Patreon
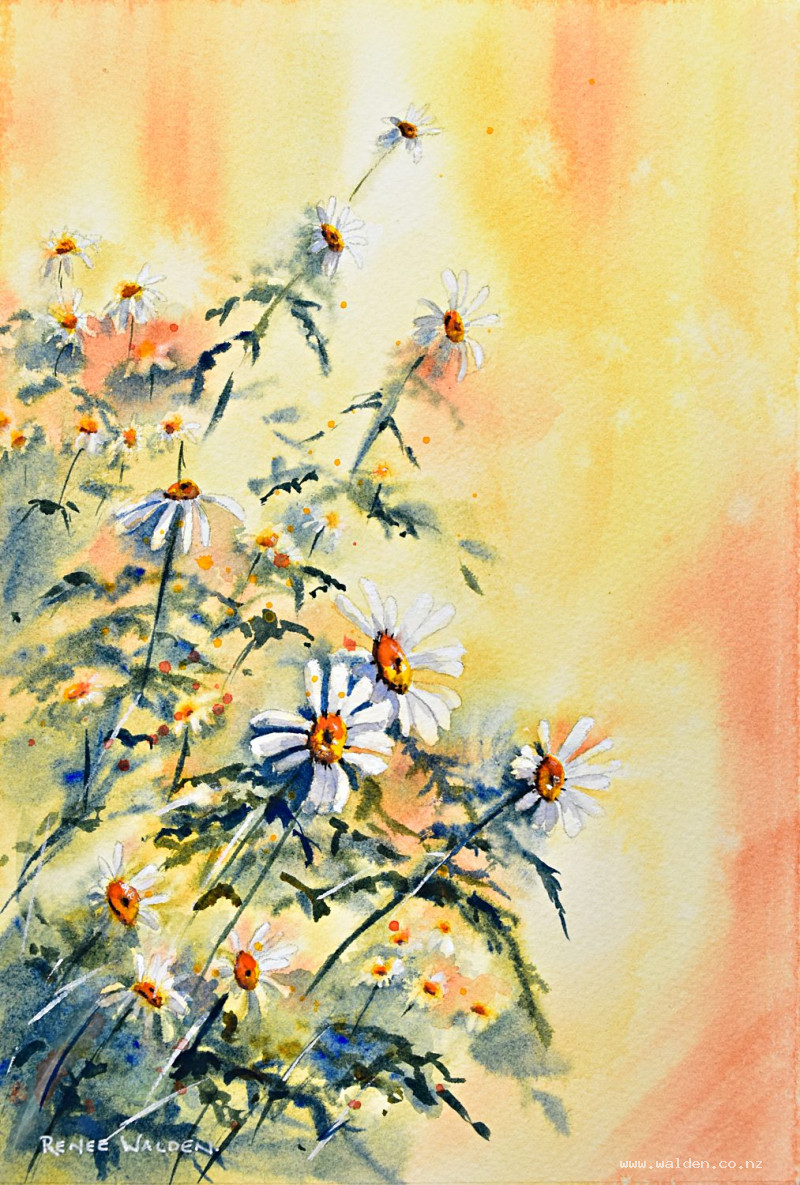
My neighbour's daisies (part 1)
8 May 2025
Video - Level ◆◆◆
We're going to try something new in this lesson. Something I haven't shown you before. We're going to wet both sides of the paper, so that we can work the soft background wet-in-wet for a very long time.
In this first part of painting my neighbour's daisies, I talk you through the idea behind abstracting the pot of flowers into something more free and full of light. Then we paint the background - all the glowing light behind and the daisies that are soft and out of focus.
In part 2, when our painting is thoroughly dry, we'll do all the details of the flowers that are in focus.
Ideally you should work on good quality, 100% cotton paper, of a heavy weight. If you've got some rough paper stashed somewhere, then you could experiment with that for this painting.
You'll also need a non-absorbent surface to work on - a piece of glass, perpex/plexiglass or plastic larger than your painting.
No masking fluid needed for this one! Just brush control ;-)
Happy painting!
Video run-through...
About This Painting
An abstracted painting of a pot of daisies — warm golden light behind, flowers leaning off to one side, some sharply in focus and others dissolving softly into the background. The technique is built around an extended wet-into-wet session using a specially prepared surface, allowing the paint to stay workable for a long time and creating beautiful soft transitions that a quickly-drying sheet can't achieve.
This lesson is in two parts — the wet-into-wet background stage is covered here, with the sharper detail work to follow once the painting is fully dry.
Before You Start: The Work Surface
Today's approach requires wetting both sides of the paper, so the normal taped board setup changes. You'll need a non-absorbent, clean surface — a sheet of plexiglass, perspex, or glass works perfectly. Avoid wood. Make sure it's free of grease or any chemical residue.
Wet the back of the paper thoroughly first, then use the surface tension of the water to press the paper flat onto the non-absorbent surface — the water acts as an adhesive and holds the paper down. Then wet the front. This keeps the paper wet for much longer than normal, giving you extended working time for the wet-into-wet stage.
You can work flat or at a slight angle — whichever is comfortable. Once the painting is finished for this session, tape all four edges to help it dry completely flat. Drying can take up to 24 hours or longer. If it starts to bow as it dries, place a clean sheet of paper on top with something heavy over it.
Planning and Sketching
Even for an abstracted painting, spending time on sketches beforehand pays off. The goal isn't to produce a map to follow rigidly — it's to get familiar with the subject and have a clear intention before picking up a brush. Once the paper is wet, decisions need to happen quickly and intuitively.
Work in a rough sketchbook: zoom into the reference photos and find daisy shapes you like, then start placing them on the page. Place the centers of the flowers first to establish composition, then build the petal shapes around them. Vary the angles — some daisies facing directly forward (circle shapes), some turned to the side (narrower on one side, wider on the other), some tilting upward, some drooping. Avoid making them all perfectly symmetrical and front-on; gaps in petals, slightly irregular shapes, and flowers that are almost spent all add life.
Think about depth: the daisies in the focal area should be large and relatively detailed, scaling down and becoming less defined towards the edges. Note where the light is coming from and mark in shadow directions as a reminder.
Once you're happy with the sketch, transfer the composition lightly onto the painting paper — mark the centers first, then the basic shapes. Once the paper is wet, pencil lines become permanent and can't be erased, so step back and check the drawing before wetting.
The Painting: Wet-into-Wet Stage
The Background Glow
With the paper thoroughly wet on both sides and lying flat, begin with the background. The intention is a warm golden glow — this is quinacridone gold (or a warm yellow if you don't have it), dropped in loosely across the upper and mid areas of the painting. Work with a large brush and keep it fluid.
Vary the colour as you go — some areas more gold, some slightly more orange. Lift out colour in areas where the brightest light falls, and use a clean damp brush to soften any hard edges you don't want. Think in terms of where the light source is and let the warm colour radiate from there.
Greens and Stems
Once the golden tones are in place, mix a muted green from ultramarine and quinacridone gold — the combination gives a slightly dull, naturalistic green rather than something too bright. Use this mostly in the lower areas of the painting to suggest stems and leaves, weighting the painting towards the bottom. Go darker by adding more blue to the mix. Still working with the large brush, keep everything loose and gestural — stems and leaves are suggested rather than described.
Negative Painting Around the Flowers
Switch to a smaller brush. The aim now is to bring the flowers out from the background using negative painting — painting the space around them rather than the petals themselves.
Work from the out-of-focus flowers first (edges and background), then move towards the focal point as the paper begins to dry. Because the paper is still very wet in the early stages, marks will bleed softly — which is exactly right for the background flowers. As the paper slowly dries, edges become progressively sharper, allowing the focal daisies to come into clearer definition.
On the shadow side of each flower, use the green/blue mix. On the sunlit side, use the golden colours. This warm/cool contrast around the petals is what makes them feel lit.
Flower Centers
Mark the centers with Hansa yellow deep while the paper is still wet — this immediately anchors each flower's position and makes the composition readable. Drop a small touch of orange into each center while still damp.
For the out-of-focus background flowers, just the yellow center dot and the softest suggestion of negative painting around it is enough — they should barely emerge from the background, recognisable more as a lightening of tone and a yellow dot than as a clearly described flower.
Flicking in Water
Flicking clean water into wet areas of the background creates blooms and organic texture — a little sparkle that adds life without any effort. Do this while the paper is still very wet.
Staying Oriented
With so much happening wet-into-wet it's easy to lose track of the composition. Keep your pencil sketch nearby and refer to it when needed. If you want to add an extra daisy, do it now while everything is still soft — place the yellow center, then use the brush to either lift out the petal shapes or paint the negative space around them.
If the paper starts to dry too fast: pick it up and spritz the back again, then lay it back down. This resets your working time.
Once you're happy with the wet stage, tape all edges and leave the painting to dry completely — at least overnight, possibly longer — before moving on to the sharper detail work in the next session.
Resources...
* Drawing to trace
* Reference photo
Join me on Patreon
Join my Adventures in Colour Tier for $16 to access this post and my full library of over 200 others including deep-dive videos and step-by-steps.