 Video on Patreon
Climbers in the Alps (part 1)
5 June 2025
Video - Level ◆◆◆
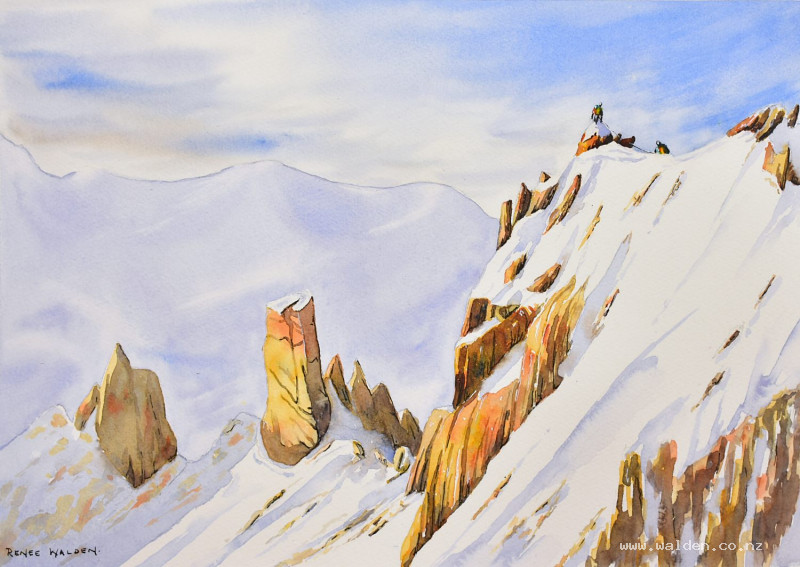
We've got a very grandiose scene for this lesson - a scene from the highest mountains in Europe, near Chamonix. We're up close in the snowy mountains, with beautiful light catching red granite cliffs and some tiny mountaineers to give everything some scale.
At first glance this scene may seem very complex, but actually, once we've made a plan and done the drawing, the painting process is quite simple. It's all in making a good plan!
So in part 1 of this lesson, I talk you through the plan, then we do the drawing together. We paint the sky and the background mountain, leaving all of the foreground for part 2.
Happy painting!
Video run-through...
About This Painting
A grand, high-alpine scene — orange granite towers rising from deep snow, a dark and moody background mountain range, and two tiny mountaineers at the summit giving scale and the focal point. The painting is built around three things identified before a mark is made: the dramatic light, the complementary colour scheme (orange rock against blue mountain), and the human element. This is Part 1, covering the planning, drawing, sky, and background mountain.
Work on a quarter-sheet of watercolour paper — this scene deserves the scale. Rough paper also works beautifully for this type of mountain landscape.
A traceable drawing is available in the lesson description.
Before You Start: Analyse the Reference Photo
Before drawing anything, take time to identify what drew you to the scene and what story you want to tell. For this painting, those three things are:
- The light — dark shadowy background against brilliant white snow and glowing orange rock
- The complementary colour scheme — warm orange granite against cool blue mountains
- The human element — two tiny mountaineers at the summit, the immediate focal point
Write these down on a sticky note and keep them visible. As the drawing and painting progress, they act as a filter: if a detail doesn't serve one of these three things, it doesn't need to be included.
Blur the background. In this scene, a highly detailed background mountain competes with the foreground rather than supporting it. Deliberately treat the background mountain as a soft, blurry wash — plenty of colour interest, but no hard edges or specific detail. This tells the viewer clearly where to look.
Check the tonal values in greyscale. The whitest areas and the darkest areas should be in the focal point — around the two climbers. The background mountain should be a lighter tone than the foreground rocks, even though it's a strong blue.
The Pencil Drawing
Start with the two mountaineers — they're the focal point and the most important element to get right. Everything else builds outward from them. Draw the climbers with some character: heavy packs, leaning postures, ice axes, a rope connecting them at the waist. Make them look like they're working, not posing. Keep the heads small and the bodies chunky. Practice on a scrap piece of paper several times before committing to the painting — they're tiny on the page but everything the viewer will look at.
From the climbers, work outward to the main cliff and the two distinctive rock towers. These three elements — people, cliff, towers — are the essential structural elements. Everything else (minor rock spires, cracks, background ridges) can be simplified or left out entirely.
Use overlapping shapes throughout the drawing to create a sense of depth — one cliff face in front of another, one rock spire overlapping the next.
Keep marks light and clean in the snow areas, where the paper will remain unpainted. A kneadable eraser is useful for lifting graphite from those areas before painting.
Step back from the drawing (or photograph it) and look at it fresh before picking up a brush — the drawing needs to make sense on its own, independent of the reference photo.
Colour Palette
Sky: Cobalt blue — clean and direct.
Sky shadow/clouds: Cobalt blue with a touch of quinacridone sienna for a warm grey.
Background mountain: Cobalt blue, permanent violet, and a small amount of lavender. Three colours used together will separate on the wet surface and create visual interest rather than a flat wash. The lavender is important — it allows you to get a lower tonal value (lighter) without losing saturation, which is essential since the background must sit behind the foreground tonally.
Rocks: Natural sienna, quinacridone gold, quinacridone sienna — rich, warm, golden.
Snow shadows: One of the golden rock colours mixed with the background mountain colour — this reflects the rocks into the snow and ties the foreground together.
Darker accents if needed: A small amount of Payne's grey.
Painting Order (Part 1)
- Sky — wet-into-wet with cobalt blue and cloud shadows
- Background mountain — wet-into-wet, soft and blurry
- Lift out highlights on background mountain peaks
Step 1: The Sky
Wet the entire sky with clean water using a flat brush, cutting carefully around the rock and figure silhouettes at the top edge. Have a paper towel ready for any water that goes onto the rocks. Check for dry patches and avoid a dry halo around the mountain edge.
Apply a strong streak of cobalt blue across the upper sky — this is a fine-weather mountain day and the blue should be intense at the top. Grey it down slightly with a touch of quinacridone sienna for any cloud shadowing. Use a smaller almost-dry brush to tease colour up around the rock silhouettes so there's no white halo.
Pull cirrus cloud streaks out with a clean, almost-dry brush — one direction, then crossing — while the sky is still wet. Add a little lavender into the cloud areas to foreshadow the purple-blue tones of the background mountain.
Let dry naturally — no hairdryer until the streaks have softened and the paint has stopped moving completely. The cirrus needs time to settle gently.
Lift out any snow patches that should remain white while the sky is still barely damp, using a clean damp brush. If the sky is already dry, this can also be done afterwards.
Step 2: The Background Mountain
Wet the entire background mountain area generously. Check from the side for dry patches; the paper should have a good even sheen. If you've used a hairdryer on the sky, the paper may be warm — apply extra water to compensate.
Mix a generous amount of the three-colour mountain mix (cobalt blue, permanent violet, lavender). Go lighter than you think — if the background is too dark, there won't be enough tonal range left for the foreground to be darker still.
Drop the colour into the wet layer gently, letting the water carry it rather than scrubbing it in. Use the big brush for open areas; switch to a smaller brush for cutting around mountain edges. The three colours will separate on the wet paper and create the soft, blurry variation of a mountain in the middle distance.
Once the base wash is in and still very wet, drop in slightly more concentrated passages of cobalt blue, permanent violet, and lavender separately to suggest ridges and form — just enough to avoid a completely flat wash. If any area has created accidental cauliflowers or streaks, embrace them or reinforce them with a similar mark so they read as intentional.
Pick up any water beads at the lower edge with a thirsty brush. Let dry naturally, then finish with a hairdryer.
Step 3: Lift Out Highlights on the Background Mountain
With a clean, slightly damp brush, gently lift out a few areas of light along glacier edges and mountain peaks. Start lightly and build — follow the direction of the slopes rather than working randomly. Be gentle with the paper at this stage.
The lifted highlights should be subtle: the whitest white and the sharpest contrasts will be in the foreground around the climbers, not here in the background.
Part 2 covers the foreground rocks, snow, the two mountaineers, and the final shadows.
Resources...
* Reference photo
* Drawing to trace
Join me on Patreon
Join my Adventures in Colour Tier for $16 to access this post and my full library of over 200 others including deep-dive videos and step-by-steps.