 Video on Patreon
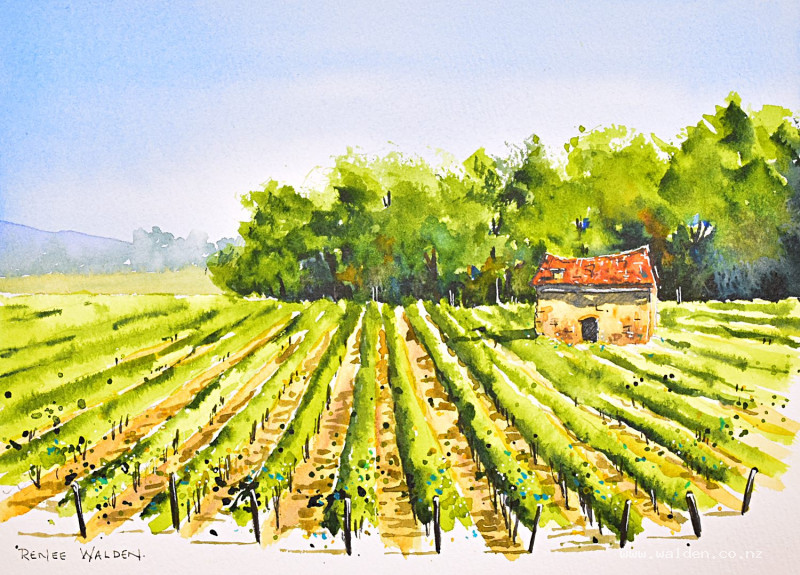
Vineyard
10 July 2025
Video - Level ◆◆◆
In June I was in France, guiding 10 day painting holiday. In this lesson we're going to paint a scene from the trip - a vineyard :-)
This scene has perfect one point perspective, so I'll explain a little about how to draw the vines correctly. And there's a wonderful old stone barn as the focal point.
Thanks to Elysia Haight, one the lovely women on my retreat, for the reference photo.
Happy painting!
Video run-through...
About This Painting
A sun-drenched French vineyard — rows of vines fanning out in perfect one-point perspective towards a characterful little barn, with lush green trees behind and a warm complementary colour scheme of red and green at the focal point. This lesson covers one-point linear perspective in a natural setting, as well as how to handle a complex foreground with multiple layers of detail.
A traceable drawing is available in the lesson description.
One-Point Perspective: The Key Concept
Before drawing anything, study the reference photo carefully. There is a strong tendency — especially for beginners — to draw vineyard rows as parallel vertical lines running straight down the page. This is wrong, and it's worth understanding why.
Lay a ruler along the vine rows in the reference photo and you'll immediately see they all fan outward from a single vanishing point somewhere up in the sky. The gaps between the rows also narrow as they recede. This fan shape is what creates the illusion of depth. Make sure every vine row follows this fan — rows that accidentally go parallel or vertical will immediately flatten the painting.
A ruler is useful for establishing the construction lines. Draw them lightly so they can be erased or painted over, then use them as guides for the vine positions.
The Pencil Drawing
Start with the barn — the main subject — placed at the focal point. Exaggerate any charm or imperfection in the reference: a slightly wonky roofline, a loose gutter casting an interesting shadow. These details give the building character.
Once the barn is in, mark the top line of the vines and establish the vanishing point. Draw the vine rows fanning out from there, getting progressively closer together as they recede. The foreground rows are further apart with clearly visible trunks; the background rows compress until individual vines are barely distinguishable. Add the background trees and hill last.
Painting Order
- Sky — flat wash
- Background hill
- Background trees
- Barn
- Foreground ground and pathways
- Vines — light to dark
- Trees (final pass with negative painting)
- Vine trunk and pole details, splatter
- Shadows
- Pen work
Step 1: The Sky
Wet the entire sky area — including over the background trees — with a large flat brush, shaping carefully around the barn roofline to avoid a blue undertone on the red roof. Let the water settle into the paper fibres.
Load the brush thoroughly with cobalt blue — colour should reach all the way down to the ferrule. Work in single strokes across the full width of the paper, letting the brush gradually run out of pigment as you move downward. The sky should be deeper at the top and fade naturally towards the horizon. Let it dry at an angle so the paint flows slowly and evenly.
Step 2: Background Hill
Mix a very pale purple (cobalt blue with a touch of permanent violet) and apply a light wash over the background hill. Keep it very pale — there is already a layer of sky wash underneath, and if this hill goes too dark it will jump forward rather than recede. No detail at all — its only purpose is to suggest depth through overlapping shapes.
Step 3: Background Trees
While the hill wash is still slightly damp, drop in the background tree line so it blurs softly at the edges. Mix a muted blue-green (sap green with cobalt blue and a touch of purple to grey it down). Keep these trees distinctly cooler and less saturated than the foreground trees — this is what makes them feel distant.
Step 4: The Barn
The barn is the focal point and carries the painting's complementary colour scheme — red-orange against the surrounding greens. Paint the warm stone and terracotta walls first, then the roof. The contrast between darkest dark and lightest light should be concentrated here. A shadow inside the doorway and under the eaves helps establish form. Any rock detail in the walls can be picked out with varied earthy colours while the wash is still damp.
Step 5: Foreground Ground and Pathways
Mix a warm sandy earth colour for the paths and bare ground between the vine rows. Keep it varied — some areas warmer, some cooler — and lay it in loosely so the vine shadows painted later will read clearly on top of it.
Step 6: The Vines
Work through the vines in three tones — light, mid, and dark — building up from pale to saturated. Keep the fan shape consistent throughout: vine shadows, vine rows, and any structural marks must all follow the same vanishing point. Shadows that accidentally go straight or vertical will immediately read as wrong.
The vines in the foreground are larger and more distinct; they compress and simplify as they recede. Suggest leaves with loose marks rather than painting each one — a flat brush works well here for textured, broken strokes.
Step 7: The Trees (Final Pass)
Now that the vines and barn are established, paint the main foreground trees using negative painting to shape cleanly around the tops of the vines and the barn roofline. Build from a light tone to a mid tone to dark, leaving intentional gaps for "birds to fly through" — these small light holes in the foliage stop the tree mass from looking flat and solid.
Use a varied palette for the trees — sap green, permanent violet, and darker mixes with Payne's grey for depth. Drop in clean water with a flat brush while still wet to create organic blooms and texture. Add the darkest trunks and branches into the lightest gaps using a dark mix of sepia and Payne's grey; find the natural gaps already created and use them rather than forcing new ones.
Step 8: Vine Trunks, Poles, and Splatter
Mix a dark neutral (sepia and Payne's grey) for the vine trunks and support poles. The trunks visible on the left-hand side of the rows are seen differently from those on the right — be aware of the angle you're painting from. Keep the foreground trunks larger and further apart, the background ones smaller and closer together.
Resist the urge to overdo the detail. The beautiful soft washes are the strength of the painting — adding too many precise marks at this stage will flatten and dull everything. Work across the whole painting simultaneously rather than finishing one area completely, and keep stepping back to assess.
Splatter light green, mid green, and a little dark yellow across the vine foreground to create the impression of leaves. Pick out any splashes that have landed well into more convincing leaf shapes, but don't be too controlled — the randomness is the point.
Step 9: Shadows
Make sure the painting is completely dry. Mix a dull earthy shadow colour (the ground colour with a little sepia or brown and Payne's grey).
The vine shadows are the most important — and they must follow the fan shape, just like the vine rows themselves. Shadows that go straight or vertical here will be immediately jarring. Keep them loose and broken, with gaps suggesting light filtering through the leaves. The shadow cast by the barn across the vines should have a slightly greenish tone. Shadow under the roof eaves and inside the doorway in a cooler, darker mix.
Step 10: Pen Work
Dark brown ink (or black): Shadow sides only — the left-hand sides of the barn, under eaves, along the shadowed edge of poles and trunks. Work quickly to avoid fussing. The goal is to tighten, not to outline. Don't draw over the beautiful washes.
White gel pen or white Posca marker: Right-hand sides of anything catching the light — barn edges, vine poles, a few shiny leaf dots in the foreground. A few small light dots suggest sunlight catching the leaves.
Once the tape is removed and the edges are clean, step back and assess whether any final splatter is needed — a little more bright yellow or a touch of opaque turquoise can add a last spark of colour if the foreground needs it.
Resources...
* Reference photo
* Drawing to trace
Join me on Patreon
Join my Adventures in Colour Tier for $16 to access this post and my full library of over 200 others including deep-dive videos and step-by-steps.