 Video on Patreon
Small town in the Pyrenees
7 August 2025
Video - Level ◆◆◆
Join me in my little home town in the Pyrenees for this lesson. We're going to paint a vibrant foreground of pretty spring cow parsley and some old buildings in the background that have beautiful light and shadow. In fact, one of the buildings is my house :-)
I'm really happy to share a small part of my world with you! And I am really looking forward to seeing your versions.
Happy painting!
Video run-through...
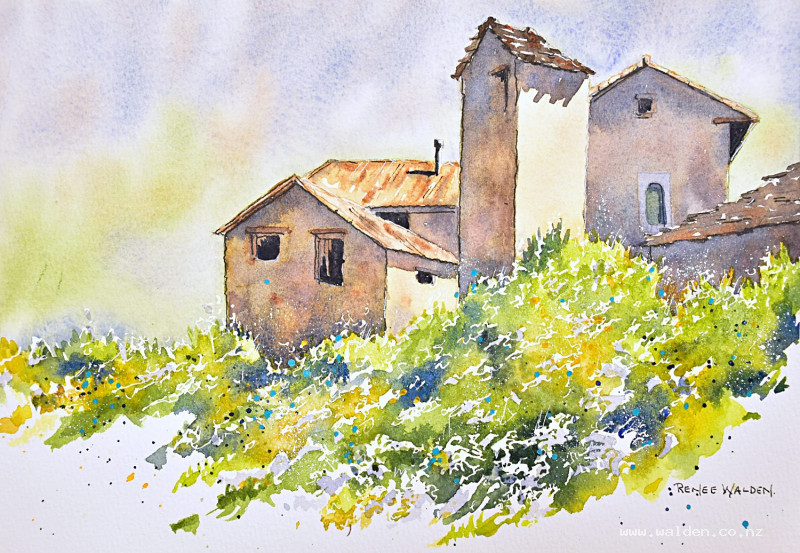
About This Painting
A sunlit village scene glimpsed through a foreground full of cow parsley — white flower heads catching the light against deep, intensely coloured greens, with buildings and a distant mountain softly out of focus in the background. The foreground is the real subject here, not the buildings, and the painting is built around that contrast between soft neutral background and vivid, textured foreground. Masking fluid preserves the white flower heads through the painting process.
Note: the tape is applied only to the top and sides, leaving the bottom edge free so the cow parsley and grasses can break out beyond the border for a looser, more naturalistic feel. If you prefer a tidy edge all the way around, tape the bottom as well.
A traceable drawing is available in the lesson description.
Masking Fluid
Apply masking fluid to the white flower heads before any painting begins. The foreground flowers are larger and more rounded in the immediate foreground, getting smaller and flatter as they recede — reflect this in the masking too. Concentrate the bigger, more detailed shapes close to the viewer and simplify as you go back. Let the masking dry completely before painting.
Painting Order
- Background — wet-into-wet, soft and neutral
- Foreground — wet-on-dry, intense colour
- Remove masking fluid, soften edges and add flower shadows
- Splatter — greens, whites, and a final opaque colour
- Dark windows and shadow details on buildings
- Pen work
Step 1: The Background
Wet the entire background area with a flat brush, using the edge to carve carefully around the building shapes. Have a paper towel in hand to immediately dab up any water that lands on the buildings. Once the paper has a good even sheen, drop in a range of soft, mostly neutral colours — the background suggests a cliff and forest without describing them in any detail.
The key mix is ultramarine and quinacridone sienna in roughly equal parts, which granulates beautifully and reads as a warm grey. Introduce a little sap green towards the lower background for the forest suggestion, and keep the upper section cooler and greyer for the cliff. Don't let the greens get too bright or saturated — an over-vivid background will jump forward and undermine the contrast with the foreground.
Use the tip of the brush to tease in a few negative shapes along the background edge where the cow parsley breaks out, suggesting the top of the flower mass. Once most of the colour is in, go around the building edges with an almost-dry brush to make sure there's no unpainted halo of dry paper — this is much easier to prevent now than to fix later.
Let dry naturally so the colours can blend and separate, then finish with a hairdryer.
Step 2: The Foreground
The foreground is painted wet-on-dry so the colours stay intense. (Painting wet-into-wet here would dilute the pigment and reduce the saturation — the opposite of what's needed.) Cover the dry background with a clean sheet of paper to protect it from splatter.
Mix up a generous range of colours: sap green as the backbone, alongside indigo for the darkest darks, ultramarine, Hansa yellow deep, green gold, and natural sienna. Have more colour mixed than you think you need.
Concentrate the most intense colour and the most contrast in the immediate foreground — this is where the viewer is standing, and the closer to us, the richer and more varied everything should be. Load the brush generously and drop the paint in without scrubbing it into the paper, so it can move and merge. Work quickly and loosely across the whole foreground, varying constantly between the greens, yellows, and blues.
As you move back from the foreground, let the colour become subtly less intense — don't make this a sharp transition, just gently dial back the saturation.
Scratch in grass and stem marks with a sharp tool (the handle end of a brush or a credit card edge) while the paint is still wet.
Step 3: Remove Masking Fluid, Soften and Shadow
Once the foreground is completely dry, remove the masking fluid by rubbing gently with a clean finger or soft eraser. Run a clean hand across the whole foreground to check nothing has been missed. Any remaining sticky residue means the paint isn't fully dry — wait longer.
Two things to address immediately:
First, any flower shapes that look awkward — too large, in the wrong position, or with an odd shape — can simply be covered with more foreground colour, blending them back into the greenery.
Second, and more importantly: the unmasked white areas will look flat and cut-out without shadows. Mix a very pale shadow wash — ultramarine, a touch of permanent violet, and a tiny amount of brown to keep it from going too blue — and apply it to the left-hand side of each flower head. The shadow side is consistent throughout. After laying each shadow mark, soften it immediately with a clean damp brush. This step transforms the flowers from flat holes in the paint into rounded, three-dimensional forms that feel part of the scene.
Increase the contrast in the immediate foreground — darker surroundings behind the closest flowers — and let it ease off as you move back.
Step 4: Splatter
Build up the splatter in layers, drying between each pass so the marks don't all merge together.
Start with the colours already used in the foreground — greens, blues, yellows — flicked across the foreground with a loaded brush. Follow with white gouache on a toothbrush (kept on a completely separate palette to avoid contaminating the watercolours). Finally, add a pass of an opaque accent colour — cobalt turquoise or lavender work well, or mix any colour with a little white gouache to make it opaque. Keep this final layer mostly concentrated in the near foreground with just a little drifting over the lower buildings.
Step 5: Windows and Building Shadows
Mix a very dark grey (ultramarine and quinacridone sienna, well loaded) for the dark windows and doorways. Tease in interesting shapes inside each opening — a suggestion of old shutters or doors. The shadow of the chimney on the wall is much lighter — just a pale grey wash.
Step 6: Pen Work
Keep pen work minimal — the loose, soft washes are the strength of this painting and should not be tightened up too much.
Dark brown ink: Shadow sides only — the left-hand sides of the buildings, underneath eaves and overhangs. Work lightly and loosely. Start tentatively; you can always add more but can't remove what's already down.
White gel pen: Highlights on the right-hand (sunlit) sides. A few extra dots and dashes in the foreground if the area needs more texture and sparkle.
Remove the tape to reveal the edges — and along the bottom, the rough, painterly edge where the cow parsley breaks free.
Resources...
* Reference photo
* Drawing to trace
Join me on Patreon
Join my Adventures in Colour Tier for $16 to access this post and my full library of over 200 others including deep-dive videos and step-by-steps.