 Video on Patreon
Little dinghy
14 August 2025
Video - Level ◆◆◆
Boats painted in watercolours - there's such a lovely, romantic history in that. If you enjoy painting details, then boats are just perfect for that. And if you enjoy giving things grunge and character, then old boats are so much fun.
Happy painting!
Video run-through...
About This Painting
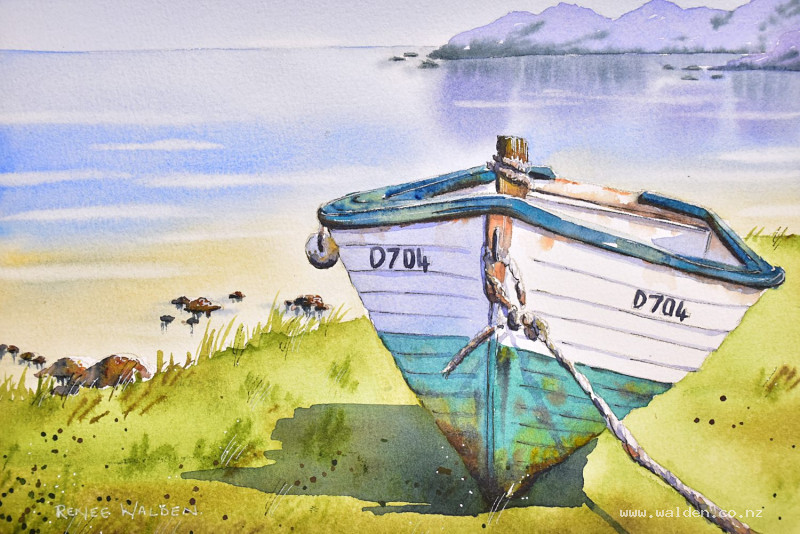
A small weathered boat sitting on a rocky shoreline by the sea — grungy, detailed, and full of character. The scene has been deliberately reimagined from the reference photo: the same boat but placed in a coastal setting with hazy islands in the background, shallow sandy water in the foreground, and a strong sunny light casting a cast shadow that anchors the whole composition. For those who love painting detail, boats are ideal subjects — and this one rewards careful observation.
A traceable drawing is available in the lesson description.
The Pencil Drawing
Spend a good amount of time on the drawing and get the boat accurate — it's the entire focus of the painting and any structural errors will be visible throughout. The background is kept intentionally simple, leaving all the interest and detail for the boat itself.
Painting Order
- Sky — simple flat wash
- Background islands and hills
- Sea — wet-into-wet with reflections
- Foreground rocks and ground
- The boat — colour by colour, section by section
- Rocks
- Shadows — cast shadow on ground and boat side
- Darker detail shadows
- Numbers, splatter, and pen work
Step 1: The Sky
Wet the sky area and drop in a simple pale wash of cobalt blue — just a single clean stroke across. The sky is small and should be kept completely uncluttered; all the interest is in the boat below. The colour should run down over the background hills to give them a sky undertone and help set them back. Dry with a hairdryer.
Step 2: Background Islands and Hills
Keep these hazy and simple — their only purpose is to give a sense of depth and coastal atmosphere. Use cobalt blue with a touch of permanent violet for the hills, and add a little indigo for the tide line along their base. Vary the silhouette so not every ridge is the same shape. Overlap two or more hills so the further one bleeds softly behind the closer one — this layering creates depth. A few tiny gaps along the ridge line can suggest distant houses or highlights. Let the hills bleed together slightly for a soft, atmospheric feel.
Step 3: The Sea
Wet the entire sea area and work wet-into-wet with horizontal strokes throughout — the sea is flat, so all marks should be horizontal. The only exception is for the reflections of the hills, which are painted as soft vertical streaks.
Keep the horizon line very pale and increase the colour intensity as you come forward. In the far distance, use the cobalt blue (matching the sky). Where the water becomes shallow close to the rocks, shift to a warm sandy colour — natural sienna or yellow ochre — to suggest the sea floor showing through. Vertical strokes of the hill colour (cobalt blue and permanent violet) under the islands suggest their reflection.
While still wet, lift out horizontal highlight streaks with a clean flat brush. White gaps left unpainted also read as movement on the surface.
Step 4: The Boat
The boat is painted section by section, working from large areas to smaller details, and broadly from light to dark.
Work colour by colour across the whole boat rather than finishing one section completely before moving to the next. This keeps the colours consistent and allows you to see the relationships between areas as you go.
Establish the basic local colours first — the hull, the interior, any coloured trim — then come back with darker tones for shadowed areas. Don't overwork any area at this stage; the shadows and details come in a later pass. Keep the sunlit side noticeably lighter and warmer than the shadow side throughout.
Pay particular attention to any ropes, fittings, and hardware — these are what make a boat feel believable and well-observed.
Step 5: The Rocks
Paint the rocks in sepia (CP), trying to leave small gaps of dry paper to suggest wet, shiny surfaces catching the light. A dark indigo tideline along the base of each rock anchors them to the ground. With an almost-dry brush, drag a few indigo strokes downward from the rocks as reflections in the shallow water. Highlights can be reclaimed later with white gouache or a white gel pen if needed.
Step 6: Shadows
This is the step that transforms the boat from a flat shape into something three-dimensional and grounded. Make sure everything is completely dry first.
The main side shadow uses the same colour as the background hills (cobalt blue and permanent violet, well diluted) applied as a clean, gentle wash over the entire shadow side of the boat and any interior areas in shadow. Don't disturb the colour underneath — load the brush to the ferrule and use a light touch.
While this is still wet, immediately work in the cast shadow on the ground using indigo, bleeding it directly from the boat's shadow wash. The cast shadow goes further than you might expect, and a shadow from any rope or hardware adds convincing detail. Charge in a slightly darker concentration of indigo directly under the boat where the shadow is deepest.
Drop in a little reflected green colour into the white areas of the shadow while still wet — this softens the shadow and makes it feel like it belongs to the environment.
Once dry, add the darker detail shadows — the small shadows under wooden slats, ropes, and fittings — with a smaller brush and a slightly darker mix. A paper towel in the other hand to remove excess water gives better control at this stage.
Step 7: Numbers, Splatter, and Final Details
Paint the boat's registration numbers or name in a dark mix (cobalt blue and sepia for a near-black). If you're not confident doing this with a brush, a pen works just as well. While this dark mix is loaded, add any remaining very dark accents elsewhere.
Cover the background and splatter a little sap green and sepia across the foreground to add texture and movement. Keep it mostly in the immediate foreground.
Step 8: Pen Work
Keep this minimal — the painting already has rich washes and detail, and outlining everything will flatten it and make the boat look cut out from the background.
Dark brown ink: Shadow sides only — the left-hand sides of the boat and anything underneath. Keep the marks slightly broken rather than fully solid. Start gently; you can always add more.
White gel pen: Highlights along the top edge and right-hand (sunlit) sides of the boat. A few grasses or texture marks in the foreground rocks. Any grungy highlights along the hull that add to the sense of wear and age.
Nothing in the background — leave it soft.
Remove the tape.
Resources...
* Reference photo
* Drawing to trace
Join me on Patreon
Join my Adventures in Colour Tier for $16 to access this post and my full library of over 200 others including deep-dive videos and step-by-steps.