 Video on Patreon
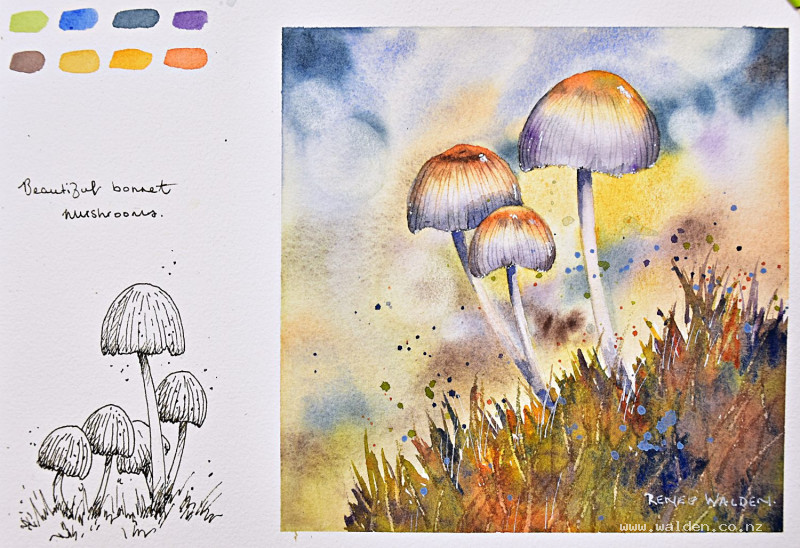
Beautiful bonnet mushrooms
11 September 2025
Video - Level ◆◆◆
It's mushroom season! Who else is happy about this? These pretty ones are actually called 'beautiful bonnet mushrooms' - I didn't need to add in the beautiful ;-)
Painting themes from nature is really absorbing. To get the mushrooms to look natural we look really closely at all the details and subtle colour changes. Then we have fun matching those colours using what we have on our palette.
It's time to make use of all the lovely golden and brown earth tones on your palette. And I'll show you trick for getting those super fine lines on the mushroom caps.
Happy painting!
Video run-through...
About This Painting
An autumn forest scene built around a cluster of mushrooms — soft, out-of-focus background light with bokeh effects, rich earth tones throughout, and a mossy, leafy foreground full of texture. The mushrooms themselves are painted with careful attention to their subtle colours and scored gill marks, sitting in amongst scratched-out grasses and a final splatter of opaque purple to carry the colour through the whole composition.
This is painted as a sketchbook spread: the painting on one side, and a pen drawing (no colour) on the other alongside colour swatches.
Extra Tools Needed
Beyond the usual brushes and palette, you'll need a few additional items:
- A circular stencil (plastic or cardboard, cut out yourself or bought) for lifting out the bokeh/lens flare circles in the background
- A pointed tool (back of a pin or similar) for scoring the gill lines into the mushroom caps
- An old credit card for scratching out grass and moss marks in the foreground
- White gouache on a completely separate palette for splattering and highlights
- Opaque lavender paint (or permanent violet mixed with white gouache) for the final foreground splatter
Colour Palette
The whole painting leans on earth tones — this is autumn, and even the greens are deliberately muted. The key mixes are:
Background grey: Ultramarine and quinacridone sienna — these two granulate together and create beautiful texture. Muted green: Sap green dulled down with sepia (or burnt umber/raw umber). Golden warmth: Natural sienna, quinacridone gold, and quinacridone sienna. Mushroom shadow: Ultramarine, quinacridone sienna, and a touch of permanent violet. Mushroom purple haze: A small amount of permanent violet — older mushrooms develop a subtle purple tint along their lower edges.
Where possible, avoid over-reliance on staining colours in the background areas where you'll later want to lift out the bokeh circles.
Painting Order
- Background — wet-into-wet
- Mushrooms — wet-into-wet, then scored gill details
- Bokeh circles — lifted out with stencil
- Foreground — wet-on-dry with credit card scratching and splatter
- Shadows on mushrooms and stems
- Final splatter and pen details
Step 1: The Background
Wet the entire background generously with clean water, using a large brush for the open areas and a smaller brush to cut carefully around the mushroom shapes. Check from the side that there are no dry patches. Have a paper towel ready to dab up any water that lands on the mushrooms — though since the mushrooms will be darker than the background, a little is not a disaster.
Drop the background colours in wet-into-wet, starting at the top with the cool blue-grey (ultramarine and quinacridone sienna) and working down into the greens and warmer tones in the middle area. Leave small gaps unpainted to suggest light filtering through — these will also be reinforced later as bokeh circles. Vary the colour as you move around: sometimes more blue, sometimes more golden, sometimes greener. The background should feel like a soft, hazy autumn forest without describing anything specific.
Let dry naturally so the colours can blend, then finish with a hairdryer.
Step 2: The Mushrooms
Work the mushrooms wet-into-wet. Wet each mushroom cap and drop in the main earthy browns and ochres, keeping the lightest areas as pale as possible. Introduce the subtle purple tint along the lower edges of the caps. The undersides and stems are generally lighter, with the shadow colour (blue-grey with a touch of violet) concentrated where they meet the ground and where one mushroom overlaps another.
While the paint is still damp, use a pointed tool (pin handle or similar) to score in the gill lines radiating from the centre of each cap underside. These scored lines will fill with pigment and create a beautiful, organic texture that's much more convincing than painted lines. The exact timing matters — too wet and the lines will close up; too dry and they won't fill with colour. Test on a small area first.
Step 3: Bokeh Circles
Once the background is dry, use the circular stencil to lift out soft bokeh circles suggesting lens flare and dappled background light. Wet the stencil opening with clean water, press it to the paper, then dab firmly with a clean flat brush or filbert. Lift the stencil to reveal a softly lightened circle. Work with overlapping circles of different sizes, keeping them subtle — this effect should read as atmosphere, not as an obvious technique. The effect will be more or less pronounced depending on the paper; cotton paper generally lifts more cleanly.
Step 4: The Foreground
The foreground is painted wet-on-dry so the colours stay intense — this is the most colourful, most textured area of the painting.
Mix up the same palette of greens, browns, blues, and earth tones used in the background but with more paint and less water. Work loosely and loosely with a mid-sized brush, holding it right at the back of the handle for the most natural, random marks. Let the colours merge and vary as you go. Keep the greens muted and earthy — a too-vivid green will look wrong against all the autumn warmth.
While the paint is still wet, use the corner of a credit card to scratch out grass and moss marks. Press in with the edge and drag upward — at the right level of dampness you'll get both a pressed-in dark mark and a lifted highlight. Work quickly and keep testing — once the paper is too dry, the effect stops working. Some splattering of the existing colours adds further texture.
Dry with the hairdryer once no more scratching effects are occurring.
Step 5: Mushroom Shadows
Add shadows in a few key places to settle the mushrooms into the ground and establish depth between overlapping caps. Use the ultramarine/quinacridone sienna/violet mix, very dilute, and concentrate it: underneath each cap where it meets the stem, where stems disappear into the grasses and moss, and where one cap casts a shadow onto the one behind. Lay the shadow colour and immediately soften the edges with a clean damp brush — everything should stay soft and integrated.
If any mushroom still looks flat, a very light shadow wash along one side, well softened, adds roundness without looking heavy.
Step 6: Final Splatter and Pen Work
Opaque lavender splatter: The mushrooms have a beautiful purple haze, and carrying that colour into the foreground through splatter ties the whole composition together. Use opaque lavender paint (or permanent violet mixed with white gouache) — transparent purples won't show up over the dark foreground. Keep it restrained; just enough to carry the colour through.
White gel pen: Very subtle highlights on the mushroom caps — particularly along the lower edges where light catches the surface. Hold the pen upside down for the finest possible line. Less is more here; the softness of the whole painting is its strength.
Dark brown ink: Only if anything genuinely needs tightening — this painting is intentionally soft, and pen work should be almost invisible. If used, keep it to shadow sides only.
Resources...
* Reference photo
* Drawing to trace
Join me on Patreon
Join my Adventures in Colour Tier for $16 to access this post and my full library of over 200 others including deep-dive videos and step-by-steps.