 Video on Patreon
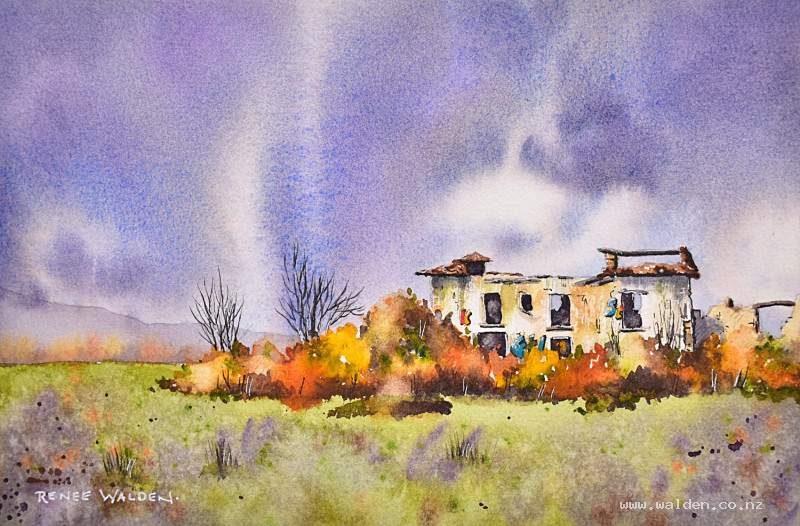
Autumn storm
25 September 2025
Video - Level ◆◆◆
I don't know what it's like where you live, but in autumn we get big thunderstorms. The other night we had a crazy one with so much lightning - several flashes per second for over an hour. Then the rain came and it was super intense. I love a good storm, especially when you're all cuddled up and cozy inside.
I can't think of another medium that lends itself to painting stormy skies as beautifully as watercolour. Each time I paint one I feel even more in love with this medium than ever before. Here's where we see watercolour at it's best - flowing across the page, intense colours separating out, the balance between control and letting go. Magic!
We go back to Tiermas for this lesson, the abandoned Roman town in Aragon in Spain for this scene, to paint a sunlit ruin against a stormy sky. This time with lots of autumn colours.
I hope you enjoy painting along. It's a super fun painting!
As always, questions and comments welcome below the post or on our
Video run-through...
About This Painting
A sunlit ruin on a stormy autumn day — the drama comes from the contrast between the dark, turbulent sky and the warm light catching the crumbling building below. Autumn colours fill the overgrown foreground, dead branches tangle across the sky, and a few touches of graffiti in the focal point add a pop of unexpected colour and tell the story of abandonment. The sky is the star of this painting and is painted in an extended, very wet session that rewards patience and a light touch.
A traceable drawing is available in the lesson description.
The Pencil Drawing
The building is placed low and to one side, giving a large sky area to work with. A soft hill sits in the background to provide context and depth. The foreground is loosely sketched with rambling bushes and brambles suggesting an overgrown, abandoned place.
Colour Palette
Mix everything before wetting the paper — once the sky is wet you need to move quickly.
Sky greys: Mix a main pool of grey from cobalt blue, quinacridone sienna, and a touch of permanent violet — this three-colour mix will separate on the wet page and create far more life than a flat Payne's grey. Also have the individual colours — cobalt blue, permanent violet, and quinacridone sienna — ready in separate pools so you can drop them in independently for variation.
Autumn colours: Natural sienna (or raw sienna/yellow ochre), quinacridone sienna or burnt sienna. Save brighter yellows for the foreground only — the background uses the duller, more muted autumn tones.
Foreground greens: Sap green dulled with sepia. Keep the greens muted throughout — this is late autumn.
Keep all the sky colours on the palette after the sky is done — they'll be used in the building, greens, and shadows to create colour harmony across the whole painting.
Painting Order
- Sky — very wet-into-wet
- Background hill and distant trees
- Building
- Foreground bushes and brambles
- Dead trees
- Shadows
- Pen work, graffiti detail, and final splatter
Step 1: The Sky
This is the most important and most technical step. Mix all your colours before touching the paper.
Wet the entire sky area generously — including over the background hill and distant bushes. Let the water sink into the paper fibres, then add a second layer of water on top. The paper will buckle slightly; let it. You want it extremely wet so the colours can move freely.
With the board tilted at an angle, drop the colours in gently — don't scrub them into the paper or they won't move. Start with the three-colour grey mix along the top, then drop in the individual colours (blue, purple, brown) in different areas. Leave plenty of white — large areas of unpainted paper are what create the sense of dramatic light breaking through storm clouds.
Tilt the board to encourage the colour to flow downward, suggesting the direction of rain. Use a spritz bottle sparingly at the top edge to encourage further movement, but keep it away from the lighter mid areas.
Immediately use a small almost-dry brush to tease the colour carefully around the building edges so there's no white halo, and into the window openings.
Let dry naturally — do not use a hairdryer until the paint has almost stopped moving. Lay the board flat to prevent the colours running in an unintended direction. Once nearly dry, finish with the hairdryer.
Once dry, use a stiff brush to gently lift out and soften any hard edges where sky colour has gone over the bushes or building — a hard boundary there will look wrong.
Step 2: Background Hill and Trees
Apply a very light wash over the hill — there is already sky colour underneath, so keep this pale or the hill will jump forward. Use the duller autumn tones (natural sienna, a little quinacridone sienna) for the hillside, and drop in muted greens and autumn colours for the background trees while the hill wash is still wet so they blur softly together. No yellows here — save those for the foreground.
Step 3: The Building
The building is sunlit — warm and light against the dark sky. Keep this contrast clear. Use the autumn earth tones for the stonework, leaving the lightest faces as pale as possible. While still damp, drop in darker tones for any shadowed areas within the ruins to start establishing form. Windows are dark — almost black inside.
Step 4: Foreground Bushes and Brambles
Build up the foreground in rich autumn colours — oranges, deep yellows, warm browns, and muted greens (sap green dulled with sepia). Work wet-on-dry so the colours stay saturated. Create a variety of shapes and sizes; avoid making everything the same height and shape.
Add shadow (cobalt blue and sepia, diluted) along the bases of the bushes and on the right-hand sides. While still wet, lift out some lighter shapes in the upper parts of the foliage to suggest some clumps receding behind others. Splatter a little clean water into the wet paint to create organic texture and blooms.
Step 5: Dead Trees
Mix a near-black from cobalt blue and sepia (leaning more blue than brown) and use a dagger brush, rigger, or small pointed brush to paint the dead branches. Test the paint consistency on a scrap first — it should be dry enough to give a controlled, crisp mark. Work from the base upward, making the marks thicker at the bottom and tapering to fine tips. Have branches cross over each other so the tangle looks convincing. The painted branches will sit slightly behind the pen work added later, giving a sense of depth in the tree itself. Use the same brush to pull a few dull green grass marks in the foreground.
Step 6: Shadows
Use the reserved sky colour (adjusted if it has become too purple — add a little more blue and brown to correct) for the building shadows. It's a stormy day, so shadows shouldn't be very dark, but the sunlit ruin needs enough contrast to read clearly.
Key shadows to address: the cast shadow of one part of the building onto another (this is the most important one for establishing depth), under the eaves, on the right-hand sides of walls and balcony edges, and deep inside the window openings.
Assess the foreground and add soft shadow washes where the bushes and brambles need more depth. Soften most edges — keep a combination of hard and soft throughout, but err on the side of soft for an overcast, stormy feel.
Step 7: Graffiti Detail
A few small patches of graffiti in the focal area add a pop of unexpected colour and reinforce the abandoned feel. Use an opaque colour that will sit on top of everything else — cobalt turquoise works well, or mix any colour with white gouache to make it opaque. A fine brush for the marks, then tidy up the edges with dark pen and white pen once dry, leaving it looking worn and faded rather than fresh.
Step 8: Pen Work and Final Splatter
Splatter a little sepia and purple into the foreground before picking up a pen — the randomness of splatter helps balance the detail on the building side.
Dark brown ink: Shadow sides only — right-hand sides and underneath on the building, tightening key edges. Add fine branches to the dead tree in pen, working out from the painted base marks into the thinnest tips. A few scratchy marks in the bushes. Start very tentatively; you cannot undo this.
White gel pen: Left-hand sides and tops of anything catching the light — building edges, branches, a few grass highlights.
Remove the tape.
Resources...
* Reference photo
* Drawing to trace
Join me on Patreon
Join my Adventures in Colour Tier for $16 to access this post and my full library of over 200 others including deep-dive videos and step-by-steps.