 Video on Patreon
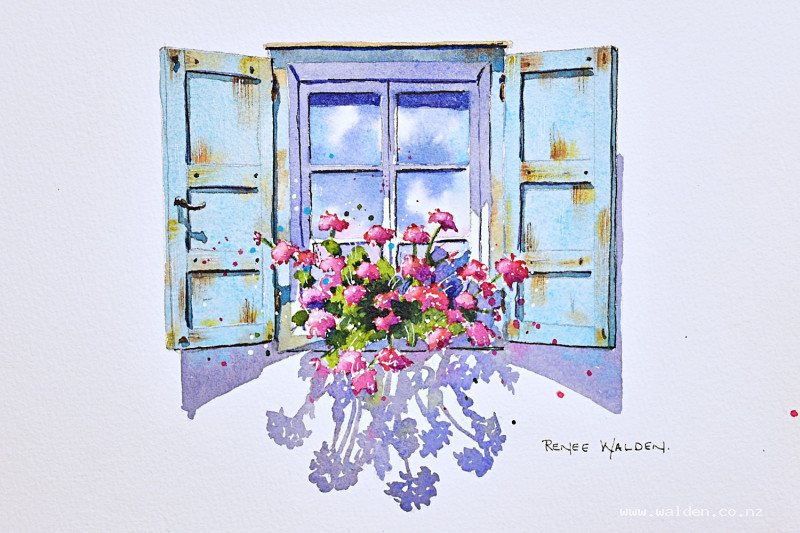
Window with geraniums
6 November 2025
Video - Level ◆◆◆
When traveling I'm always taking photos of windows and doors. There are so many different ones with lovely features to paint - old and rustic, new and shiny, flower boxes, shutters, stonework or bricks. And shadows! I'm always looking for lovely light that creates interesting shadows.
We have a lot to explore in this scene - the pretty geraniums of course, which cast wonderful shadows, then the old shutters and lastly, the light reflected in the window panes.
Happy painting!
Video run-through...
About This Painting
A charming European window — weathered blue-painted shutters, geraniums spilling out, glass panes reflecting the sky and flowers, and cast shadows that pull the whole composition into life. The shadows are the real subject here: they transform what would otherwise be a flat, static scene into something dynamic and three-dimensional. This painting rewards careful planning before picking up a brush and then relaxed, confident execution once the brush is in hand.
A traceable drawing is available in the lesson description.
The Pencil Drawing
This is one of the more detailed pencil drawings in the series — there are lots of angles and symmetrical elements to get right. Use a ruler and a centre line as a reference, measuring left and right from the centre as you go to keep the window frame properly symmetrical. Once the structure is established the flowers can be drawn freely.
Mark the shadows in the drawing — this is important. When you're painting freely you don't want to be thinking about where the shadows fall; having them already mapped out means you can just paint. If shadow lines get lost under the paint later, simply redraw them before the shadow stage begins.
Simplify the window frame detail — the focal point is the flowers, shadows, and shutters, not the architecture.
Colour Palette
Mix colours in advance rather than stopping to mix as you go.
Shutters: Cobalt turquoise dulled with a little ultramarine and Payne's grey — adjust until you reach the worn, slightly greyed blue of old painted wood. Have browns ready alongside it: quinacridone sienna, sepia, and natural sienna for the worn areas where paint has flaked away.
Window glass: Ultramarine and indigo for the dark, reflective glass, with touches of the shutter colour and flower colours for reflections.
Flowers: A warm pink (or your chosen flower colour). Also prepare green for the leaves.
Shadows on blue painted surfaces: The shutter colour (turquoise base) shadowed down with ultramarine and a little quinacridone sienna — kept more on the blue side than the brown.
Shadows on white wall: Ultramarine, quinacridone sienna, and a touch of violet — a cooler, lighter mix. Reflected pink from the flowers and turquoise from the shutters should be dropped into these shadow areas while still wet.
Painting Order
- Shutters — wet wash plus dry brushing for worn texture
- Window glass
- Flowers and leaves
- Smaller details — hinges, nails, lintel, handles
- Shadows — first pass, then darker accents
- Pen work and optional splatter
Step 1: The Shutters
Use a flat brush throughout — it gives clean straight edges and suits the geometric nature of the shutters.
Paint each shutter with the main blue-grey mix, working confidently across the whole surface and not trying to avoid the nails and hinges — they're dark enough that they'll show through later. While the paint is still wet, drop in the brown colours (quinacridone sienna, sepia, natural sienna) in the areas where paint would have worn away — along grain lines and wherever the wood shows through. These will bleed softly into the blue for a natural, aged effect.
Make the two shutters different from each other — different wear patterns, different colour variations. Avoid copying one side onto the other.
Once dry, come back with dry brushing: dry the flat brush thoroughly on a paper towel, splay the bristles slightly, pick up almost-dry pigment, and drag very lightly across the paper surface following the direction of the wood grain. At the lightest touch on cold pressed paper, the bristles will skip across the texture and leave beautifully broken streaks suggesting worn paint and wood grain. Use both the brown colours and Payne's grey for variety.
Step 2: The Window Glass
Wet each pane individually and work one at a time. Glass is dark and reflective — use ultramarine and indigo as the base, then drop in hints of the shutter colour (reflected blue), the flower colour (reflected pink), and lighter areas suggesting cloud or sky reflections. Work wet-into-wet so the colours merge softly, leaving some harder edges to suggest the glass surface. The goal is the impression of something reflective and glassy, not a detailed scene.
Step 3: The Flowers and Leaves
Paint the geraniums loosely — they shouldn't be tight and botanical. Vary the pinks, leave some white highlights, and let petals overlap naturally. Add the leaves in muted greens, some catching more light than others. These will be unified and brought to life once the shadows go over them.
Step 4: Small Details
Before the shadows: add the hinges, shutter handles, nails, and any metal lintel using a small brush and a warm dark mix (browns with Payne's grey to suggest rust and age). Add any extra dry brushing to the shutters if needed. All of this goes on before the shadows so the shadow wash can pass cleanly over everything.
Step 5: Shadows
This is the step the whole painting has been building towards — it's when everything becomes three-dimensional and the scene comes alive.
The shadows fall across multiple surfaces, so you'll need different colours as you move across the painting:
Shadows on the blue shutters: The shutter colour darkened with ultramarine and a little quinacridone sienna — more blue than brown, so the underlying colour still reads.
Shadows on the white wall: A cool mix of ultramarine, quinacridone sienna, and a touch of violet — keep it light and transparent. While still wet, drop in touches of reflected pink (from the flowers) and turquoise (from the shutters) so the shadow isn't a single flat colour.
Work wet and fast — the more fluid the paint, the more the colours will separate and glow. Carry colour from one surface into the next without stopping, changing colour as you cross from shutter to wall. Leave deliberate gaps within the flower shadow areas to suggest individual flower clusters rather than one solid shape. Drop reflected green from the leaves into shadow areas where appropriate.
Once the first shadow pass is dry, go back in with darker accents: deeper shadows within the leaf cluster, under the window frame edges, and in any tight corners or recesses. These second-pass darks are what separate the first shadow wash from true depth.
Step 6: Pen Work and Splatter
Dark brown ink: Shadow sides — underneath and on the left. Keep this minimal. The dry brushing, wet washes, and shadow glazes have done most of the work; the pen is just a gentle tightening, invisible to anyone who doesn't know it's there.
White gel pen: Highlights on tops and right-hand sides of the shutters, window frames, and flowers. A few marks suggesting worn, lighter wood grain on the shutters adds to the aged character.
Optional splatter: A little pink, green, and opaque turquoise splattered across the flower area adds life and sparkle. The turquoise is opaque and will sit on top with a bright, punchy mark. Cover the rest of the painting carefully before splattering.
Resources...
* Reference photo
* Drawing to trace
Join me on Patreon
Join my Adventures in Colour Tier for $16 to access this post and my full library of over 200 others including deep-dive videos and step-by-steps.