 Video on Patreon
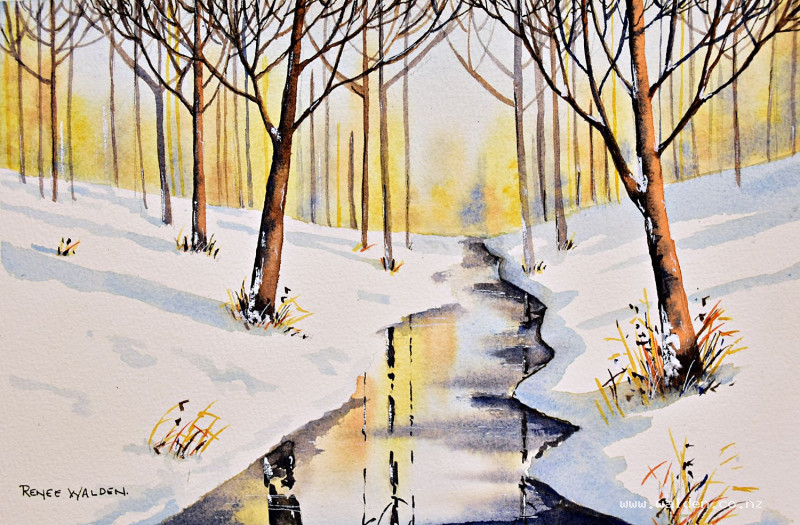
Imaginary snowscape
4 December 2025
Video - Level ◆◆◆
December already! Yikes!! But that means it's totally fine to do our first snow scene for winter. It's always so lovely to switch seasons in the studio :-)In today's lesson we paint an imaginary scene, one from my head. There are lot of great things to explore in this almost abstract scene - soft misty background in late autumn colours, stylised trees and then an icy road or stream that has pretty reflections.
It's not a complicated painting, so it's a good one if you're dusting off the brushes after a break, or you're just starting to paint in watercolours. Those of you who are more advanced, can take this idea and run with it, by creating a lot more detail in the trees.
And, of course, if you don't have your Christmas cards sorted yet, then you could use this one.
Happy painting!
Video run-through...
About This Painting
A quiet winter scene — bare trees standing in soft, misty snow, with a winding road or frozen stream catching their reflections in the foreground. The composition is semi-abstract and atmospheric: the background trees dissolve into a cold, hazy wash while the main foreground trees are rendered with more presence and detail. Snow shadows, tree reflections, and a tangle of fine branches bring the whole thing together. This scene works at any size; at smaller sizes simply reduce the level of detail.
A traceable drawing is available in the lesson description, or you can design your own arrangement.
The Pencil Drawing
Keep the drawing light — the background washes need to be free and unencumbered, and heavy pencil lines will show through.
Place the horizon line high so the painting is mostly foreground. Mark in the winding road or stream: off-centre, narrowing as it recedes, widening in the foreground, with gentle curves and uneven banks on each side. Then place the three main trees: one on the left, two on the right (one slightly further back). Make them different heights, different spacings, and have the main branches lean outward — ideally escaping the composition edges — so the scene feels enclosed rather than open.
A few smaller trees can be indicated lightly in the background; others will be placed freely once the wet washes are in. Avoid making the trees all the same size, spacing, or shape.
Colour Palette
Prepare all colours before wetting the paper. This is a winter palette — deliberately cool and muted, with no strong yellows.
Sky and shadow blue: A very pale, icy cobalt blue — almost no pigment, mostly water.
Background warm tones: Natural sienna and quinacridone sienna — muted and understated, suggesting the last traces of autumn colour in the bare trees.
Dark cool tone: Ultramarine — this granulates beautifully and gives the deepest, coldest marks in the background trees and shadows.
Foreground grasses: Natural sienna, quinacridone sienna, and ultramarine mixed into a warm dark brown for the closest grass marks.
Snow on branches: White gouache on a completely separate palette.
Painting Order
- Background — wet-into-wet, soft misty trees
- Main tree trunks — painted into the damp background
- Foreground road or stream — reflections and water surface
- Foreground grasses and grass reflections
- Tree reflections in the water
- Snow shadows
- White gouache snow on branches
- Pen work and final branch details
Step 1: The Background
Wet the entire background — everything above and including the snowy slope — generously with clean water, painting in all directions for an even sheen. Let the water settle, then wet it again. The paper should be very wet.
Drop in the pale icy blue across the whole wet area first — gently, held back on the brush handle, letting the water carry the paint rather than scrubbing it in. If colour spreads too fast, wait; the paper is too wet and the colour will just keep running. Patience at this stage is essential.
While watching the timing, drop in the background tree colours — natural sienna first for the lighter, warmer distant shapes, then quinacridone sienna, then ultramarine for the darkest and coolest. Vary the sizes and groupings; avoid making them all the same distance apart or the same shape. Leave gaps of sky showing through. The colours will separate and granulate in the wet layer, creating beautiful natural texture without any effort.
Don't push the paint into the paper. Drop it gently onto the wet surface and let the water do the work. Marks that are forced into the paper won't spread and will look hard and stuck.
Let this dry naturally — don't use the hairdryer until the paint has almost stopped moving.
Step 2: The Main Tree Trunks
While the background is still damp (not soaking wet), paint the main tree trunks into the wet surface so their edges soften slightly into the background. Use a dark mix of quinacridone sienna and ultramarine for the trunks, making them darker and more defined than anything in the background. Carry each trunk down into the ground — don't leave it floating. Main branches escape off the top and sides of the composition.
Once dry, thinner background trunks can be added in lighter, warmer colours (natural sienna, or a pale grey) to fill gaps without competing with the main trees.
Step 3: The Foreground Road or Stream
The foreground surface is wet, reflective, and dark — much darker than the snow. Wet the area and paint a dark wash using the blues and siennas, keeping it richer and more saturated than the background. While still wet, pull in some of the sky blue as horizontal streaks of reflected light.
The snow banks on either side of the road should remain mostly white — protect them carefully or lift out any colour that strays there.
Step 4: Foreground Grasses
Use a rigger or fine brush for these. Work with the warm-to-dark progression: natural sienna first, then quinacridone sienna, then the darkest brown (sienna mixed with ultramarine). Have some grass marks escape off the lower edge of the painting — this makes the scene feel like it continues beyond the frame. Make grasses larger and more detailed in the immediate foreground, smaller and simpler as they recede. Concentrate most detail at the focal point.
Step 5: Tree Reflections in the Water
Use a ruler to align the reflections correctly beneath each trunk — if a tree leans slightly, its reflection leans in the opposite direction. Paint the reflections as slightly broken, slightly wiggly vertical strokes so they read as movement in the water. Keep them very dark and use the same colours as the trunks above. The snow bank also casts a pale reflection; this can be a soft horizontal wash of the shadow blue.
Step 6: Snow Shadows
Use a very pale wash of the same icy cobalt blue used in the sky for all snow shadows. Keep it very dilute — the snow is bright and the shadows should feel cool and delicate rather than heavy. Cast the main shadows from the trees across the slope, following the angle of the ground. A large shadow across one side of the foreground suggests something outside the frame blocking the light — this gives the viewer a sense that the world extends beyond the painting.
Add a slightly darker blue along the water's edge where the bank meets the water. Small indentations or footprints in the snow, indicated with the shadow blue, add life and scale.
Step 7: Snow on Branches
Mix white gouache on a completely separate palette. Apply it to the upper and shadow sides of the main branches where snow would settle — a little more generously on the main foreground tree, lighter and more sparingly as you move back. Keep it naturalistic: snow settles on horizontal surfaces and in crevices, not uniformly.
Step 8: Pen Work and Final Details
Remove the tape before making final decisions about what the painting needs — the border is distracting and makes it difficult to judge.
Dark brown ink (shadow sides): The left-hand sides of trunks and main branches. Use the rigger or pen for the finest twigs at the tips of branches — these are too delicate for even a small brush. More detail on the main foreground tree, progressively less as you move back. A few marks in the foreground grasses.
White gel pen: Right-hand (sunlit) sides of branches. Useful for correcting any lines that came out too thick or wobbly — a stroke of white gel pen over a too-heavy mark will thin it and push it back. A few highlights on the snow surface.
If any area of the background feels empty, a few very light, almost invisible trunks in natural sienna can be added — but stand back frequently and stop before it feels overworked.
Resources...
* Drawing to trace
Join me on Patreon
Join my Adventures in Colour Tier for $16 to access this post and my full library of over 200 others including deep-dive videos and step-by-steps.