 Video on Patreon
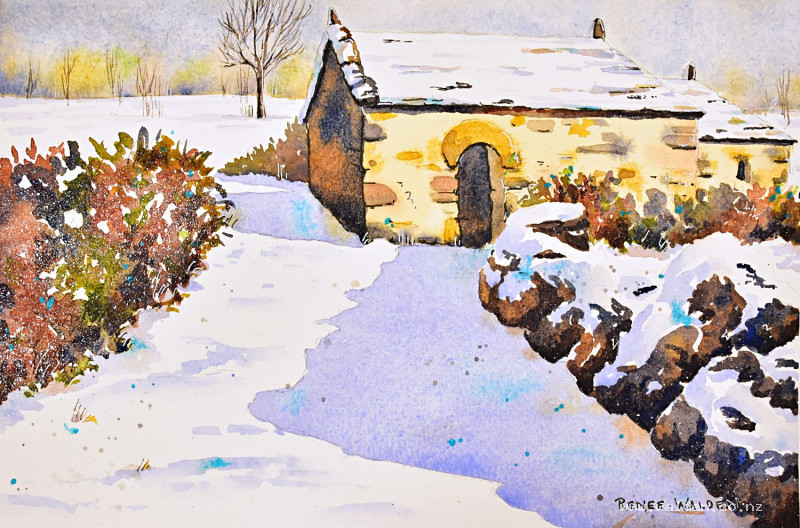
A chapel in the snow
5 February 2026
Video - Level ◆◆◆
Join me in the little village just above where we live in the Pyrenees, on a quiet, sunny winter morning after an overnight snowfall.
Last week we woke to a world transformed — fresh snow, clear blue skies, and that special hush that only comes after a big dump of snow. We wandered up through the forest and into the village above ours, where I spotted this simple little chapel covered by snow. It instantly felt like a scene we should paint together.
There’s so much to explore in this lesson: the soft, snowy background, the snow-covered stone wall, tangled brambles, and of course the beautiful shadows on the snow.
Happy painting!
Video run-through...
About This Painting
A snow-covered Alpine building — an old stone structure with a slate roof, framed by a lead-in pathway with beautiful cast shadows on the snow, rocky walls, and winter brambles. The scene is zoomed in close on the building so there's plenty of room for rock texture and architectural detail, while the snowy pathway in the foreground draws the eye in. A large walnut tree and soft background forest provide depth behind the focal point.
A traceable drawing is available in the lesson description.
Composition Notes
The building is placed high on the page to give the snowy pathway maximum space below. Keeping a soft, layered background — despite the close crop — is important: something in the background prevents the painting from feeling flat. The lead-in pathway adds the same sense of depth as converging perspective lines, inviting the viewer to walk into the scene.
Colour Palette
Background cool mix: Ultramarine blue and quinacridone sienna for a granulating grey, with a small touch of sap green — cool, blue-leaning, very dilute.
Background warm mix: Natural sienna (or raw sienna/yellow ochre) with a little quinacridone sienna — very dilute, suggesting the last oak leaves holding on. Nothing bright.
Building stonework: Natural sienna, quinacridone sienna, and ultramarine, varied throughout for a living, irregular stone texture.
Snow shadows: Ultramarine and quinacridone sienna, shifting between more-blue and more-brown across the shadow area. Add reflected light (natural sienna, quinacridone sienna) into the shadows while still wet — snow is highly reflective and shadows should not be flat.
Accent colour: A small amount of opaque cobalt turquoise (or lavender) used sparingly in a few places to create a colour the eye can follow across the painting without it becoming a pattern.
Snow splatter: White gouache on a completely separate palette.
Painting Order
- Background — wet-into-wet, soft grey-greens and warm tree tones
- Snowy field and pathway base
- Rocks and lead-in walls
- Brambles
- The building — stonework, roof, doorway
- Shadows on snow and building
- Rock detail, turquoise accents, and snow splatter
- Pen work
Step 1: The Background
Wet the entire background — up to the line of the snowy field, carving carefully around the building. Have a paper towel ready to dab any water that lands on the roof (the snow must stay white). Avoid a dry halo around the building edges — work wet paint right up to the edge with an almost-dry brush if needed.
With two brushes ready (one for the cool mix, one for the warm), drop both colours into the wet layer without scrubbing. The cool grey-green goes throughout; the warm sienna tones go in among the tree shapes. Vary the groupings — some close together, one on its own — and avoid any regular pattern. Keep everything very dilute; the background must read as distant and soft. The ultramarine in the cool mix will granulate and create natural texture as it dries.
If colours spread too fast, wait — the paper is still too wet. Let dry naturally, then finish with a hairdryer.
Step 2: Snowy Field and Pathway
The snow is essentially white paper, preserved by not painting it. Any colour that wanders into the snow area can be lifted immediately with a paper towel while wet. The pathway and foreground snow will receive their colour and form entirely from the shadow stage later.
Step 3: Rocks and Lead-in Walls
Paint the rocky walls wet-into-wet where possible, dropping in a variety of warm and cool colours — natural sienna, quinacridone sienna, ultramarine — without mixing them flat. Let them merge and separate on the paper. Vary the wetness and timing: some areas wetter for softer transitions, some drier for harder edges where one stone meets another. Scratch in a few rock lines with a sharp tool while the paint is still damp.
Don't pick out every stone — the wash itself suggests rock texture. A few well-chosen marks are more effective than exhaustive detail.
Step 4: Brambles
Use a rigger or fine brush with a warm dark colour (quinacridone sienna mixed with ultramarine) for the bramble branches. Hold the brush at the back of the handle for the most natural, random marks. Add a touch of green against the warm reds for interest.
Step 5: The Building
The stone walls of the building are painted with the same approach as the rocky walls — drop varied warm and cool tones into a wet surface and let them merge. The stonework should look organic and textured, not uniform.
The roof is snow-covered — protect the white paper. Any colour that goes onto it can be lifted immediately.
The doorway interior is dark — a deep mix of ultramarine and quinacridone sienna. Inside the arch above the door, the shadows are slightly lighter than the doorway itself; there should be some reflected light visible even deep in the shadow.
Step 6: Shadows on Snow and Building
This is the step that makes the painting. Make sure everything is dry first.
Snow shadows are the most important element in the foreground. Mix a warm shadow colour (ultramarine and quinacridone sienna, starting more brown, shifting more blue in places) and apply it as a confident wash across the shadow areas of the pathway and snowy ground. While still wet, drop in warm reflected-light colours — natural sienna, quinacridone sienna — to suggest light bouncing off the snow surface into the shadows. Snow shadows are never flat; they're full of reflected light.
Go darker along the bottom edge of shadowed areas where they meet the ground, and slightly darker under the eaves of the building.
Building shadows follow the same principle: vary the colour across the shadow area (yellow-brown to red-brown to blue-brown), adding warmth to mid-shadow areas and cool to the deepest parts. The focal point deserves the most varied and interesting shadow work.
Step 7: Rock Detail, Turquoise Accents, and Snow Splatter
Rock detail: With the shadows in place, a few additional rock lines or shapes can be picked out to make the stonework read more clearly. Work from what the earlier washes have already suggested — look for shapes in the paint and exaggerate them slightly rather than imposing new ones. Use a medium brush, not a tiny one — fine detail here will compete with the building.
Turquoise accent: Place small touches of opaque cobalt turquoise (or lavender) in a handful of spots across the painting. The goal is a colour the eye follows — enough to create a visual thread without becoming a pattern. If you feel the risk of pattern, splatter it rather than painting it.
Snow splatter: Load an old toothbrush with white gouache (on its own palette) and splatter across the bramble and bush areas to suggest snow caught on branches. Test on a scrap first. Keep it in the bramble areas rather than across the whole painting.
Step 8: Pen Work
Keep this minimal — if the painting is going well, it should barely need any.
Dark brown ink (fountain pen or fine nib): Shadow sides only — the right-hand sides and underneath of all architectural elements. Extra-fine marks on the tree, holding the pen upside down for the finest lines. Don't touch any area where the wash is already doing its job well.
White gel pen: Highlights on sunlit sides, snow on branches (also useful for thinning out any branch marks that came out too thick — a stroke of white over a heavy mark will fine it down and push it back). A few highlight lines on the roof snow edge.
Remove the tape.
Resources...
* Reference photo
* Drawing to trace
Join me on Patreon
Join my Adventures in Colour Tier for $16 to access this post and my full library of over 200 others including deep-dive videos and step-by-steps.