 Video on Patreon
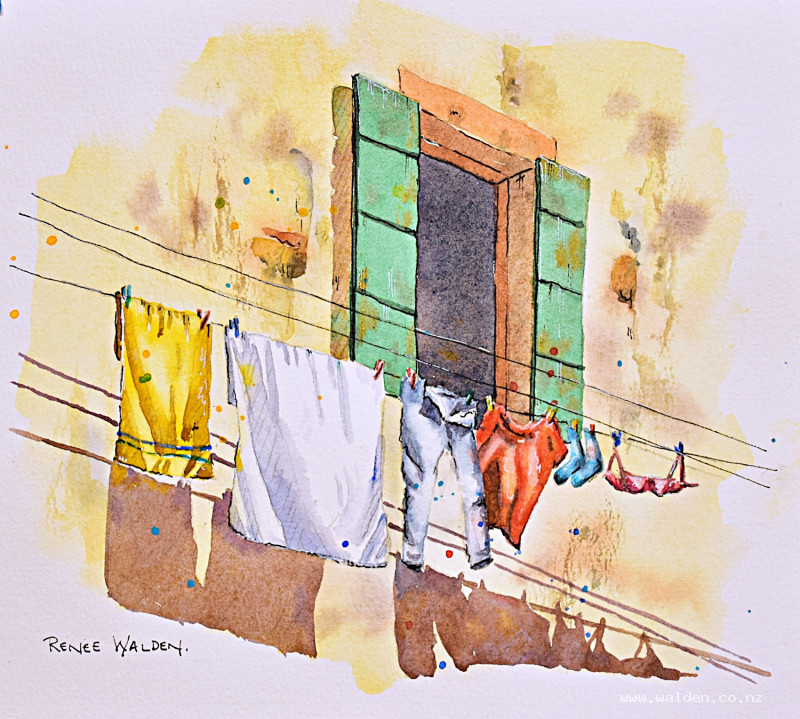
Washing day
5 March 2026
Video - Level ◆◆◆
Scenes of washing hanging in doorways and across alleyways have been painted for centuries. There’s something timeless about them — humble, ordinary moments that quietly tell stories about everyday life.
I’ve always been drawn to these kinds of subjects. A simple glimpse down a back street somewhere in Europe, a flash of colour in the laundry, the feeling that you’re peeking into a real, lived-in moment.
I chose this particular scene for that reason… but also because it’s a wonderful playground for exploring colour.
In this lesson, I show you how I mix a whole range of different shadow colours using complementary colour theory — not in a rigid, technical way, but in a practical, intuitive way that’s easy to apply to your own paintings.
It’s a fun way to put theory into practice, and the result is a painting that feels vibrant, rich, and full of life.
If you’ve ever wanted your shadows to feel more colourful and your paintings to glow a little more, then you're going to love this one.
Happy painting!
Video run-through...
About This Painting
A sun-drenched washing line strung between old shuttered windows — colourful laundry casting shadows, a worn stone wall, and rustic shutters. The real subject of this painting is shadows falling across different colours, and how the shadow colour changes depending on what it lands on. Choose your own laundry — just make sure you pick a variety of colours so there's plenty to play with.
This lesson has an urban sketching feel and can be painted edge-to-edge or as a loose vignette shape in a sketchbook.
A traceable drawing is available in the lesson description.
Choosing Your Laundry
Pick items in a range of different colours so the shadow stage is interesting. The lesson uses: a yellow towel, a white sheet, blue jeans, a pink/red top, and green socks. Aim for at least one warm colour, one cool colour, one neutral or white, and something bright. The shadow colour is the complement of whatever it falls on — so more colour variety means more interesting shadows.
The Key Concept: Complementary Colour Shadows
Rather than mixing a generic grey for all shadows, each shadow is mixed from the complementary colour of the surface it falls on:
- Shadow on yellow → add purple
- Shadow on blue → add orange
- Shadow on red/pink → add green
- Shadow on white/neutral → use a cool blue-grey, then add reflected colours from nearby items
This gives the shadows luminosity and keeps them feeling part of the light rather than deadening it. Also drop in reflected colours from neighbouring laundry items while the shadow wash is still wet — a white sheet next to blue jeans will pick up a touch of blue-orange; one next to a yellow towel will pick up a little yellow.
Painting Order
- Background wall — wet-into-wet, old stone texture
- Shutters and window frame
- Inside of window
- Laundry — all base colours
- Shadows on each laundry item (complementary colours)
- Large cast shadows along the bottom
- Pen work and splatter
Step 1: The Background Wall
Wet the entire wall area with clean water, using a flat brush to carve around the shutters and laundry. With the paper wet, lay in the base wall colour — natural sienna, raw sienna, or yellow ochre — across the whole area in one pass.
While still wet, drop in a few other colours in varying sizes and positions: a terracotta or quinacridone sienna here, a touch of grey (Payne's grey or a blue-brown mix) for water streaks and cracks, maybe a slightly warmer tone for the lintel. Avoid making polka dots — vary the size, shape, and spacing, and try not to make a regular pattern. The goal is a wall that looks old, worn, and textured without being fussy.
Let dry naturally until the sheen is almost gone, then finish with a hairdryer.
Step 2: Shutters and Window Frame
Use a flat brush for the shutters. Mix a dull, muted green — something like a phthalo or sap green knocked back with burnt umber or natural sienna. This is a painted green, not a natural green, so it can be slightly unconventional in hue. Keep it old and worn, not bright or fresh.
For the window frame, a warm neutral — slightly darker than the wall — works well.
Step 3: Inside the Window
Let the wall colour merge into the window interior while still damp, then come in with a dark mix (ultramarine and quinacridone sienna) for the deep shadow inside the window. Don't wait for the surrounding colour to dry — the merging adds atmosphere.
Step 4: Laundry Base Colours
Paint each piece of laundry in its base colour. Keep these fresh and vivid — this is the brightest stage of the painting. You can be a little free with the edges; they don't need to be crisp cutouts. For a white sheet, leave the paper unpainted or apply the most delicate wash.
Step 5: Shadows on Each Laundry Item
Once the base colours are dry, mix the shadow colour for each item individually using the complementary colour principle above. Apply the shadow wash and immediately soften some edges with a clean damp brush — a mix of hard and soft edges suggests folds naturally. Don't soften all the edges; some hard lines give structure and crispness. Drop in reflected colour from nearby items while still wet.
The white sheet benefits from a pale, slightly blue wash, then add in a small amount of each neighbouring colour as reflected light — a touch of yellow from the towel, a suggestion of blue from the jeans.
Dry with a hairdryer before moving to the cast shadows.
Step 6: Large Cast Shadows Along the Bottom
These are the shadows cast by the entire washing line onto the wall below — a big, joined-up shadow area. Work as wet and fast as possible so the colours stay luminous. Start with the shadow colour that matches the dominant wall tone (a warm brown — the wall's base colour with a little purple added), then immediately drop in reflected colours: a touch of yellow near the yellow towel, a little more purple near the sheet. Vary the colour constantly to avoid a flat, dead shadow.
The shadow of the washing line itself is a fine dark line that runs across and connects everything. Let it go off the edges of the painting.
Step 7: Pen Work and Splatter
Dark brown ink: Shadow sides only — under the shutters, along the shadowed edges of the window frame, any architectural details. The washing line itself can be drawn freehand in pen for an urban sketching feel, or with a ruler if preferred. Minimal and light — start tentatively.
White gel pen: Highlights on the top edges of the washing line (makes it read as shiny wire), light catches on the shutters and laundry.
Optional splatter: A few loose splashes of yellow, blue, red, and a touch of opaque turquoise bring the scene to life and reinforce the sketch-like quality. Stand back before splashing to decide whether it's actually needed.
Resources...
* Reference photo
* Drawing to trace
Join me on Patreon
Join my Adventures in Colour Tier for $16 to access this post and my full library of over 200 others including deep-dive videos and step-by-steps.