 Video on Patreon
Sunset palm tree
9 July 2026
Video - Level ◆◆◆
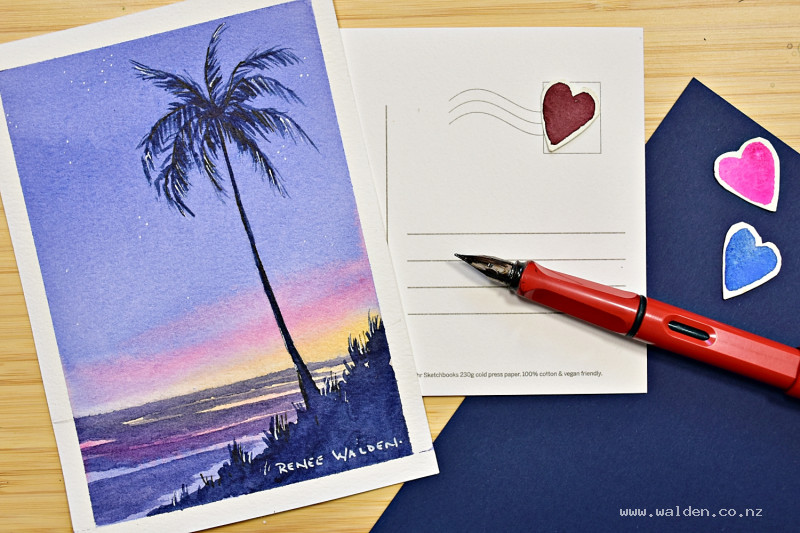
We're back to the beach for our second summer postcard this week — and this time, we're catching it at sunset, with a silhouetted palm tree standing against a glowing horizon. That glow is really the star of the painting, and I'll walk you through exactly how to paint it.
It's a quick one too: the whole sky and the glow on the sea come together in one continuous wash, then the palm goes on top. So carve out half an hour, pour yourself something nice, and give yourself a little me-time.
Happy painting!
Video run-through...
About This Painting
The second in the summer postcard series — a beach sunset with a palm tree silhouette. The sky moves from deep purple-blue at the top through pink and yellow toward the horizon, and that same sequence of colours is reflected in the water below. The palm tree and foreground are painted last as a dark silhouette over everything. The key constraint throughout is keeping the sky light enough that the palm tree can be darker still.
A traceable drawing is available in the lesson description.
The Pencil Drawing
Draw the palm tree first. The fronds have a backbone — a slightly jagged, irregular central stem — and the leaflets branch off from there. They're windswept and untidy, not a neat star shape. The trunk is long relative to the canopy and slightly wider at the base. Once the palm is in, add the slope of the foreground and the horizon line.
Colours to Prepare
- Deep purple-blue — cobalt blue with a touch of permanent violet (or quinacridone violet). Add a little Payne's gray if it needs to be slightly darker or less purple.
- Pink — quinacridone rose
- Yellow — Hansa yellow deep (or similar warm yellow)
- Dark silhouette mix — Payne's gray, cobalt blue, and permanent violet combined into a rich near-black
Sky and Water: One Wet Pass
Wet the entire painting from top to bottom — sky, horizon, water, and foreground all in one go. Since the palm tree and foreground will be painted as a dark silhouette over the top, it doesn't matter what colour goes underneath them.
Working quickly with a flat brush, apply the purple-blue from the top downward, letting it fade as it reaches the middle of the painting. Add a streak of pink as a buffer between the blue and the yellow — this prevents the two from mixing to green. Then bring in the yellow close to the horizon. Keep the colours intense but not so dark that there's no room to go darker for the palm tree later.
Immediately repeat the same colour sequence in the water: yellow first, then pink, then purple. The water should be slightly darker overall than the sky.
Let the whole wash dry naturally — hair-drying too soon will cause streaks in the graduation. Finish with a hair dryer once it's almost dry.
Water: Darkening and Reflections
Once dry, run a strip of tape along the horizon line. Using the same purple-blue mix with a little extra Payne's gray, paint loose horizontal streaks across the water with a flat brush, leaving some of the warm underlayer showing through as streaks of reflected light. The foreground will be covered by the dark silhouette later, so don't worry about that area. Remove the tape carefully, warming it first with a hair dryer.
Palm Tree and Foreground Silhouette
Mix the dark silhouette colour — Payne's gray, cobalt blue, and permanent violet into a deep, rich near-black. Paint the trunk first with a medium brush, giving it a little natural unevenness. Switch immediately to the foreground while the same paint is loaded, keeping the silhouette edge interesting and irregular rather than flat.
For the fronds, use a dagger brush or rigger. Work the same way as the drawing: place the backbone of each frond first, keeping the lines squiggly and varied. Once you're happy with the number and arrangement of fronds, add the leaflets — some fronds will have them on both sides, others on just one. This asymmetry is what makes the tree look natural. Build the shape slowly. The pen can tighten anything that feels too wobbly.
Push the centre of the canopy darker so that some fronds read as closer and others further away.
Stars and Final Details
Add a few stars scattered across the sky in small groupings and singles — resist making a pattern. A white gel pen works well for these, and for catching a few leaflet tips that might be catching the last of the light.
A little brown ink used very sparingly can tighten the finest frond details — but keep it subtle, almost invisible. The silhouette should feel painted, not drawn over.
Resources...
* Reference photo
* Drawing to trace
Join me on Patreon
Join my Adventures in Colour Tier for $16 to access this post and my full library of over 200 others including deep-dive videos and step-by-steps.