 Video on Patreon
Floating flamingo
16 July 2026
Video - Level ◆◆◆
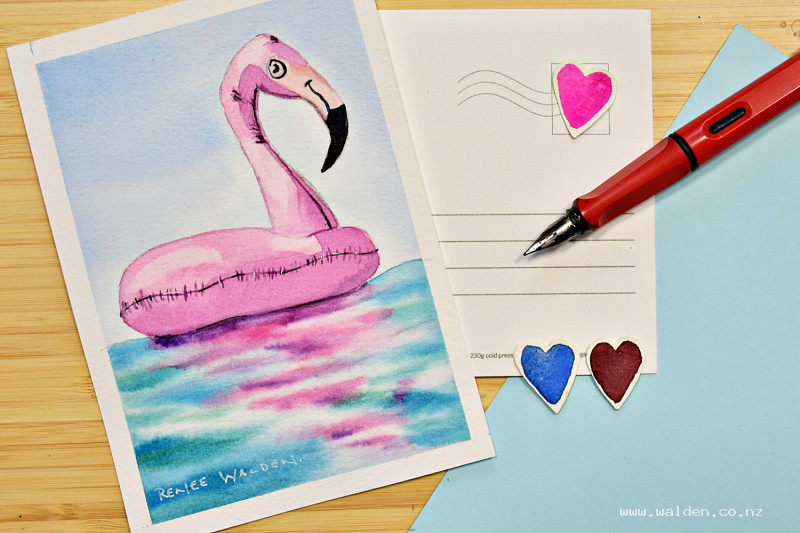
Summer postcard number 3, and this reference photo made me laugh out loud when I found it! I'll admit it — secretly, I've always wanted one of these pool flamingos ;-)
Confession out of the way, there's actually a lot to get into here: how to make the flamingo shiny, how to paint its reflection, and how to bring a bit of movement into the water.
Maybe this is the postcard you send to someone just to make them smile. Let's spread a few.
Happy painting!
Video run-through...
About This Painting
The third in the summer postcard series — a plastic inflatable flamingo floating on vivid turquoise water. It's a fun subject with plenty of colour: bright pink against tropical blue-green, with the flamingo's reflection rippling in the water below. The plastic surface means strong highlights, a mix of hard and soft shadow edges, and a glossy feel that's satisfying to capture. The sky is kept simple and pale so all the energy stays in the water and the flamingo.
A traceable drawing is available in the lesson description.
Before painting, lighten any heavy pencil lines with a kneadable eraser — particularly along the neck and the back where the pink will be palest.
Colours to Prepare
- Cobalt blue — pale, for the sky
- Phthalo blue and lemon yellow — mixed to a vibrant turquoise for the water
- Quinacridone rose — for the flamingo body, kept very dilute for the first wash
- Quinacridone rose plus a touch of yellow — for the slightly peachy face area
- Quinacridone sienna plus permanent violet — a duller, deeper pink for the shadows
- Payne's gray — for the beak and darkest details
Sky
Wet the sky area with a flat brush, shaping carefully around the flamingo. Check from the side for dry patches and pooling — a well-wetted sky gives a clean, even wash with no halo around the flamingo edge. Drop in a pale cobalt blue wash, letting it graduate slightly lighter toward the horizon. Let dry naturally, then finish with a hair dryer.
Water and Flamingo Reflection: One Wet Pass
Wet the entire water area, then work quickly — the goal is to paint the turquoise water and the pink reflection wet-into-wet so they bleed together naturally at the edges.
Start with the turquoise: mix phthalo blue and lemon yellow into a vibrant blue-green. Paint with flat, horizontal marks near the top of the water area, becoming larger and more three-dimensional toward the foreground. Leave the area where the flamingo reflection will go unpainted for now. Build intensity in passes — each time, use slightly less water and slightly more pigment, pushing the darkest and most intense colour to the foreground. Leave some white paper showing, particularly where the reflection will sit.
While the turquoise is still wet, clean the brush thoroughly and come in with quinacridone rose for the flamingo's reflection. Use similar horizontal marks — flatter toward the background, more shapely at the front. Add a touch of purple for the darkest area of the reflection. While still wet, lift out a few highlights with a clean, damp, stiff brush to suggest movement in the water.
Flamingo: First Wash
The first pass over the flamingo should be very pale — quinacridone rose with a lot of water. Work quickly across the whole bird so you can lift highlights before the paint dries. Leave the face area for now. Immediately use a flat brush to lift out the brightest highlights: the large glossy spot on the body, the top of the head, and the neck. Work while the paper still has a sheen — once it loses it, stop.
Flamingo Face
Mix the same quinacridone rose with a small touch of yellow for a slightly peachy tone. Paint the face area, going straight over the beak since that will be covered with dark paint anyway.
Flamingo Shadows
Mix quinacridone sienna with a touch of permanent violet for a duller, deeper pink — still well diluted. Work through the shadow areas with a combination of hard and soft edges: hard edges where the plastic creases or folds sharply, soft edges where the surface curves. Connect the shadows into one continuous wash where possible for a clean result, then soften the rounded edges by pulling a clean, barely damp brush over them before they dry. Shadow areas include the underside of the neck, the throat, the body's lower half, and the top of the head.
Details
Paint the beak with thick Payne's gray, including the curved smile line. Add the eye. Use the deeper quinacridone sienna and violet mix to suggest the seam lines and surface creases — a few marks, dabbed lightly with a paper towel to set them, then soften some with a clean brush to vary the focus.
Keep pen work to a minimum — just enough to sharpen the beak if needed. The colours are bright and alive and heavy inking will deaden them.
A white gel pen or Posca marker picks out the sharpest highlights. Gouache works too if the lifted highlights weren't quite light enough.
Resources...
* Reference photo
* Drawing to trace
Join me on Patreon
Join my Adventures in Colour Tier for $16 to access this post and my full library of over 200 others including deep-dive videos and step-by-steps.