 Video on Patreon
Painting distant trees and forests
1 February 2023
Video - Level ◆◆◆
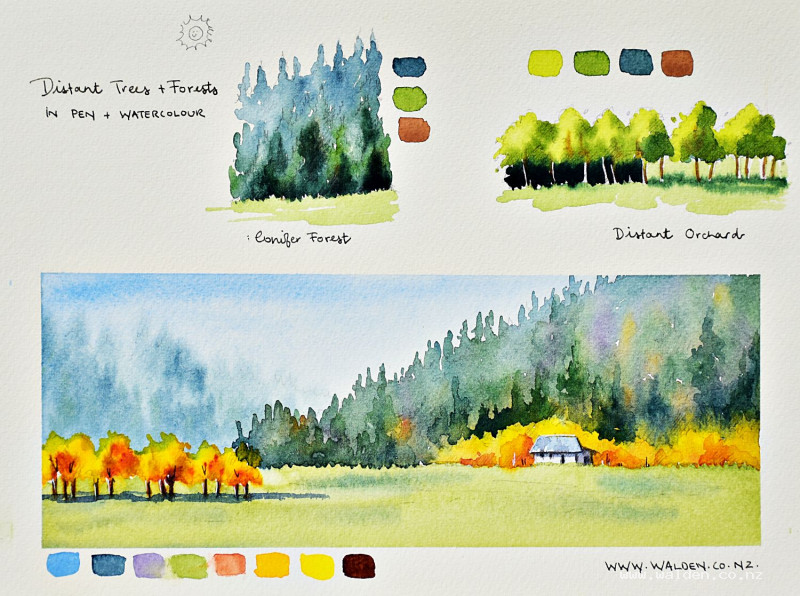
In this skills lesson we paint a distant conifer forest and a distant orchard. Then we put those skills together in a little autumn scene.
This lesson is a compliment to the "Mixing greens & painting summer trees" lesson. You don't have to do the previous lesson before this one - they can be done in any order.
Video run-through...
About This Lesson
This skills lesson is a companion to the earlier lesson on mixing greens and painting individual foreground trees. Where that lesson focused on trees up close — with detail, form, and distinct shapes — this one is about trees that are far away, grouped together into forests, orchards, and hillside slopes. The techniques are different, and so is the way you think about them. The lesson covers three exercises: a distant conifer slope, a distant deciduous orchard, and a final autumn scene that puts both together.
A downloadable worksheet with colour swatches is available in the lesson description.
The Key Principle: Distance and Depth
Every decision in painting distant trees comes back to one idea: objects further away are lighter, cooler, less saturated, and less detailed than objects close to you. This applies to colour, tone, edge quality, and the amount of time you spend on any given area.
In a slope of trees, the ones at the back touch the sky and should be palest and most blue. As you come forward, the trees get slightly greener, darker, and more defined. The ones closest to the viewer are the most saturated and have the most distinct shapes. Even without any shadows or details, simply shifting from blue-gray at the back to richer green at the front creates an immediate sense of depth.
Exercise One: A Conifer Slope
Drawing the Shape
Before painting, sketch the slope lightly. The key is an irregular skyline — trees of different heights and spacings, with no two silhouettes the same. Avoid a uniform bumpy line. The trees furthest back, touching the sky, are barely distinguishable as individual trees; as you move forward they become progressively more defined, and the ones at the very front have a more recognisable pine shape. The bottom edge where the forest meets the meadow should be equally organic and varied.
Think about where the sun is and indicate it on your sketch. Shadows fall on the opposite side — light from the left means shadows on the right. In the distant trees, shadows are faint; in the foreground trees, they're strong and dark.
Painting the Conifer Slope
Mix indigo with plenty of water for the back trees — blue-gray and very pale. As you move forward, add sap green to the mix in increasing amounts, keeping it darker and richer toward the front. Work with the tip of the brush to suggest tree tops at the skyline, keeping the touch light so the paint can move. Let the back and mid-ground colours merge together while wet.
For the foreground trees — the ones closest to the viewer — go very dark with a thick mix of indigo and sap green, with barely any water. These are the ones where individual pine tree shapes start to emerge. Add a few trunks in burnt umber while the paint is still damp.
Let the conifer area dry completely before painting the meadow below it. This keeps the lower edge of the forest crisp rather than bleeding into the grass.
Tip: Working Fast
The key to keeping the top edge of a conifer slope soft (no halo between the sky and the trees) is to paint it while the sky is still wet, or to work the tree colour right up to and slightly into the sky colour while both are damp. Use a larger brush than feels comfortable — it's the only way to cover the area quickly enough.
If the area is too large to complete before it dries, break it into sections separated by a natural feature: a hillock, a gap, or a deciduous tree poking through the canopy.
Exercise Two: A Distant Deciduous Orchard
Drawing the Shape
Sketch a row or grouping of rounded deciduous trees — an orchard, a line of trees dividing fields, or trees at the lower edge of a conifer slope. The tops are rounded, but irregularly so: some trees overlapping, some slightly apart, the overall silhouette varied and organic. A few escaped leaves at the edges suggest movement. Indicate trunks, but not every one.
Consider what's behind the trees. If there's a dark conifer forest behind them, the trunks and gaps will be dark. If there's open field or sky, light will show through. Both are valid — just be consistent.
Painting the Orchard
Paint everything in the highlight colour first, working quickly from one side to the other so all the edges stay soft. Green gold is a good starting point; if you don't have it, sap green with a little yellow works well. While still wet, drop in the shadow colour on the right-hand side and underneath — a darker, cooler green, or a mix leaning toward brown or blue. Let the colours merge together rather than creating hard internal lines. The goal is a soft, unified mass with a sense of light on one side and shade on the other.
Unlike painting an individual foreground tree, there should be no hard-edged details inside the mass — everything is soft and grouped.
Exercise Three: An Autumn Scene
The full scene combines a conifer slope in the background, deciduous trees in the mid-ground with autumn colour, a small house, and a simple foreground meadow. The principles from the two exercises above apply throughout, but with autumn colour replacing the summer greens.
Background Conifers
Use indigo as the base, shifting toward sap green as you come forward. Add a touch of brown (burnt umber) to dull the mix slightly — with saturated autumn colours coming later in the scene, the background should be calm and slightly muted, not competing. Work the skyline with a light touch and irregular shape. Reserve any darker definitional marks for the trees closest to the mid-ground, and soften these in while still damp.
Mid-Ground Autumn Trees
For distant autumn trees, the same wet-on-wet approach applies, but with warm yellows and golds instead of greens. Paint the sunlit side first with Hansa yellow medium and Hansa yellow deep — these two work beautifully together, one slightly cooler and one warmer. While still wet, drop in deeper colour on the shadow side and underneath. A touch of brown suggests dead or turning leaves and keeps it from looking too uniformly golden.
More detail is appropriate here than in the background, but still keep everything soft and grouped — this is mid-ground, not foreground.
The Foreground Meadow
For an autumn meadow, sap green alone reads as too fresh and vivid. Add a little pyrrole orange or red to the sap green to dull it toward the muted, slightly tired quality of grass in autumn. Apply with a large brush in simple horizontal or directional strokes. A touch of indigo in places suggests dips and hollows without overworking it.
The House
Keep the house simple — a few shapes suggesting a white-fronted building with a blue-gray roof (cobalt blue picking up the sky colour). Shadow the underside and one side with a cool gray-purple. Add minimal detail; the house is supporting the trees, not competing with them.
Shadows
Shadows under the foreground trees and along the base of the mid-ground trees complete the tonal structure. In autumn, with the sun lower in the sky, shadows are longer than in summer — keep this in mind when placing them. A grayish purple works well as a shadow colour against the warm yellows and golds elsewhere.
Pen Work (Optional)
A little pen work around the house — shadow sides, window openings, the roofline — and the shadow sides of the most prominent trunks is enough. A white gel pen along the sunlit side of the roof and tree trunks adds sparkle without much effort.
Key Takeaways
Distance means lighter, cooler, less saturated, less detailed. Apply this consistently from back to front in any landscape.
Group distant trees together. Don't try to paint individual distant trees — treat them as a mass with a varied silhouette.
Soft edges throughout. Distant trees have no hard internal lines. Work wet on wet, or soften edges afterward with a damp flat brush.
Work fast with a big brush. This is the practical skill that makes everything above possible.
Resources...
* Worksheet
Join me on Patreon
Join my Adventures in Colour Tier for $16 to access this post and my full library of over 200 others including deep-dive videos and step-by-steps.