 Video on Patreon
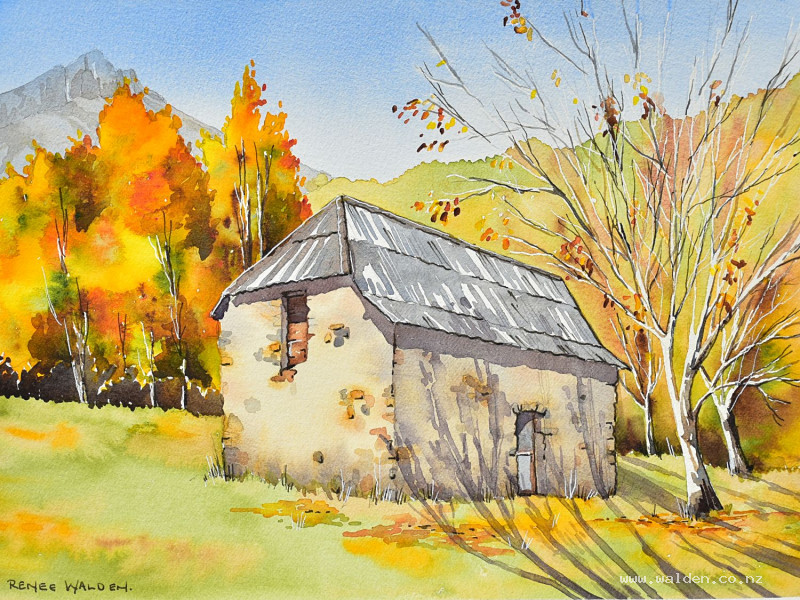
Rustic barn in autumn
15 February 2023
Video - Level ◆◆◆
We're back to the beautiful Pineta Valley in the Spanish Pyrenees for this autumn scene. A big stone barn nestled in a row of autumn trees, with the mountains and forest in the distance. In front are some trees that have already lost their leaves. Completing the scene are the long autumn shadows leading your eye from outside the painting right up to the barn.
Lots of skills from the previous lessons to put together here, in a complete painting.
You'll need some masking fluid for the dead trees.
Happy painting!
Video run-through...
About This Painting
Autumn fading fast in the Pineta Valley — this scene is from right at the head of the valley inside the National Park of Ordesa and Monte Perdido, where the colours in this particular season were exceptional. It's a more complex scene than most: a stone barn surrounded by white-trunked trees with golden foliage, a scree slope and mountains behind, long diagonal tree shadows across the grass, and a clear blue autumn sky. The lesson introduces masking fluid for preserving the white tree trunks, and brings together distant tree painting, wet-on-wet skies, shadow work, and pen finishing in one scene.
A reference photo and traceable drawing are available in the lesson description.
Masking Fluid: Tips Before You Start
Masking fluid is used here to preserve the white trunks of the trees so that a rich, dark background can be painted freely around them. A few important rules:
Apply masking fluid to dry paper only, and make sure it is completely dry before painting over it. Never dry it with a hairdryer — masking fluid contains a latex-like compound that can melt and bond to the paper under heat. A good brush or an old ruling pen works for application; a straightened paperclip or the head of a pin can produce very fine lines. Don't leave masking fluid on the paper for more than a day or so — it becomes harder to remove cleanly the longer it sits.
Apply the masking fluid to the main tree trunks and a few selected leaf marks where you want bright golden colour to show through a darker background wash. Remove it only once everything is completely, thoroughly dry.
Painting the Sky
Mix a generous pool of cobalt blue with plenty of water. Wet the entire sky area with clean water, shaping carefully around the upper tree canopy and mountain edges. Work with the board at around 20–25 degrees — this angle helps the wash flow down the paper naturally.
Load the brush with the cobalt mix and sweep across the top of the sky in a single stroke, then continue downward without reloading the brush. As the paint runs out, it will naturally grow lighter toward the horizon and over the distant hills, giving a built-in graduation. Soften around any tree shapes at the top edge carefully to avoid a halo. Pick up any beads of paint along the tape at the bottom before they can run back and create cauliflowers. Let dry completely.
While waiting, add any pencil marks for the long diagonal tree shadows falling across the grass — these are easier to plan now than to do freehand later with a brush.
The Background Mountains and Cliffs
Once the sky is dry, the mountains already have a blue tinge from the sky wash underneath. Mix the same cobalt blue with a little burnt umber to warm it slightly toward a gray, then paint the mountain shapes. Leave some white where the rock faces are bright. The upper cliff area is bare scree — no vegetation — so a slightly more brown-biased mix suits it. A large cave is visible as a distinctive dark mark in the cliff face.
Add very light, partially softened marks to suggest the crags and fissures. The key is restraint — this is background, and too much detail will pull the eye away from the barn and trees.
The Back Hillside (Distant Autumn Trees)
The hillside behind the barn is covered in the same type of trees as the foreground, but much further away. Use muted, less saturated versions of the autumn yellows — Hansa yellow deep rather than the brighter cadmium yellows or Hansa yellow medium, which are being saved for the foreground. Mix in some of the cobalt-brown gray to keep the distant trees visually pushed back. The colours can be lovely, but they should feel quieter than what's coming in the front. Work loosely and let the colours merge.
The Foreground Trees and Golden Foliage
The foreground trees are the heart of the painting. Because their white trunks are masked, the surrounding foliage and background can be painted freely and darkly without losing the trunk shapes.
Build up the foliage with a range of autumn colours: Hansa yellow medium and cadmium yellow light for the brightest, most saturated golds; Hansa yellow deep for warmer, deeper areas; reddish-brown (dragon's blood or similar) for the russet patches; and touches of darker mixes where the foliage is in shadow or where leaves have turned. Work wet on wet so the colours merge naturally and avoid hard internal edges. Drop in occasional darker marks to give the canopy depth and to suggest the tangle of branches within.
Paint the dark background behind the trees very dark — this is negative painting, and the contrast is what makes the foliage glow. Use indigo mixed with sap green, pushed very dark. Cut in carefully around the masked trunk lines and any leaf shapes you want to keep bright.
The Barn
Paint the barn walls in a warm stone mix — natural sienna with a little ultramarine-brown gray for variation. The front-facing wall catches the light and should stay relatively pale. The side wall is in shadow and can be started slightly darker. Tease the paint into the grasses at the base of the walls so the building sits naturally in the ground rather than floating above it. The roof takes a gray-blue mix for the corrugated metal, painted in the direction of the corrugations with a few white gaps left for highlights.
The Meadow and Ground
Mix sap green with a touch of warm colour (pyrrole orange or burnt sienna) for the autumn grass — straight sap green reads as too vivid for this time of year. Apply with a large brush in directional strokes that follow the slope of the ground. Vary the tone and temperature slightly across the meadow.
Removing the Masking Fluid
Once absolutely everything is dry, gently rub off the masking fluid with a clean finger or eraser. The white trunks and any masked leaf marks will be revealed. This moment always feels like magic.
Tree Details After Masking
With the trunks revealed, add the brown markings and shadow sides using a very fine brush — the shadow side of each trunk, bark texture, and the characteristic brown patches of these white-barked trees. Keep the sunny side of each trunk clean and white. Add a few falling or fallen leaves around the base of the trees and on the ground using small marks of yellow, gold, and reddish-brown.
Shadows
Sketch the shadow shapes lightly in pencil before picking up a brush. The long diagonal tree shadows are one of the most compelling elements of this scene — they're what autumn light does, with the sun low in the sky, and they animate the otherwise plain areas of grass. They also cast shadow across part of the barn, making the sunny face of it — the focal point — pop by contrast.
Mix cobalt blue and burnt umber with a touch of permanent violet for the shadows. The violet works as a complement to all the orange and gold in the painting and gives the shadows a richness rather than a flat gray quality. Apply shadows across the grass in directional strokes following the angle of the light, then soften some edges to suggest the trees are moving gently in a breeze. Add the shadow shapes to the barn walls, following the roofline carefully.
Pen Work
Once the painting is completely dry, a fine-nib fountain pen with dark brown ink and a white gel pen are used to sharpen things up around the barn. Focus on the shadow sides: the corrugation overlaps on the roof, the door frame, the stonework (shadow sides of select stones only, not every one), the window openings. Keep the pen work subtle — this is a scene rich in colour and paint quality, and heavy pen marks would flatten it.
Add a few grasses at the base of the barn to settle it into the ground. The tree canopy can have a few fine branch marks with the pen, suggesting the tangle of branches more clearly than the brush managed. The white gel pen highlights the sunlit side of the barn walls and the bright faces of the tree trunks on the sun side.
Stand back regularly and stop before you feel finished — a scene this rich doesn't need much pen at all.
Resources...
* Drawing to trace
* Reference photo
Join me on Patreon
Join my Adventures in Colour Tier for $16 to access this post and my full library of over 200 others including deep-dive videos and step-by-steps.