 Video on Patreon
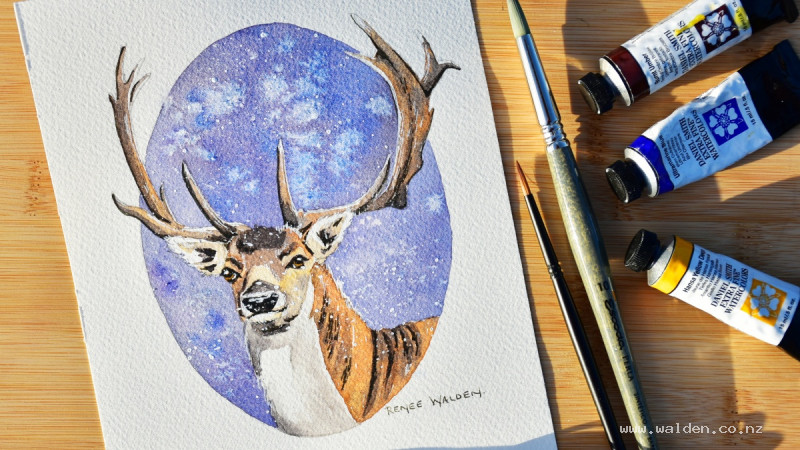
Deer in the snow
22 February 2023
Video - Level ◆◆◆
Let's have some winter fun with a deer looking out through some falling snow. This is a quick and easy painting - a perfect introduction to painting an animal, if you've never done one before.
Video run-through...
About This Painting
A deer portrait set in a snowy oval vignette — warm golden-brown fur against a cool, moody purple-gray background, with salt-created snowflakes and white gouache splatter suggesting falling snow. The oval format and generous space below give it an old-world, traditional feel that suits framing — either in a standard rectangular frame with the oval sitting on a cream mat, or in an oval frame if you can find a good framer.
The same approach works for any animal: fox, hare, robin, owl. A whole set makes a natural series.
You'll need table salt, white gouache, an old toothbrush for splattering, and a white gel pen.
A traceable drawing is available in the lesson description.
The Pencil Drawing
A detailed pencil drawing is the foundation for animal portraits — careful drawing means the watercolour washes on top don't have to do all the structural work. Draw in the direction of the fur. Mark the oval lightly and position it high on the page. The horns are adjusted slightly to follow the curve of the oval, and the neck is lengthened to fill the shape. The eyes are made fractionally larger than life — the eye is always where the viewer looks first. A very slight upward curve to the mouth keeps the expression friendly rather than blank.
Use a kneadable eraser to lighten the oval outline before painting so it doesn't show through the background wash. The deer markings can remain darker — the pencil showing through the transparent washes is part of the layered effect.
Painting the Deer
Mix three colours for the fur: a light golden-brown (burnt sienna with a touch of Hansa yellow deep); a mid dark brown (burnt umber or sepia); and a very dark brown for the deepest markings (burnt umber plus a little ultramarine). Keep all mixes well watered — soft transitions between tones require wet paint.
Work across the deer in sections, always painting in the direction the fur lies. Start with the lighter golden-brown across the main body and head, then drop in the darker tones wet-in-wet while the wash is still open: the folds where neck meets back, the darker forehead marking, the shadowed areas beneath the chin, the shading that gives the chest its cylindrical form. Reserve the whites — the inside of the ears, the front of the chest, the brightest areas of the muzzle — by simply leaving them unpainted.
Paint the inside of the ears with a very light warm brown, using the brush tip to suggest fine hairs at the edge. The horns use the same colour range; leave the inner edges and tips pale or white, and suggest the darker shadow side with the mid-brown. Work the whole deer wet enough that colours blend softly at their boundaries — hard-edged tonal transitions will be sharpened with pen later, but the underlying washes should feel unified and smooth.
Once the bulk of the deer is done and dry, add the second pass of detail: the darker facial markings, the eye sockets, the nostrils, the folds in the back. These can be slightly crisper. Allow to dry fully before starting the background.
The Background
Mix a grayish-purple — the existing dark brown (burnt umber and ultramarine) with a little more blue and a touch of violet. This cool, slightly moody tone complements the warm deer and reads immediately as a wintry sky. Mix generously; the oval is a large area and running out mid-wash is a risk.
Work across the background in sections using two brushes simultaneously — a larger brush for the broad areas and a tiny brush for the edges close to the deer. Where you want the deer's fur to appear backlit or outlined against the sky (along the back of the neck, around the ears, at the chest edge), use the tiny brush to paint the background colour right up to and just into the fur edge, negative-painting individual hair wisps. This is where the white chest area really starts to glow.
While each section is still wet, drop in touches of additional blue and violet for colour variation. Sprinkle a small amount of salt into the wet wash before it starts to dry — a little goes a long way. The salt draws the pigment toward it, leaving soft circular marks that suggest distant or moving snowflakes once dry.
Work quickly through each section and do not use a hairdryer to speed up drying — it will scatter the salt. Allow to dry naturally, then gently brush away the salt crystals.
Pen and Ink Work
Use dark brown ink with a fine nib to sharpen the key details: the eyes (pupil, lid line, and the reflective highlight), the nostrils, the darker facial markings, the folds in the back, and the shadow side of the horns. Work slowly and deliberately — the ink is permanent. The goal is to tighten specific areas, not to outline the whole animal. If the pencil drawing is showing through the washes in the way you want, very little pen is needed.
Use a white gel pen for the brightest highlights: the top of the muzzle, the inner light edges of the horns, the fluffy ear fur, and any hair wisps in the background that were lost during the background wash.
White Gouache Snow
Use the oval cut-out template (or pieces of paper) to mask the area outside the oval and a small area over the deer. Load an old toothbrush with white gouache and splatter across the background — most of the snow should fall on the background, but a few flakes over the deer itself add depth and the sense of being outside in falling snow.
Remove the tape and sign.
Resources...
* Drawing to trace
* Reference photo
Join me on Patreon
Join my Adventures in Colour Tier for $16 to access this post and my full library of over 200 others including deep-dive videos and step-by-steps.