 Video on Patreon
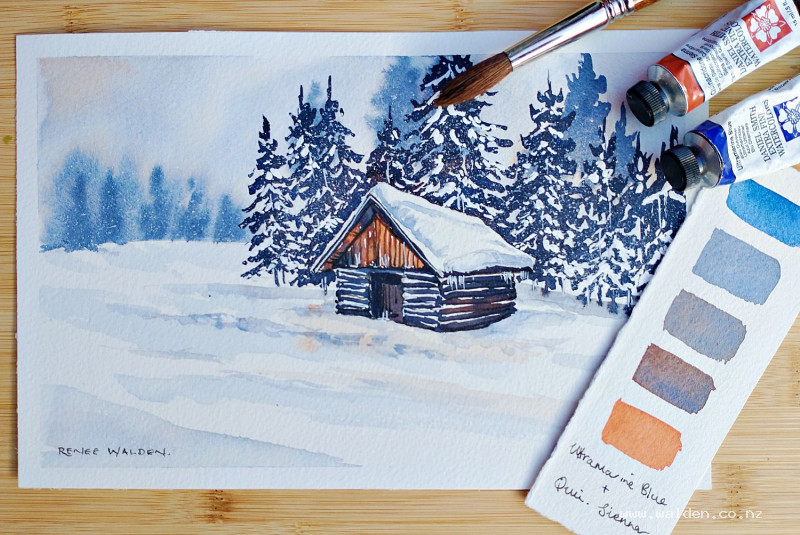
Winter scene in two colours
8 March 2023
Video - Level ◆◆◆
Beautiful greys and a very limited palette are the focus of this lesson. We'll use just two colours (a blue and a brown) to mix a range of greys to paint a little cabin in the snow. You can choose your favourite blue and brown and make this scene your own.
Video run-through...
About This Painting
A snowy forest scene with a small timber cabin — painted using just two colours, a blue and a brown. The entire painting, from the stormy sky to the dark conifers to the snow-laden roof, is mixed from these two pigments in varying ratios. The result is a harmonious, naturally varied range of grays that are far more interesting than anything from a tube, particularly when the two colours are allowed to separate out on wet paper.
Ultramarine blue and quinacridone sienna are used here, but any blue and brown pairing works — cobalt blue with burnt umber, or sepia with a blue, are both excellent alternatives. Raw sienna can substitute for quinacridone sienna.
You'll need white gouache, an old toothbrush for splattering, and a white gel pen for icicles and highlights.
A traceable drawing is available in the lesson description.
Before You Start: Make a Swatch
Before painting, make a small test swatch of your chosen blue and brown at different ratios: 50/50 for a neutral gray, more blue for a cool gray, more brown for a warm gray. Working very wet encourages the two pigments to separate on the page — ultramarine in particular is a heavy pigment that settles into the paper's texture while the sienna floats, creating beautiful granulated variation. Keep the swatch labelled for reference during the painting.
The Pencil Drawing
Mark in the cabin and indicate the tree trunks only — don't draw the full tree shapes, as the background trees will blend softly into the sky and a hard pencil outline would work against that. The cabin is made slightly smaller and moved up the page from the reference photo, giving more foreground to work with and making it feel more exposed in the weather.
The Sky and Background Trees
Wet the sky area, extending the water right across where the background trees and hills will sit. Drop in a very pale blue-gray wash — mostly blue with a small touch of brown, a lot of water. Warm it slightly in one or two areas by adding a touch more brown. Work carefully around the snow on the cabin roof.
While the sky wash is still wet but beginning to lose its sheen, drop in the most distant trees using slightly thicker paint, still biased toward blue. These soft, wet-into-wet marks will blur at the edges and read as trees deep in the mist. Test the wetness before committing — if the paint beads out too much, wait. If it sinks in without spreading at all, work quickly. Vary the tree heights and spacing; let some disappear into the background. Then drop in a second, slightly darker set of trees just in front of those, while the paper still has some moisture. Allow to dry.
The Snow Foreground
While the background dries, lay in some loose diagonal strokes across the foreground snow using a very dilute blue-gray. The strokes follow the slope of the terrain and help stop the eye from exiting the bottom of the painting. They also give the snow its shape — slightly darker in areas that are lower or more shadowed, suggesting the undulations of a well-used slope. Add a touch more brown near the cabin to suggest the warm wood colour reflecting into the snow.
The Foreground Trees
Once the background is fully dry, paint the close foreground conifers with thick, dark paint — much less water than before, allowing full pigment strength. These are the darkest marks in the painting and create the depth contrast against the soft background trees. Vary the mix between blue and brown as you go, keeping the paint wet enough that the colours still separate and granulate on the page. Hold the brush loosely toward the back end for a freer mark. Paint downward-angled strokes for the snow-laden branches, leaving deliberate gaps for the snow that will be added with gouache later. Vary tree widths, heights, and spacing; let one or two run off the edge of the page. Add a few light footprint and shadow marks in the snow near the cabin, softening some with a clean dry brush — keep this detail concentrated around the focal point.
The Cabin
Paint the protected woodwork under the eaves first — this is a warm golden brown (quinacridone sienna or similar), the only warm note in an otherwise cool painting. Paint in the direction of the timber grain, leaving small gaps where snow has settled between the boards.
For the log walls, use a mid gray (50/50 blue and brown) — the logs are old and weathered. Paint them loosely, varying thickness and direction to suggest irregular stacking. Leave small white gaps between logs for accumulated snow. Use slightly more brown for the door to distinguish it from the wall.
For the roof snow, use a very blue, very dilute mix with plenty of water. Snow on a roof mounds and rounds except at the eaves where it is about to fall, which creates a hard lower edge. Work in small sections: lay in the shadow colour, then immediately soften most of the edge with a clean dry brush, leaving it hard only where the snow breaks away at the edge. Slightly darker marks suggest where the snow is thick enough to crack and slide.
White Gouache: Snow on Trees and Splatter
Use white gouache on a separate small palette. With a fine brush, add snow to the darker foreground tree branches — just enough to suggest weight and accumulation without covering the tree structure. Use the same brush to touch up the cabin roofline if needed.
Cover the cabin and use an old toothbrush to splatter white gouache across the painting for falling snow. Test on scrap paper first to judge the size of the drops.
Pen and Ink Work
Use dark brown ink with a fine nib to define the cabin: door frame, window, log end-grain, and any structural details that need sharpening. Keep marks on the shadow side — underneath the eaves and on the right-hand edges. A few broken lines are enough; don't outline everything.
Use a white gel pen for the icicles hanging from the eaves — short, tapered strokes downward. Also use it to pick out snow accumulated on tree trunks and to restore any roof snow edges that need brightening.
Remove the tape and sign.
Resources...
* Drawing to trace
* Reference photo
Join me on Patreon
Join my Adventures in Colour Tier for $16 to access this post and my full library of over 200 others including deep-dive videos and step-by-steps.