 Video on Patreon
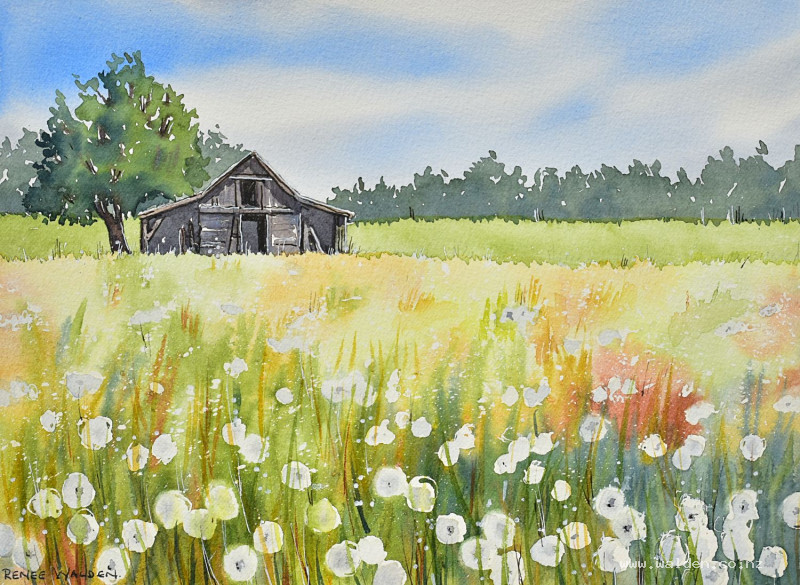
A barn in a field of dandelions
19 April 2023
Video - Level ◆◆◆
Here's one of the happiest paintings I've done in a while! A barn in a field of dandelions. I just want to run through and set them all off :-)
There are a lot of wonderful parts to this painting - big areas of wet-in-wet, wet-on-damp, dry brushing, and effective use of masking fluid. There's a wooden barn, trees, bushes and a field of weedy dandelions.
Having said all that, it's not a complicated lesson at all!
Happy painting!
Video run-through...
Barn in Dandelion Field
This painting captures the cheerful energy of a summer meadow filled with dandelions, with a weathered barn providing a quiet backdrop to the natural abundance. The focus is entirely on the dandelions themselves, from the large blooms in the foreground that feel close enough to touch, to the tiny distant dots that fade into the background. The composition simplifies the scene intentionally, scaling down the barn and removing distracting elements so that the dandelions take centre stage. The result is a joyful painting that makes you want to run through the field and watch the seeds scatter.
Simplifying the Scene
The composition is an interpretation of the reference photograph rather than a direct copy. The barn has been scaled down to become a secondary element rather than the main subject, allowing a large area for the dandelion field. Only a single tree remains, with everything else removed from the scene. This simplification creates space to focus on what matters most: the dandelions themselves, from the foreground blooms down to the smallest marks in the distance.
Applying Masking Fluid for Dandelions
The dandelions are created using masking fluid applied in two different ways to achieve varied sizes. For the smallest dandelions in the background, use a toothbrush. Scrub the bristles quite hard and fill them with normal hand soap first, then load with masking fluid. The soap makes cleanup much easier. Flick the masking fluid across the back of the painting and into parts of the foreground to create tiny marks for the distant dandelions.
Once the small background marks are complete, switch to a ruling pen for the larger dandelions. If you don't have a ruling pen, a paintbrush works well, again loaded first with soap and then masking fluid. Make some of the dandelions extend off the page so it feels like you're standing among them, as if they're around your knees and mid-calf, surrounding you in the field.
If you get masking fluid in the wrong place while splashing it on, such as up in the sky area or in the back trees, wait until it's thoroughly dry, perhaps an hour or two. Before you start painting, use a clean soft eraser to remove any marks that feel out of place. Remove any from the sky area, and check for any dandelions that are too large for their position in the composition. Tidy these up before moving forward.
Painting a Summer Sky
The reference photograph had a very white, boring sky. Since there's quite a bit of sky visible in this composition, it deserves to be more cheerful and interesting. Create a summer sky to match the energy of the dandelions, but keep it relatively simple since there's already a lot happening in the dandelion area.
Using a one inch flat brush with clean water, wet the sky area right down over the back trees and the single tree as well. The flat brush is helpful for framing neatly around the building. If too much of a bead forms along the bottom edge, pick it up with your paper towel. Wet the paper once and let that water sink into the cotton fibres while you mix your colours, then come back with another layer of water so you can drop colours into that layer rather than having them stick directly to the paper.
Mix cobalt blue for the main sky colour. You'll need quite a bit since it's a fairly large sky. For the area towards the horizon, create a warm grey by mixing cobalt blue with a touch of burnt umber, using slightly more burnt umber than cobalt blue for a gentle haze. Keep the values light.
After mixing your colours, the paper will have dried somewhat, so re-wet the sky with a clean brush to create a fresh layer of water. If too much of a bead forms at the bottom, use your paper towel to grab it. Load your brush completely with paint, filling it right to where the ferrule is. Gently add streaks into that layer of water without scrubbing into the page. Stroke in one direction, then another, keeping the sky darker at the top where it's overhead and lighter towards the horizon. Add just a touch of that warm grey for colour variation.
Pick up any beads of paint so nothing runs back into your sky and creates cauliflowers, particularly along the tape edges. Let the sky dry naturally rather than using a hair dryer. If the paper is properly wet, the paint will move for a long time, creating lovely soft edges without visible brush strokes. If you dry it with a hair dryer, it stops moving immediately, and any additional brushwork will show. If you're happy with how it looks, you can drop your painting flat and let it dry completely.
Planning the Dandelion Field
Before painting the foreground, consider the different areas and how they'll work together. The area immediately around the dandelions is busy with texture, grasses, and a lovely implied cast shadow that suggests another tree just out of view. This foreground area has a bright, greeny-yellow quality. The area in the back, which appears to be plowed and planted with grass, should read as a more straightforward greeny-green.
The back area will be painted first with simpler treatment, while the foreground with all its texture and activity gets more attention and layering. Make sure your masking fluid is completely dry before you begin. It should start milky when first applied and become more transparent as it dries, no longer tacky to the touch. Don't dry masking fluid with a hair dryer, as it's a latex product that can melt into your paper.
Painting the Back Field
Wet the entire back field area first to give yourself plenty of time to work. Use the same approach as the sky: wet the area once to let it absorb into the cotton fibres, mix your colours, then wet it again so the second layer of water sits on top and you can work into it without the colours sticking directly to the paper.
For the colour mixes, you'll need sap green, green gold, burnt sienna, and natural sienna. Mix a generous amount of a greeny-green from the sap green and green gold. Add another version that leans more towards the burnt sienna for warmer passages. Create a third mix that's even warmer with the natural sienna and burnt sienna. Having these mixes ready before you start keeps you from rushing.
Once the paper has absorbed that first layer of water, go back in with clean water to create a fresh wet layer on the surface. Make sure you have a nice shine but not too much of a bead. Load your brush with the greeny-green mix, filling it completely, and drop the paint in gently, letting it move on its own within the water. Start at the back near the horizon with lighter values and work forward with slightly darker values.
Add some of the warmer green that leans towards brown in places to create variation. Let the colours mingle naturally on the paper. Add the warmest mix sparingly for further colour interest. The paint should be moving and blending softly since you're working wet-in-wet. If you feel an area looks too flat, you can go in while it's still damp and add a darker green, but be gentle and don't fiddle too much. Trust the wetness to do the work. Let this dry completely before moving on.
Building the Foreground Field
The foreground gets more complex treatment with multiple layers. Start the same way by wetting the entire foreground area, letting it absorb, mixing colours, then re-wetting. You'll use the same greens: green gold, sap green, natural sienna, and burnt sienna, but with more variety in how they're applied.
Make sure you have a generous amount of paint mixed and ready. The foreground needs brighter, more yellow-leaning greens, so favour the green gold. After re-wetting the surface, load your brush with the bright greeny-yellow and drop it in, working all across the foreground. Add the warmer mixes while everything is still wet, allowing the colours to mingle.
The beauty of working this area wet-in-wet is that you don't have to be too precise. The paint will move and create organic, natural-looking texture on its own. Add darker passages as you work, creating depth. You can be quite free with how you apply the paint. If you feel you've added too much of one colour, you can lift a bit with a damp brush or add another colour to balance it.
Once the first layer is down, let it dry partially, not completely. You want it damp but not soaking wet. Then you can start adding texture. Take a rigger brush or a smaller brush and paint in some grass stalks using those same colours, but now the strokes will be more defined since the paper is only damp rather than soaking wet. Add some warm stalks, some cooler stalks, varying the heights and angles to make it feel natural. Work these marks across the foreground, more concentrated in some areas, lighter in others.
Adding the Implied Shadow
There's a lovely cast shadow that runs across the foreground field, implying a tree that's just outside the composition. This shadow adds wonderful dimension and pulls the viewer's eye across the painting. While the foreground is still workable, mix a shadow colour from cobalt blue and burnt umber, leaning towards the blue. Keep it fairly light since it's falling on bright grass.
Using a flat brush, paint in the shadow shape, working quickly and confidently. The shadow should be darker where it's closest to the implied tree and lighter as it stretches across the field. Let the edges be soft and organic, not hard-edged. If you've timed it right and the paper is still slightly damp, the shadow will blend gently into the grass colours. If the paper has dried too much, you can pre-wet just the shadow area before adding the colour.
Dry-Brushing Foreground Texture
Once the foreground is completely dry, you can add another layer of texture using dry-brush technique. This creates the scratchy, wild texture of a meadow filled with grasses. Load your brush with paint but wipe most of it off so the brush is nearly dry. Using the same colour mixes from before, drag the brush across the paper quickly and lightly. The paint will catch on the texture of the paper, creating broken, natural-looking marks.
Work with different colours: some strokes with the green gold for bright yellow-green grasses, some with sap green for cooler passages, some with the siennas for brown stalks. Vary the direction and length of your strokes. Make some marks short and choppy, others longer and more flowing. Build up this texture gradually. Step back frequently to check how it's reading from a distance.
The dry-brush technique is particularly effective in creating the sense of countless individual grass blades and stalks without having to paint each one. Let your hand move freely and quickly. The marks should feel spontaneous and natural, not laboured.
Painting the Barn
The barn is intentionally understated since it's a secondary element. Begin with the shadow side of the structure. Mix a grey from cobalt blue and burnt umber, leaning towards the burnt umber for warmth. Keep the value fairly dark but not overly intense. Paint the entire shadow side of the barn in this colour, using smooth, even strokes.
For the sunlit side of the barn, mix a warmer colour using natural sienna with just a touch of the grey from before. This side should be noticeably lighter and warmer. Paint it in with confident strokes. While it's still wet, you can drop in a bit more of the grey mix to show some weathering or boards, but keep this subtle.
Under the eaves, add a darker shadow using the same grey mix but with more cobalt blue and less water. This shadow grounds the roof and gives the structure form. Keep the edge a bit wobbly to suggest an old, weathered building. Paint the cast shadow the barn throws onto the ground, making it wider on the side where the sun is coming from and narrower on the opposite side.
For the interior of the doorways, use your darkest mixture, nearly pure indigo or a very dark mix of cobalt blue and burnt umber. These darks should be rich and thick. Fill in the doorways completely. This deep shadow creates strong contrast and helps the barn read clearly even though it's small in the composition.
Painting the Tree
The single tree is painted simply, matching the barn in its level of detail. Mix a grey-green for the foliage using sap green with cobalt blue and burnt umber. Keep it fairly dark since the tree is creating shade. Using a damp brush, dab in the foliage mass loosely, not trying to paint individual leaves. Let some of the paper show through in places to suggest light filtering through.
For the trunk and main branches, use burnt umber darkened with a touch of indigo. The trunk should be darker on one side where it's in shadow. Paint the main trunk and a few key branches, but don't overwork it. The tree should feel secondary, supporting the composition without demanding attention.
Painting the Distant Trees
The trees along the horizon line should recede into the distance, reading as a soft, hazy backdrop. Mix a pale version of your grey-green, adding more water to keep it light. Using a flat brush, paint these trees with very simple shapes, nearly silhouettes. Keep the values close to the sky value so they don't jump forward. Let the edges be soft. These trees should barely be there, creating depth but not competing with the foreground activity.
Removing and Softening the Masking Fluid
Once everything is completely dry, it's time to reveal the dandelions. Use a clean rubber eraser or your finger to gently rub away the masking fluid. Work carefully so you don't damage the paper. The masking fluid should lift away easily, leaving white shapes behind.
Now you'll have stark white dandelions, some of which will need softening to look more natural. Take a damp brush and gently rub along the edges of some of the dandelions, particularly those in the background and middle ground. This sets them into the painting more naturally and prevents them from looking too static and cut-out. Leave some dandelions with hard edges, especially in the foreground where you want them to stand out crisply. Choose which dandelions to soften based on what will make your particular painting look best. Work gently to avoid damaging the paper.
For the dandelions furthest back, you'll want to soften them the most, as you want the brightest whites to be in the foreground, with the background dandelions settling back into the space.
Adding Form to the Dandelions
The white dandelions need some shading to give them form and make them read as three-dimensional. Use the same grey mix from earlier: cobalt blue and burnt umber. Working quickly, wet a few dandelions with clean water, then drop that grey mixture in on the left-hand side of each one, assuming the light is coming from the right. The paint will spread softly on the damp surface.
Work through your dandelions methodically, adding this same shading to each one. You don't need to be overly accurate. For the dandelions in the background, you can settle them even more by making the shading slightly more prominent, which helps them recede into space.
Some dandelions need a slightly darker centre to make them look more like dandelions and less like cotton wool buds. While the shading on the left side is still damp, drop in a small, darker mark near the centre using the same grey mixture but with less water. This simple addition gives the impression of the seed head's structure.
Sharp Foreground Grasses
Once the paper is thoroughly dry, add the sharpest, most defined grasses in the foreground. These grasses should be particularly distinctive where they cross over the dandelions, since not all the dandelions are in front of all the grasses. This layering creates depth.
Use the same colours as before: green gold, sap green, natural sienna, and burnt sienna. Load your brush with paint and start your stroke off the page, flicking across the paper to create sharp grass blades. Paint some in green gold, some in sap green, some in the warm siennas. Vary the lengths and angles.
Try to be free and spontaneous, but be thoughtful about preserving some of your dandelions so they still read as being in front of the grasses. Don't overdo this step. Add enough grasses to create texture and interest, but not so many that they overwhelm the dandelions.
For the darkest, most prominent grasses, use indigo straight from the pan. These dark marks carry weight, so use them thoughtfully. They're particularly effective for indicating the stalks of the foreground dandelions. Be sparing with the indigo, as it's very dark and can quickly dominate.
Knowing When to Stop
At this stage, step back from your painting and view it from a distance. Remember that anyone looking at your finished painting will see it from across a room, not from the close working distance you've been using. Check whether you've added enough detail or if you're starting to fuss. A good rule is this: if you have your brush in your hand and you're thinking about what to do next, or you're hesitating, it usually means you should put the brush down. That moment of uncertainty often signals that your painting is complete.
Adding Pen Work
Pen work adds the final layer of detail and definition, but it should be subtle enough that viewers almost don't notice it was used. Start with a fountain pen filled with dark brown ink, focusing primarily on the barn. Add pen lines under the eaves to sharpen that shadow, define the edges of the boards on the shadow side, and add a few marks to suggest weathering and texture. Keep the pen work minimal. The barn is not the focal point, so don't overwork it.
Add tiny bits of pen work elsewhere to balance what's happening at the barn. Draw some branches in the tree, maybe indicate a few tree trunks in the background trees, and add a few marks in the foreground. Start these marks off the page, on the tape, and bring them across onto the painting. Keep them very gentle, especially within the dandelions since they're so soft and delicate.
Use a white gel pen for anything catching light. If your gel pen stops working, it's usually because some pigment has clogged the nib. Dunk it in your water, clean it on your paper towel, and it should flow again. Add white marks across the whole painting to make it work together, perhaps highlighting a few things on the sunlit side of the barn. Be cautious with white ink as it will be whiter than your paper and can look odd if overused.
With a white acrylic ink marker, you can add some extra dots and marks to make it look like there's abundant activity in the foreground. Use this sparingly, as the white of the ink differs from the white of the paper. Test in an inconspicuous area first. If you find yourself fussing and overthinking where to add marks, it's time to stop.
Final Assessment
Step back and look at the painting as a whole. The composition should feel joyful and full of summer energy, with the dandelions taking centre stage and the barn providing quiet context. The scale should draw the viewer in, making them feel as though they're standing in the field, surrounded by blooms. The layering of different sized dandelions from large and crisp in the foreground to tiny and soft in the distance creates depth and space. The implied shadow and varied grass textures add to the sense of a real, living meadow. This is a painting that feels happy and alive.
Resources...
* Drawing to trace
* Reference photo
Join me on Patreon
Join my Adventures in Colour Tier for $16 to access this post and my full library of over 200 others including deep-dive videos and step-by-steps.