 Video on Patreon
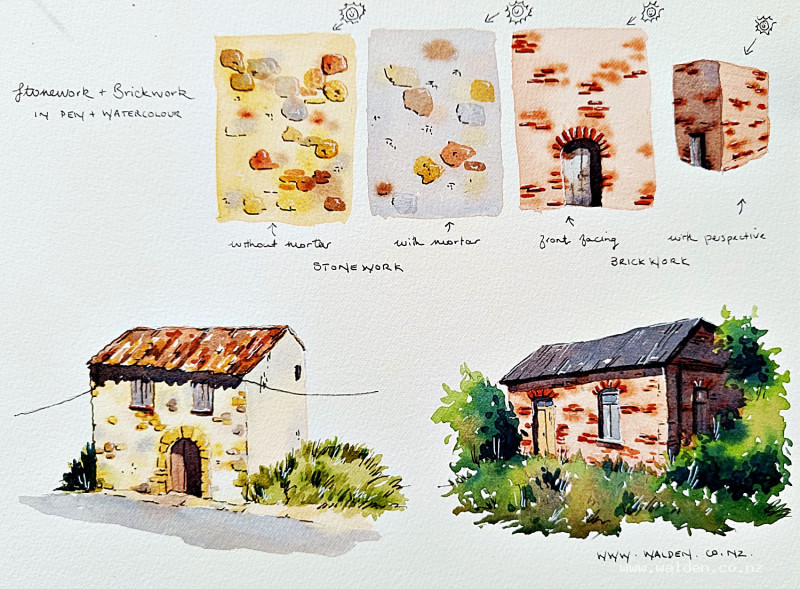
Stonework and brickwork
26 April 2023
Video - Level ◆◆◆
It's not necessary to paint every single stone or brick ;-)
In this skills lesson I show you how to simplify stonework and brickwork in pen and watercolour. First we'll do a few of small exercises for each and then we'll use the skills to paint two pretty little buildings.
There's a downloadable worksheet below for you to print out and keep.
Video run-through...
This hour-long video covers the following material.
About This Lesson
Stonework and brickwork are among the most common elements in architectural watercolour, and one of the most common mistakes is trying to paint every single stone or brick. This lesson teaches a simpler, more effective approach: establish the overall colour first, suggest a selection of individual elements, and let the viewer's eye fill in the rest. The lesson covers two types of stonework, a brickwork exercise, and then puts all three techniques into practice in two small scenes.
A downloadable worksheet is available in the lesson description.
The Core Principle: Overall Colour First
Before painting any individual stone or brick, identify the overall colour of the wall — what you see when you stand back and squint, or when you look at the wall as a whole rather than its parts. For a stone wall, this might be a warm limestone tone. For a mortared wall, it's the mortar colour that dominates. This overall colour becomes the first wash, painted across the entire surface. Individual stones or bricks are added into or over this wash, not instead of it.
The goal throughout is to give the viewer just enough information to understand what the surface is made of — then let them participate in completing the picture. A wall that suggests stonework invites the eye; a wall where every stone is painted in equal detail exhausts it.
Exercise One: Tightly Packed Stonework
For stone walls where the stones sit close together with little mortar — like a dry stone wall — the overall colour is the colour of the stone itself. Mix natural sienna with plenty of water for a light limestone tone and paint the whole area. While still wet, drop in individual stone marks in varying browns and grays: a slightly thicker mix of the same sienna, some burnt sienna for warmer stones, a touch of gray for the cooler ones. Vary the sizes and shapes. Let some touch each other, keep others slightly apart. Don't follow a pattern — no rows, no regular spacing, no polka dots.
This is the first pass only. Once dry, come back with a slightly smaller brush and a thicker mix to define a handful of individual stones more clearly — a few rounded ones here, a couple of small ones there, the occasional unusually shaped one. Aim to use the marks you've already created as guides rather than painting over them. Stop before you feel finished; the wall will look more convincing with some areas left loose than if every stone is accounted for.
Exercise Two: Mortared Stonework
When the mortar is prominent — lots of space between the stones — the approach reverses: the overall colour is the mortar colour, not the stone colour. Mix ultramarine blue with quinacridone sienna (or any blue with any brown) for a warm, complex gray. Working wet so the two colours separate on the page, paint the entire surface. This separation of blue and brown in the wash creates natural texture that already reads as concrete or mortar without any additional work.
While still wet, drop in individual stones — but further apart than in the first exercise, reflecting the wider mortar joints. Same principle applies: vary the size, shape, and colour, don't let them touch too often, and avoid any suggestion of pattern.
On the second pass once dry, add a few more defined stone shapes, but be even more restrained than with the tightly packed wall. The mortar dominates here, and too many stones will undermine that reading.
Pen Work on Stonework
Once dry, a fine pen with dark brown ink adds definition on the shadow sides of individual stones — the edges where one stone sits underneath another, or where a stone casts a small shadow onto the mortar beside it. Don't outline every stone; pick out a selection on the shadow side only. A white gel pen on the lit upper edges of a few prominent stones adds sparkle and suggests the slightly rounded or rough surface of real stone.
Exercise Three: Brickwork
Brickwork follows the same layered approach, but with an important addition: perspective. Bricks are laid in horizontal courses, but those courses are only truly horizontal at eye level. Above eye level, the courses slope downward as they recede; below eye level, they slope upward. Before painting, establish your eye level line and indicate the direction of the brick courses with light pencil marks. Where bricks arch around windows or doorways, indicate those directions too. This thinking done in pencil means it doesn't need to be done mid-painting.
Mix burnt sienna (or your preferred reddish-brown) with plenty of water and paint the entire brick surface as a flat wash. While still wet, use a smaller brush to suggest some of the courses — following the perspective established in the pencil drawing. Even at this early stage, perspective-correct brick courses make the building look three-dimensional.
On the second pass once dry, use thicker paint to define individual bricks in a few key areas — particularly where courses change direction (around arches, at corners), and wherever the pencil marks indicate structural interest. Not every brick needs to be painted — just enough to confirm what material it is.
Applying the Techniques: Two Scenes
Scene One: A Stone Building
The stone building is painted working from back to front. The overall stone colour (natural sienna or similar) covers the walls first, with stone marks dropped in wet. The roof — corrugated iron — is painted in the same ultramarine and quinacridone sienna gray mix used for the mortared stonework exercise, applied wet in the direction of the corrugations with a few white gaps left to suggest the reflective quality of metal.
Shadows are planned in pencil before painting — the cast shadow from the eave, the shadow on the side wall, and the darkness inside windows and door openings. The shadow wash (ultramarine and quinacridone sienna, well diluted) is applied as a transparent glaze so the stonework and details beneath remain visible. A second, slightly darker pass under the eave and inside the windows deepens the contrast and brings the building forward.
Pen work on the shadow sides of the building elements, and a white gel pen on the highlighted edges, finishes the scene.
Scene Two: A Brick Building
The brick building uses burnt sienna as the base wash across all facades. Sap green with a touch of indigo (shadowed) and brown (to avoid too-perfect greenery) surrounds the building, complementing the warm red brick beautifully. Let the green dry before continuing with the brickwork details.
As with the stone building, plan the shadows in pencil first, checking perspective carefully. The shadow wash (transparent, well diluted) goes over the darker facade and inside the windows, immediately making the building read as three-dimensional. A second shadow layer under the eave strengthens the depth.
Note that the light source shifts between the two scenes — in the stone building it comes from one side, in the brick building from the other. Keep this consistent throughout each scene: shadow sides, pen work, and highlights must all agree on where the light is coming from.
Key Takeaways
Paint the overall colour first, always. Stand back, squint, and identify the dominant tone — stone, mortar, or brick — before adding any individual elements.
Suggest, don't document. A handful of well-placed stones or bricks reads as convincingly as a wall where every element is painted. The viewer's imagination fills the rest.
Vary everything. Size, shape, colour, spacing — avoid regularity and pattern in all of them.
Perspective matters for brickwork. Establish the eye level and brick course directions in pencil before picking up a brush.
Shadows do the heavy lifting. A flat wall becomes a building when a transparent shadow glaze is applied. Be brave and put them in.
Resources...
* Worksheet
* Reference photo
* Reference photo
Join me on Patreon
Join my Adventures in Colour Tier for $16 to access this post and my full library of over 200 others including deep-dive videos and step-by-steps.