 Video on Patreon
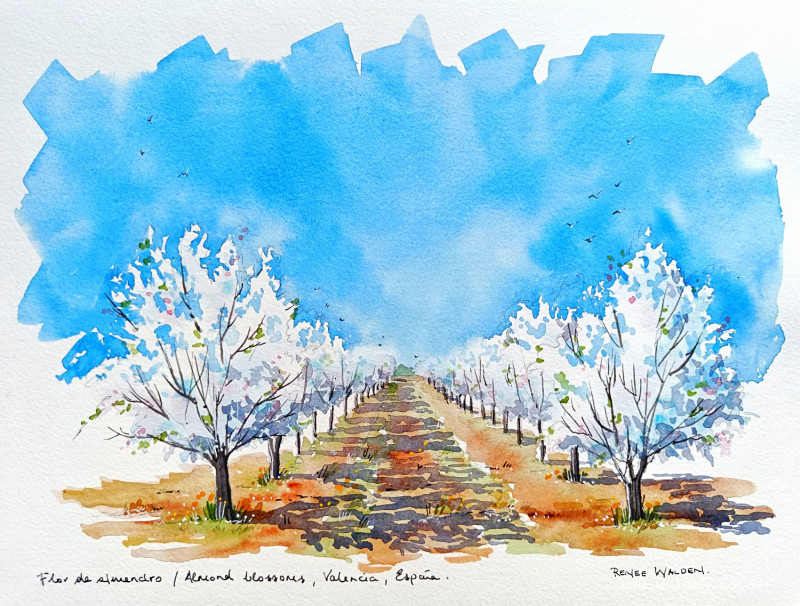
Blossoming almond orchard
17 May 2023
Video - Level ◆◆◆
A few weeks ago the almond blossoms were out in full abundance. Solid white trees, lots of bees and a wonderful smell.
You may have seen my sketch that I did of this orchard on
Video run-through...
About This Painting
Almond blossom season in Valencia — rows of trees in full bloom, the air full of bees and the scent of flowers, a tractor path leading the eye straight into the distance. This painting was first sketched on location in the orchard and then repainted in a studio setting to explore the full range of delicate spring colours. It's a lesson rich in technique: one-point perspective for the rows of trees, pastel wet-on-wet washes for the blossoms, and cast shadows that follow the same perspective lines as the trees themselves.
A traceable drawing is available in the lesson description.
Drawing the Orchard: One-Point Perspective
This scene is a classic example of one-point perspective — two rows of trees converging to a single vanishing point in the distance, with the path between them leading the eye in. Working through the drawing step by step before picking up a brush is worth the investment here.
Step one: the eye level line. Standing in the orchard at ground level, your eye level is roughly one and a half to two metres above the ground. Draw a horizontal line across the page at roughly this height — this is your eye level, and the vanishing point sits on it, centred between the two rows.
Step two: the first trunks. Draw the two foreground trees first, one on each side of the path. These are the largest and most detailed — the trunk is visible from the ground up to where the blossom canopy begins, and the canopy itself is roughly three times the height of the trunk. Give the trunks a slight lean; the wind shapes real trees.
Step three: the receding rows. Each successive trunk along the row is both shorter and thinner than the one before, and the gap between trunks also narrows. This double reduction — in the size of each tree and in the spacing between them — is what creates the convincing sense of depth. Draw the trunks getting progressively smaller until they become barely distinguishable marks near the vanishing point.
Step four: the path. The path between the rows follows the perspective lines, narrowing as it recedes. A slight texture in the centre (where the tractor drives) and grassy strips on either side add variety without complexity. This path is a key compositional element — it draws the viewer directly into the painting.
Erase construction lines before painting. Work lightly, particularly in the background trees, as the whole scene will be predominantly white and pale.
Painting the Sky
Mix a large pool of cerulean blue (or your preferred spring blue — something lighter and more cheerful than ultramarine, which can feel too heavy for this mood). Also prepare opera pink or a pale permanent rose, very diluted.
Wet the sky area thoroughly — including over the background trees, which will be soft and hazy anyway. For the foreground trees, wet around them carefully. Check from the side for dry patches, then wet again so a layer of water sits on the surface.
Drop in the cerulean blue in the upper sky, leaving some white cloud areas. While still wet, bring a very diluted wash of pink into the lower sky and along the tops of the background blossom canopy — this warmer tone against the blue gives the sky the luminous, slightly golden quality of spring light. Let the two colours blend softly. The sky should feel open, airy, and bright — not dramatic.
Painting the Blossom Canopy
The blossoms are mostly the white of the paper, with soft pastel colour dropped in to suggest depth and shadow. Work with very diluted mixes throughout — this is not the place for saturated colour.
For the background trees, wet the entire canopy area and drop in an extremely diluted wash of pale pink. The blossoms at the back are a soft, almost colourless haze — they're far away and in full bloom, so much detail is lost. Let the wash be very pale and uneven.
For the foreground trees, work slightly more firmly. Still keep the blossoms predominantly white, but use a slightly more concentrated pink on the shadow sides of the canopy and underneath where the foliage is densest. The light comes from the left, so the right-hand side and undersides of each tree are slightly darker. A touch of very diluted lavender or blue-gray in the deepest shadow areas suggests the cool shadow within the canopy.
Vary between hard and soft edges throughout. Some areas of the canopy edge can be soft and lost — where the blossom dissolves into sky — and others can be slightly harder where a branch or denser cluster creates a more defined shape. Resist the urge to paint every individual flower.
Trunks and Branches
Once the canopy washes are dry, mix a dark warm brown — the browns already on the palette with a little ultramarine blue added to darken and cool it slightly. Use a small brush for the trunks, painting from the ground upward and teasing the mark into the blossom canopy so the transition feels natural rather than cut out. At the base, use a little negative painting around the grasses to settle the trunk into the ground.
Switch to a rigger brush (or a number zero round) for the finer branches — these flicking upward marks are what make the tree structure suddenly make sense. Use much more water for the background trunks so they're lighter and less assertive than the foreground ones.
Add a simple stone wall and bush at the far end of the path to close off the composition — without something there, the path feels like it goes over a cliff.
Blossom Details and Ground
With a tiny brush, add individual blossom dots in very pale pink and white, concentrated in the foreground trees and sparser toward the back. Keep them random — no polka-dot patterns. A few small green marks and brown fragments in the foreground ground suggest grasses, twigs, and stones. A few tiny daisies extend the spring feeling into the path itself.
The Cast Shadows
The shadows are what bring the perspective alive and transform the painting from a pleasant sketch into a fully resolved scene. Each tree casts a shadow to the right (light coming from the left), and — crucially — these shadows follow the same perspective lines as the tree spacing. The shadow from each trunk runs out from the base and extends along the ground to the perspective line at the edge of the grassy strip. The foreground shadows are wider, darker, and more separated; as they recede, they become narrower, lighter, and closer together, until at the back they're nearly merged.
Mix the shadow colour from ultramarine blue, burnt umber, and a touch of permanent violet — an interesting, slightly warm purple-gray. Don't overmix: some colour variation in the wash makes the shadow more lively. Start with the foreground shadow, full strength, and add progressively more water for each successive shadow as you move back through the orchard. Check the perspective lines with your drawing as you go.
While the shadow mix is still on the brush, add a little forming to the right-hand side of each canopy — a light glaze that makes the tree feel round rather than flat.
Pen Work and Finishing
Four tools are useful at this stage, all optional: dark brown ink in a fine pen, a white gel pen, a white Molotow marker (or white gouache and a tiny brush), and a yellow Posca marker (or thick yellow paint).
The dark brown ink tightens the shadow sides of the trunks and adds finer branch marks than even the rigger can achieve. A few grass stalks around the base of the foreground trunks settle them into the ground. The white gel pen picks up the highlight side of branches and can be used to break up any branches that look too thick or heavy. White gouache or acrylic ink, flicked or dotted, adds a few fallen blossoms on the ground and recovers any lost white marks where branches meet the sky. The yellow marker adds small daisies in the path.
Finally, add a scatter of small birds in the upper sky — odd number, varying sizes and positions, some higher and some lower. They give life and movement to an otherwise still scene and reinforce the feeling of a warm spring morning.
Resources...
* Reference photo
Join me on Patreon
Join my Adventures in Colour Tier for $16 to access this post and my full library of over 200 others including deep-dive videos and step-by-steps.