 Video on Patreon
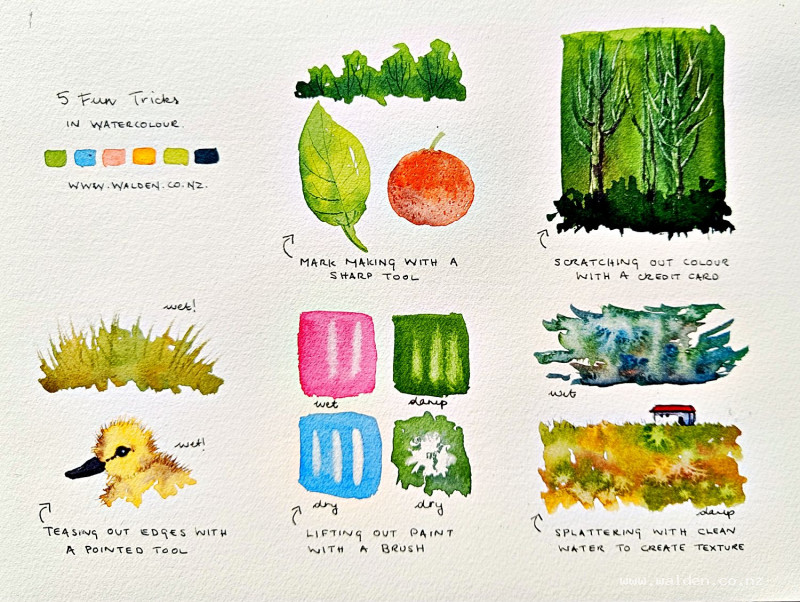
5 watercolour tricks
7 June 2023
Video - Level ◆◆◆
In this lesson I introduce you to 5 things you may not have tried in watercolour and give you a few ideas on how to use these new tricks.
Tricks ...
- mark making with a sharp tool
- scratching out colour with an old credit card
- teasing out colour with a sharp tool
- lifting out colour with a brush
- splattering with clean water to create texture
Give them a go, and then challenge yourself to use some of them in your next painting.
There's a downloadable worksheet below for you to print out and keep.
Video run-through...
About This Lesson
A collection of practical techniques that appear across many different lessons — gathered here onto a single worksheet so they're easy to refer back to. The techniques covered are: mark-making by denting into wet paint with a sharp tool, lifting out paint with a credit card, lifting out highlights with a brush, and creating texture with clean water. Each works differently depending on timing, paper type, and paint pigment, and understanding those variables is what makes them useful rather than unpredictable.
A downloadable worksheet is available in the lesson description.
The Core Variable: Timing
Almost every technique in this lesson depends critically on when you apply it. Watercolour paint goes through three distinct stages as it dries: very wet (paint flows freely), damp (paint is still slightly mobile but beginning to set), and dry. The effect you get from any mark-making or lifting technique changes significantly depending on which stage you're working in. The single most useful thing you can do with any of these techniques is test them at all three stages on a scrap of paper before applying them to a painting.
The most dangerous stage for unintended effects is what might be called the "damp is dangerous" phase — not wet, not dry, but somewhere in between. A brush with even a little too much water at this stage will create a cauliflower bloom. For lifting techniques this needs extra care; for texture effects it can be deliberately exploited.
Technique One: Mark-Making with a Sharp Tool (Denting)
Useful for: tree trunks in foliage, leaf veins, dimpled textures (fruit skin, stone surfaces), grass marks.
Sharp tools that work well: a sgraffito pottery tool, a mechanical pencil with the lead retracted so the metal tip shows, the pointed handle end of many brushes, or an empty ballpoint pen. Each gives a slightly different mark width and depth.
How it works: Paint an area normally and while still very wet, press the tool gently into the wet paint to create a dented line. The paint runs into the indentation and settles there as it dries, leaving a dark mark exactly where you pressed. Work gently — enough to dent the paper fibres without tearing or cracking the surface. The marks will be invisible or nearly invisible while wet, becoming clear as the paint dries.
Trunks in foliage: Paint a mass of foliage with sap green and indigo, working wet with good dark tones. While still wet, press the tool in to draw trunk and branch lines upward through the green. The paint collects in the indentations and the trunks appear as darker marks within the foliage once dry.
Leaf veins: Paint a leaf in green gold with some indigo variation, then use the tool to press in the central vein and the branching side veins while still wet. Work quickly before the paint starts to set.
Stippling for texture: For a dimpled surface like an orange or mandarin, paint the fruit, add shadow with a touch of brown on one side, then stipple the surface all over with the tip of the tool while still wet. The resulting texture suggests the fine bumps of citrus skin.
Technique Two: Lifting Out with a Credit Card
Useful for: distant tree trunks in a forest, rock highlights, foreground grass streaks.
An old credit card works well because its edge can be used in different orientations and the corners give different mark widths. Some painters collect several cards cut to different shapes — sharp corners, blunt curves — to create a toolkit of different marks. Long fingernails can also work for similar effects.
How it works: Paint an area in a dark, richly loaded wash and allow it to settle briefly until it's damp but not fully set. Then drag the edge or corner of the card through the paint in a quick, decisive stroke. The card displaces and lifts the paint, leaving a lighter mark — almost the colour of the paper — where the card passed. Clean the card edge on a paper towel between strokes.
Timing is critical: too wet and the paint floods back into the mark; too dry and the paint won't lift. Test on a scrap piece. The paint should feel tacky rather than flowing.
Silver birch trunks: Paint a dark forest background with sap green, indigo, and burnt sienna. Let settle until damp, then drag the card corner upward to create pale trunks. Once dry, add grounding bushes at the base of the trunks and a shadow on one side with a small brush to make them look three-dimensional rather than flat marks.
Applications: The same technique works for rock highlights (diagonal strokes across a gray-brown rocky wash), and for streaks of light in foreground grass (upward or angled strokes across a green meadow wash).
Technique Three: Lifting Out with a Brush
Useful for: soft highlights on petals, beetles, curved surfaces; recovering areas where paint has gone where it shouldn't; softening masking fluid edges after removal.
How it works: A clean, damp brush — damp, not wet — is rubbed gently over an area of paint to loosen and lift colour. The loosened paint is then dabbed away with a paper towel. The effect on the painting depends on the timing:
- Very wet paint: Lifting creates a very soft, diffuse highlight with gradual edges. The mark blends into the surrounding colour.
- Damp paint: Creates a softer result but requires more care — too much water on the brush at this stage will create a cauliflower. Dry the brush almost completely on a paper towel before each stroke. The resulting highlight has slightly rougher edges, almost like a dry-brush effect in reverse.
- Dry paint: The brush can be used repeatedly on the same spot to lift progressively more colour, potentially recovering close to the white of the paper. This gives the most control but also the hardest edges.
Paper and pigment matter: Some papers lift paint much more readily than others — Fabriano Artistico is particularly good for this. Quinacridone and phthalo pigments are staining colours: they lift well while wet but resist lifting once dry. Test your specific paper and pigment combinations.
Softening masking fluid edges: After removing masking fluid, the reserved white area can look stark and hole-like. Use the brush-lifting technique to soften some of the edges, particularly for natural subjects where the form needs to feel rounded or moving rather than cut out.
Technique Four: Texture with Clean Water (Blooms)
Useful for: foam and turbulence in sea water, foreground meadow texture, plowed fields, any surface that benefits from organic, unpredictable variation.
How it works: Water dropped or tapped into a damp — but not fully dry — area of paint creates a bloom: the water pushes the paint outward and creates a soft, irregular halo around the dropped point. Multiple drops create multiple overlapping blooms, giving a texture that looks organic rather than painted.
This is the technique that produces cauliflowers when it happens accidentally; here it's used deliberately. The size and softness of each bloom depends on how wet the painted area is, how much water is dropped in, and what kind of brush is used to drop it.
- Seawater foam: Paint waves with a mix of blues, greens, and browns, suggesting movement. Let settle until slightly damp, then tap clean water from a clean brush into the wet area. The blooms suggest foam, bubbles, and the turbulent texture of crashing water.
- Foreground meadow: Paint a large foreground area in sap green and natural sienna. While damp, tap in clean water to create soft textural blooms that read as variation in grass and ground without needing to paint individual blades. Combine with dented grass marks from Technique One for a richer result.
The wetter the base paint and the more water dropped in, the larger and softer the blooms. A drier base with a little water dropped in creates smaller, more defined marks. Experiment on scraps.
Applications and Combinations
These techniques are most useful when combined. Some starting points:
- Leaf veins (denting) work equally well for butterfly wing patterns.
- Credit card lifting is excellent for yacht masts or poles against a dark sky.
- Brush lifting is essential for cloud highlights in a wet sky.
- Water blooms in a foreground meadow can be combined with pen grasses at the finishing stage for a rich, varied surface.
The best way to learn these is to fill a page with small painted rectangles and test each technique at wet, damp, and dry stages with different tools and different amounts of water. The worksheet is designed for exactly this.
Resources...
* Worksheet
Join me on Patreon
Join my Adventures in Colour Tier for $16 to access this post and my full library of over 200 others including deep-dive videos and step-by-steps.