 Video on Patreon
Waterlily pond
21 June 2023
Video - Level ◆◆◆
I've just returned from southern France. On one of our plein air painting excursions, my students and I visited a beautiful water garden. It was so peaceful and so beautiful - lots of different colour water lilies, big koi, croaking frogs and little paths through pretty water features. A very Monet type of place :-)
After our painting session, I went for a walk around the gardens and took lots of photos of the lily ponds, because I knew it would be lovely to paint something from the day with you. And here it is!
Happy painting!
Video run-through...
About This Painting
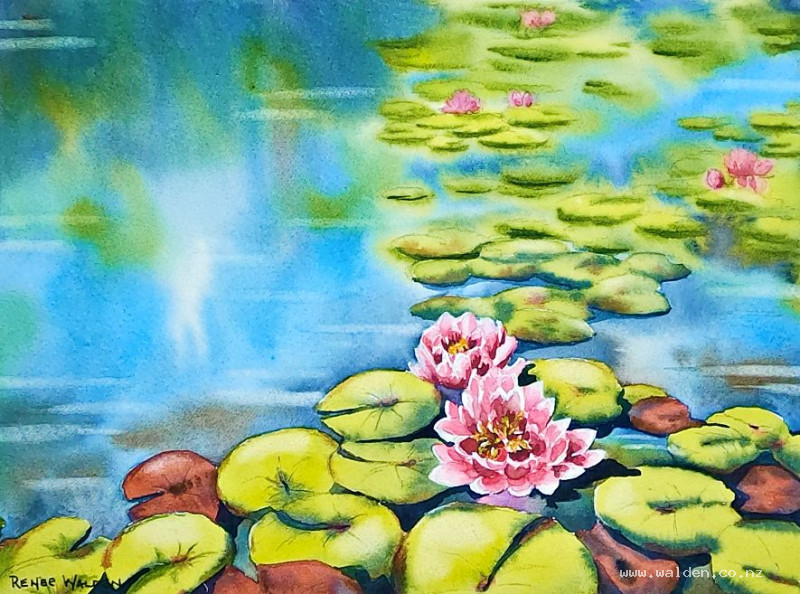
A water garden in southern France, visited on a plein air excursion — water lilies everywhere, koi beneath the surface, and the Monet-esque shimmer of sky and pink reflected in still water. This painting leans heavily on wet-on-wet technique to create the soft, luminous quality of deep water and the blurred reflections of everything surrounding the pond. It's a lesson in composition as much as technique: how to arrange lily pads and flowers to create depth, movement, and a focal point.
A traceable drawing is available in the lesson description.
Composition Planning
The reference photo is in portrait format but the lesson is painted in landscape — a deliberate change for video. Either format works; the composition principles apply to both.
The two large foreground water lilies are placed first, at different distances from each edge so they sit naturally as a focal point rather than centred. Everything else — the other lily pads, the background lilies, the open water — is arranged around them. A few specific decisions worth noting:
Odd numbers: Five water lilies, plus a few buds. Odd numbers feel more natural than even ones.
Perspective in lily pads: Lily pads in the foreground are shown as nearly round. As they recede, they flatten progressively — becoming more elliptical, then almost linear at the back. If the background lily pads are drawn as round as the foreground ones, the water will look vertical rather than horizontal. This is one of the most common mistakes in painting water scenes.
Depth through detail: More detail and stronger colour in the foreground, less toward the back. This applies to both the drawing and the painting stages.
Overlapping and gaps: Some lily pads overlap each other; the gaps between them are as important as the pads themselves, allowing reflections of the sky and surroundings to show through.
Reflected colour: One lily pad is positioned so that pink from the flowers reflects in the water beside it — a deliberate compositional choice that ties the foreground to the water.
Preparing to Paint: The Wet-on-Wet Plan
Before picking up a brush, make a clear plan. The entire water area and the background lily pads (approximately the back half of the composition) will be painted wet on wet in a single pass. The foreground lily pads and flowers are painted separately once this first wash is dry. Knowing this in advance prevents the wet and dry areas from colliding accidentally.
Wet the water area and the background lily pads thoroughly — twice, letting the first pass settle into the paper fibres before wetting again. Check from the side for dry patches. The board is tilted at around twenty degrees so the reflections will run downward naturally, creating a more convincing look than if painted on a flat surface.
Painting the Water (Wet on Wet)
Mix the water colours before wetting the paper: phthalo blue (bright and clear — cobalt will work but ultramarine tends to dull the result), green gold, sap green, indigo for the deeper shadows under lily pads, and Payne's gray for the very darkest areas. Work with a large brush and keep everything moving quickly.
Drop the colours in without overworking them. The water has several distinct qualities happening simultaneously: the sky reflects as a bright, lighter area in the open water; shadows under lily pads are very dark; areas between pads show green and golden reflections of the surrounding vegetation. Work wet into wet so all of these blend together softly. Where a lily pad casts shadow, push the indigo or Payne's gray directly under its drawn edge.
The background lily pads are painted at the same time — soft, blurry, mostly suggested by the lighter areas left between the darker water. Keep them indistinct; they're far away. More detail would flatten the depth of field.
Let the entire wet section dry completely before moving on.
The Foreground Lily Pads
The foreground lily pads are painted once the water wash is dry, with harder, more deliberate edges. Mix a varied green — green gold as the base, sap green for fresher areas, a touch of natural sienna for the older, slightly brown-tinged pads. Give each pad some variation: lighter where the surface catches the light, slightly darker and greener toward the shadows.
Work from the lightest colour first, then drop in variations while still wet. The veining pattern on the lily pad surface can be lightly suggested by pulling a clean, damp brush along the wet paint.
Add a slight shadow on the underside of the pad edges — where one pad overlaps another, the lower pad is in shadow. A very diluted cool blue-gray is enough; this detail is subtle but helps the layering read correctly.
Painting the Water Lilies
Use two colours: quinacridone rose for the main petals and pyroline violet (or a mix of quinacridone rose and permanent violet) for the shadows. Both are quinacridone pigments, which lift beautifully while still damp — take advantage of this by working quickly and lifting highlights from wet paint rather than leaving white paper.
Paint one petal section at a time. Lay in the pink, clean the brush, dry it on a paper towel, and soften the outer edge while still wet to keep the petal tip light or white. The outside petals are paler than the inner ones. Work around the central stamens without covering them — a small, pointed brush gives enough control to shape around them without masking fluid.
For the shadow petals (those folded inward or in shade), use the violet mix and soften some but not all edges — a mix of hard and soft edges makes the flower look dimensional rather than flat. Drop in the yellow stamens with cadmium yellow or a warm Hansa yellow once the surrounding pink is dry enough to accept it without blooming.
The largest, most detailed flowers are the foreground two. The background flower is smaller and slightly less defined but follows the same approach.
Cast Shadows and Water Reflections
Once the flowers and pads are dry, add the cast shadows: the shadow that each lily flower casts onto its own lily pad, and the shadows cast by the lily pads into the water beneath them. Use a rich, dark mix — phthalo blue with Payne's gray and a touch of green — and keep the shapes interesting and irregular. These shadows are what makes the flowers look as though they're truly resting on the water rather than floating in mid-air.
Cast shadows also define which lily pad sits on top of which — the over-under layering that creates visual order in an otherwise complex arrangement.
Lifting Out Water Highlights
Once everything is dry, use a clean, damp flat brush (a cat's tongue or eradicator brush works particularly well) to gently lift horizontal streaks of colour from the water surface. These light streaks read as the shimmer and sparkle of reflected sky. Work gently and check from a distance regularly — it's easy to overdo this step. A few carefully placed streaks are more effective than many.
Pen Work (Optional)
Very little pen work is needed here. A white gel pen can define the lit outer edges of the foreground water lily petals — used sparingly and blended in slightly so it doesn't look obviously applied. A touch of yellow Posca marker brightens the stamens. Dark brown ink, if used at all, goes only in the very deepest shadow areas inside the flower centres and under the most prominent lily pad edges.
The general rule: if in doubt, stop before you think you're finished. This painting is primarily about soft, wet paint and luminous colour — pen work that's too heavy will harden it unnecessarily.
Sign in paint (no pen has been used), remove the tape, and done.
Resources...
* Reference photo
* Drawing to trace
Join me on Patreon
Join my Adventures in Colour Tier for $16 to access this post and my full library of over 200 others including deep-dive videos and step-by-steps.