 Video on Patreon
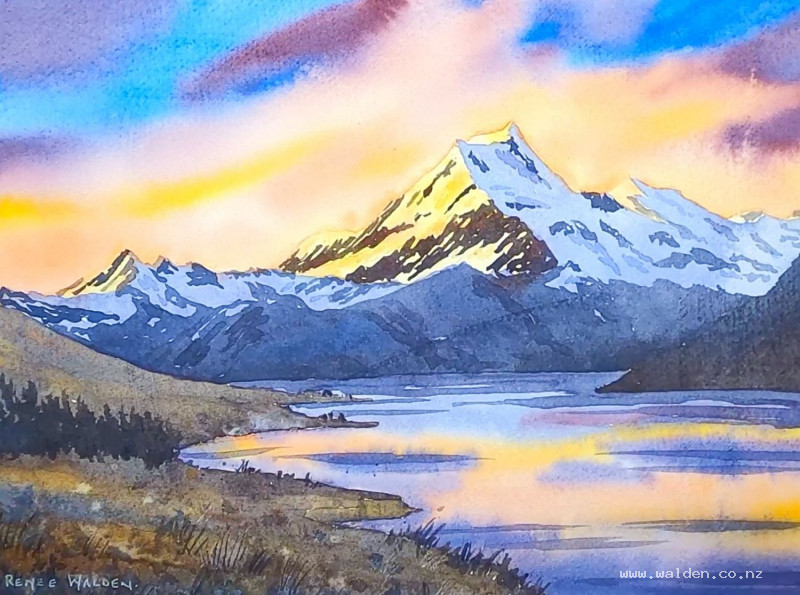
Sunset over Aoraki / Mt Cook
26 July 2023
Video - Level ◆◆◆
We're back to New Zealand's highest peak this week. This time for one of New Zealand's most iconic and famous views - Aoraki / Mt Cook with Lake Pukaki in the foreground. And it's a sunset too - little happy dance ;-)
It's time to have some fun with all the lovely sunset colours on your palette to create the glowing sky and then use those colours on the sunlit snow and in the reflections in the water. The rest of the scene we paint in neutrals, so that the sunset colours really glow.
Happy painting!
Video run-through...
About This Painting
The most iconic view of Aoraki Mount Cook — New Zealand's highest mountain rising above Lake Pukaki at sunset, painted from a stunning reference photograph. The orange-and-blue sky, the snow-covered peak catching the last warm light, and the still lake reflecting everything below. This painting follows the same mountain from a completely different angle and mood to the summit close-up lesson: here the emphasis is on the full sweep of the scene, the drama of the sunset colours, and the relationship between mountain, sky, and water.
A traceable drawing is available in the lesson description.
Composition Decisions
The reference photograph is beautiful but benefits from a few deliberate changes. Mount Cook's main peak is moved slightly off-centre — a centred composition can feel calm and balanced, but for a dramatic sunset it's better to have a degree of tension. The peak is made slightly larger relative to the surrounding mountains; this is an artistic choice, not an inaccuracy, and keeps the mountain dominant without looking unnatural. A few surrounding peaks are repositioned to accommodate the change. The road in the foreground is removed — it adds nothing compositionally.
The orange glow is extended further down the sunlit faces of the mountain than it appears in the photograph, creating a richer warm-cool contrast between the lit and shadowed sides of the peak. Lighten the pencil drawing in the sunlit areas with a kneadable eraser before painting — heavy pencil lines under the lightest, warmest parts of the mountain will show through and dull them.
Painting the Sky
The sunset sky is the foundation of everything. The photograph shows an almost entirely orange sky, which reads as slightly artificial — the painted version benefits from more variation: cobalt blue at the top darkening toward the zenith, transitioning to orange and pyrrole orange through the middle, with a little Hansa yellow medium near the horizon, and touches of permanent violet to warm the blue-orange transition.
The critical rule for painting a multicolour sunset: do not pre-mix the colours together on the palette. Mixed together, these colours produce muddy brown. Instead, lay each colour separately into the wet paper and let them mix on the page. The wet surface carries the paint to where it needs to go without scrubbing, and the colours remain clean and vivid where they blend at their edges.
Wet the sky thoroughly, then wet again. Board at approximately 20 degrees. Load the brush with pyrrole orange and lay broad diagonal strokes across the mid-sky, leaving gaps. Switch to Hansa yellow medium for the area just above the mountain peaks. Clean the brush completely before picking up the cobalt blue for the upper sky — even a trace of orange will muddy it. Allow the blue to flow down toward the orange naturally rather than pushing it there. Add the violet in the transition zone. Work quickly and don't overwork the colours once they're down.
The Mountain: Warm Sunlit Faces
Once the sky is dry, paint the sunlit faces of Mount Cook and the surrounding peaks. The warm faces catch the orange light of the sunset and are painted in a mix of cobalt blue and burnt umber leaning heavily toward the burnt umber — a warm, rich golden-brown. For the most brightly lit areas of the main peak, add a little of the pyrrole orange or quinacridone gold.
The key principle from the summit lesson applies here too: paint in the direction each rock band or snow field runs. The warm faces of the glacier slope downward; the brush strokes should follow that slope. The glaciated areas between rocky ridges have their own direction.
Keep the warmest, lightest tones around the main peak — this is the focal point, and the greatest tonal contrast should be here.
The Mountain: Cool Shadow Faces
The shadow sides of the peaks and the mountains further from the light are painted with the same cobalt blue and burnt umber mix, but with the balance reversed — more cobalt blue, giving a distinctly cooler blue-gray. This warm-cool distinction between the lit and shadowed faces is what makes the mountain feel three-dimensional and gives the sunset its drama.
Darker values stay around the focal point (the main peak), with progressively more water added as you move to the secondary mountains further back. More water means lighter colour, which pushes them back in space. The furthest mountains are barely more than a suggestion.
Lake Pukaki
The lake is still and highly reflective. The sky colours — the orange and blue — reflect in the water, and the dark mountains and foreshore cast dark reflections. Work with horizontal strokes throughout: reflections in water are always horizontal, regardless of the vertical angle of what they're reflecting.
The lake's base colour picks up the orange of the sky, but slightly more muted. The dark reflections of the hills and mountains are added as dark horizontal strokes using the cool cobalt blue and burnt umber mix. Wind streaks — fine, slightly lighter horizontal lines — suggest the almost-still surface.
The Foreground
In this scene the foreground is mostly silhouette rather than warm, detailed landscape. It needs to come forward in space without competing with the mountain — this is achieved through texture and dark tone rather than warm colour.
Work wet from back to front across the foreground in one pass, using a range of warm-dark browns (cobalt blue and burnt umber, adding burnt sienna and natural sienna as you come forward). Paint the distinctive pine trees on the hill edges wet, so they stay slightly soft and don't harden into stiff silhouettes. A few splashes of clean water into the wet foreground wash create soft cauliflower blooms that suggest rough vegetation. Splattered dark paint (cobalt blue and burnt umber, very thick) adds further texture. A ruler edge scratched through still-wet paint produces grass marks.
The foreground progressively darkens toward the very bottom of the composition, grounding the scene.
Final Details
Once everything is dry, a few glazing passes complete the painting:
For the sunlit snow and glacier areas of the main peak, glaze very lightly with the warm orange-yellow mix to reinforce the glow. Use directional strokes that follow the slope of the glacier. Keep this minimal — it's a glaze, not a repaint.
For the shadow areas of the mountain, add a few marks with the blue-violet mix (cobalt blue and permanent violet) to suggest crevasses and forming within the large snow fields. Again, directional — following the slope of the face. Very light, just enough to break up blank areas that feel too empty.
For the lake, add a few dark horizontal strokes to deepen the reflection of the mountains, and a passage of the warm-dark mix to suggest the reflection of the dark foreshores.
No pen work is used in this painting. Sign in paint with a tiny brush, remove the tape, and step back.
Resources...
* Drawing to trace
* Reference photo
Join me on Patreon
Join my Adventures in Colour Tier for $16 to access this post and my full library of over 200 others including deep-dive videos and step-by-steps.