 Video on Patreon
Romanesque bridge
9 August 2023
Video - Level ◆◆◆
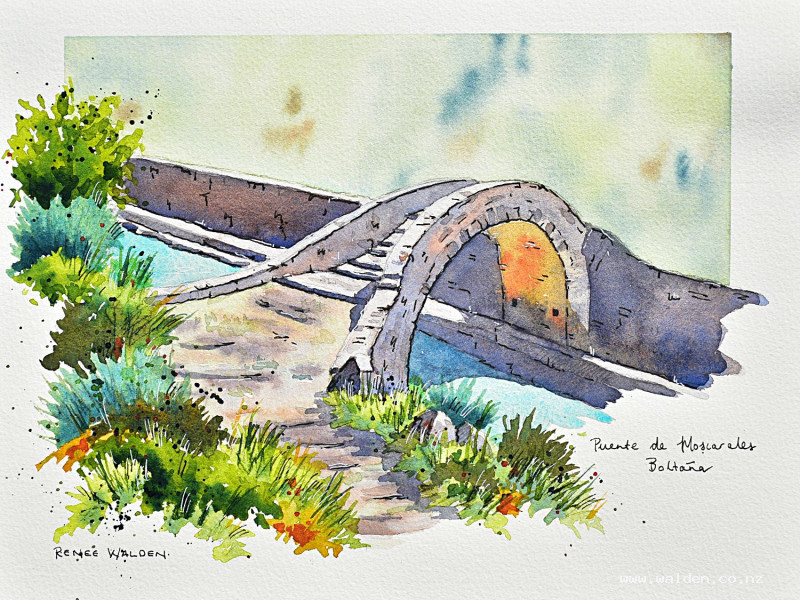
About 6 weeks ago I visited this beautiful, 1000 year old, romanesque bridge in Boltaña in the Pyrenees. It's in a super pretty location, above some swimming holes, and has been beautifully looked after. It was a wonderful place to sketch.
When I shared my finished sketch online a number of people asked if I would redo the scene as a tutorial. Of course! So in this lesson I show you how I turn in a sketch into a finished painting, while still retaining the feel and story of the plein air excursion.
Lots of elements to explore and paint in this lesson - architecture, stonework and many of different greens.
Enjoy painting along!
PS ... I don't know what happened to my directional sense in this one! My apologies for confusing left and right in my commentary. The shadows are on the left hand side.
Video run-through...
About This Painting
An 11th-century Romanesque bridge in Nia in the Spanish Pyrenees — beautifully preserved, arching over a river with swimming holes below, surrounded by lush riverside vegetation. This painting began as a location sketch and was later reworked as a more finished studio piece, taking the elements that worked best from the original sketch and refining the things that needed more attention. It's a good example of how a quick field sketch can be developed into a complete painting without losing its spontaneous quality.
Arched bridges involve some perspective complexity, so a traceable drawing is available in the lesson description.
Pencil Drawing and Shadow Planning
Place the bridge off-centre for a better composition. The pathway leading to the bridge is equally important — it invites the viewer in and gives the scene a sense that you could actually walk onto it. Once the bridge and pathway are positioned, build the rest of the scene around them: the vegetation, the water, the background.
Before painting, mark the shadows into the pencil drawing with hatching. Shadows change quickly when painting outdoors, so noting them at the moment they look best is valuable. This hatching is also a useful reminder during the painting stages — a glance at the drawing shows exactly where the darks need to go.
Understanding the Stone Colour
The bridge has three distinct colour zones, and recognising them before mixing is important:
The shadowed face — the side of the bridge not catching the sun — is a varied, granulating gray. Wet weather has weathered these stones over a thousand years.
The sunlit tops — the tops of the parapet walls, the steps, the pathway — are the same stone but much lighter and slightly warmer, catching the direct sun.
Under the arch — the underside of the bridge and the stones protected from weather — is a warm golden limestone colour. Sheltered from rain and lichen, these stones retain their original warm tone. There is often also reflected light from the water below in this area.
Painting the Shadowed Stone (First Pass)
Mix ultramarine blue with quinacridone sienna (or burnt sienna) to make a complex, granulating gray. Mix wet with plenty of water — the wetter the mix, the more the ultramarine (a heavy pigment) will settle into the paper dimples while the sienna stays on the surface, creating beautiful natural variation without any effort.
Paint all the shadowed areas of the bridge in one continuous pass, changing the balance of the mix as you go: more blue in some areas, more brown in others. Include the space under the arch in the same pass, shifting to natural sienna or raw sienna for the warm golden limestone tone there. It doesn't matter if the gray and golden tones bleed slightly at their boundary — shadows and pen work will resolve the edges later.
Use negative painting at the base of the walls to shape the grasses rather than painting the grasses themselves at this stage.
Let dry completely before the next pass.
Painting the Sunlit Stone (Second Pass)
The sunlit tops of the walls, steps, and pathway use the same ultramarine and quinacridone sienna mix, but very much diluted — pale, warm, and light. The pathway also gets a touch of sap green mixed in where mosses and grasses grow between the paving stones.
Keep this wash light and transparent so it reads clearly as a different tone to the shadowed faces.
Painting the Water
The water beneath the bridge reflects the sky and the stone above. A cool blue-green mix works well for the base. The reflection of the bridge arch in the water is one of the most satisfying elements of the composition — a dark, slightly distorted mirror of the arch above. Add horizontal strokes in the reflection to suggest movement on the water surface.
Painting the Vegetation
Use a large brush and work from back to front, working wet so the background vegetation stays soft. Sap green with some yellow (Hansa yellow medium or green gold) for the lighter, sunlit areas; sap green with indigo for the deeper shadows within the foliage. Add a touch of warm sienna or red-orange occasionally to suggest the variety in a real riverbank — it's never one uniform green.
The vegetation around and below the bridge should feel lush and slightly wild. Keep the edges organic rather than neat, and let some of the background wash show through as gaps in the foliage.
Stone Detail (After All Washes Are Dry)
With a small brush and a thick mix of the gray, indicate a selection of individual stones: some along the arch (the stones go in the direction of the curve), some on the wall face, and a few on the pathway. Not every stone needs to be painted — just enough to confirm the material and the construction. Vary the size and colour of each mark; some slightly more blue, some slightly more brown.
Soften some stone marks with a clean damp brush immediately after placing them so they don't all read as equally sharp. The combination of defined and softened stone marks looks more natural than everything at the same level of finish.
On the pathway, a few small marks suggest paving stones and a few small strokes suggest low-growing plants between them. Keep it simple — there is already a lot happening in this painting.
Shadows (Final Wash)
At this point the bridge has a light tone and a mid-tone but no dark tone. The shadows give the bridge its third dimension and make the arch read as a three-dimensional structure rather than a flat shape.
The light source is from the right, so shadows fall on the left-hand sides of all elements and underneath everything. Plan the shadow shapes by referring back to the hatching in the pencil drawing.
Mix the same ultramarine and quinacridone sienna gray again, slightly darker than the mid-tone but not dramatically so — the existing mid-tone wash already does some of the work, and the shadow glaze just deepens it. Apply with a light touch so the texture and colour from the earlier layers remain visible through the wash. Transparent watercolour makes this possible; scrubbing into the paper destroys it.
The area under the bridge needs the golden sienna colour in the central arch (the warm reflected light) with the gray shadow wash over the sides. Add a shadow on the water where the bridge's reflection falls, using a slightly more blue version of the mix.
Pen Work
Dark brown ink in a fine pen (extra-fine nib) goes on the shadow sides only: defining the underside of the arch with a slightly irregular, hand-drawn edge that gives it age and character, indicating a few of the arch stones as they curve around, suggesting the two original construction holes visible in the stonework, and adding a few crack lines and crevices in the rocks. Extend pen marks into the vegetation so the detail isn't entirely concentrated on the bridge.
The white gel pen handles any highlights: the sunlit tops of the parapet, the light catching the water surface. Use it sparingly.
Write the name of the bridge and its location directly on the painting — this is a place with history and a name is part of telling its story. Use pencil guide lines to keep the lettering straight.
Resources...
* Drawing to trace
* Reference photo
Join me on Patreon
Join my Adventures in Colour Tier for $16 to access this post and my full library of over 200 others including deep-dive videos and step-by-steps.