 Video on Patreon
Ermita de San Anton
15 August 2023
Video - Level ◆◆◆
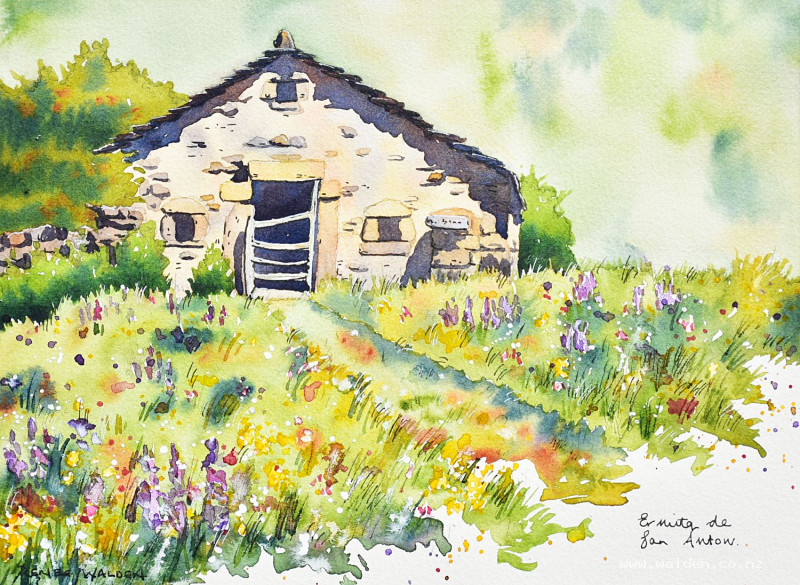
The Ermita de San Anton is a lovely, historic building on one of our favourite walks. I've sketched it many times before when I'm walking past, but this is the first time that I've done a full painting of the pretty place.
On one of our walks past the little chapel recently, the grassy patch in front was full of summer flowers and humming with bees and butterflies. I thought making a feature of these colourful wild flowers would make a fun scene to paint. Plus there's the wonderful stonework on the ermita too.
Happy painting!
Video run-through...
About This Painting
An old ermita (hermitage chapel) on a favourite walking route in Spain — ancient stonework, heavy stone roof tiles, a little gate, a sign above the door, and a riot of summer wildflowers in the foreground. The painting was sketched on location many times before, but this is a full studio treatment: zoomed in close to emphasise the character of the stonework and to give the wildflowers real space. A warm, intimate composition rather than a wide landscape view.
A traceable drawing is available in the lesson description.
Composition Decisions
The reference photo offered several approaches — a wider view including the mountain and cliffs behind, or a side pathway leading in. The decision was to crop in tight, dropping the pathway (which would have led the eye out of the frame) and leaving more foreground space for the flowers. A flattened grass path in the lower foreground now serves the same purpose: it leads the eye gently toward the door. The flowers are painted from feeling as much as from the photograph — on the day, the purple flowers felt dominant and numerous in a way the photo doesn't quite capture.
Wildflowers First
The foreground flowers are painted before the stonework so that the bright colours dry thoroughly before the grasses are painted around them later. Trying to paint grasses around wet flower colour risks everything bleeding together.
Purple spiked flowers (permanent violet, well diluted — strong pigment): start large in the foreground, getting smaller and sparser toward the back. Join some clusters together; leave others isolated. While still wet, drop in a touch of quinacridone rose to vary the colour — a single flat purple looks artificial; the pink variation makes it natural.
Yellow daisies (Hansa yellow deep): work with a smaller brush, holding it loosely near the end for free, slightly unpredictable marks. Big individual heads in the foreground, reducing to small dots at the back. Vary the size and spacing of the clusters — sometimes a few together, sometimes one alone.
Pink clover: loosely suggested with a warm pink, adding to the variety of the meadow without needing much definition.
Leave plenty of green space between the flower clusters — the grass and foliage will be added once this layer is dry. Odd numbers of flower groups work better than even.
Painting the Stonework
The ermita's stonework has three colour qualities: warm golden limestone (natural or raw sienna) where the stone is relatively clean and sheltered; gray where it has weathered (ultramarine mixed with quinacridone sienna — a rich, separating gray-brown, not a flat Payne's gray); and the much darker, heavier stone tiles of the roof, which are painted separately and later.
Use a large brush and work the entire wall surface wet into wet, laying in areas of the warm sienna and dropping the gray mix in while still wet, allowing the two to blend and separate. The separation of the ultramarine (which settles into the paper's surface texture) and the quinacridone sienna (which floats on top) creates beautiful granulation without any additional work — this is the key reason for mixing the gray rather than using it straight from the tube. Work quickly across large areas so the wet edges can merge softly, then move on to the next section before the first dries.
Keep the paint genuinely wet: a bead of paint should be visible at the lower edge of each section as you work. The more water, the more separation and texture.
Avoid polka-dot patterns — as humans we instinctively want to make regular, spaced marks, and it takes conscious effort to keep the colour drops random.
The Roof Tiles
The heavy stone tiles are much darker and grayer than the walls — these stones have weathered more severely and carry more lichen and shadow. A separate, darker wash of the ultramarine-sienna gray covers the roof area, with the direction of the brush strokes following the slope of the tiles.
The Windows, Door, and Details
Once the walls are dry, add the dark interior of the windows and door as a simple, very dark mix. The sign above the door gets its rectangular shape indicated. The gate and any metal fittings can be suggested simply.
Grasses and Foreground Vegetation
With the flowers dry, paint the grasses and ground cover between and around them. A muted sap green with a touch of brown or sienna keeps the grass from looking too vivid. Work with a large brush and directional strokes that follow the slope and growth of the grass — towards the building in the foreground, slightly horizontal on the flat areas. Tease the paint around the flower clusters with negative painting, defining their shapes from outside rather than painting each flower's outline.
Use the ruler edge or a sharp tool scratched through the still-wet green to suggest individual grass blades in the foreground. A few darker marks with indigo or sap green plus indigo in the shadowed base of the vegetation grounds everything.
Background Vegetation and Trees
Keep background trees and shrubs cooler and lighter than foreground ones. A blue-green mix (sap green with cobalt or ultramarine) for distant trees; a warmer, darker sap green plus indigo for the trees closer to the building. Let edges remain soft — background vegetation that is too hard or detailed competes with the building.
Marking the Shadows
Before painting the shadows, mark their positions lightly in pencil. This is a useful habit — once the brush is in hand the mind switches into paint mode and it's easy to lose track of what the reference shows. Shadows change quickly with the sun; noting them early avoids recomposing mid-painting.
The shadows are cast by the overhanging roof tiles, the rounded rocks, and the gate. They follow the irregular surface of the stonework rather than running in straight lines, and this irregularity is informative — it tells the viewer that the stones are uneven, that the roof overhang varies, that the wall is not a flat plane.
Painting the Shadows
Mix ultramarine with quinacridone sienna again for the shadow wash — the same pair used for the stonework, but richer and less diluted. Have two pools: one leaning toward blue, one leaning toward brown. Vary between them as you work, keeping the shadow interesting and never flat. Work wet so the colour continues to separate.
Apply the shadow wash as a transparent glaze — enough water that the stonework colour and texture from the earlier layers remain visible through it. This transparency is critical: scrubbing into the paper muddies everything underneath and loses all the hard-won texture. Shadows should look like shadows cast on a surface, not like a different material.
Shadow the interior of windows and door very dark. Cast shadows from the gate, any protruding stone elements, and the roof overhang. In summer the light is high and strong, making shadows sharp and dark — don't be tentative.
Pen Work
Dark brown ink in a fine pen (extra-fine nib) on the shadow sides: underneath and along the shadow edges of the roof tiles, defining the uneven lower edge of the stonework, inside the windows and door, along the shadow side of the gate. The pen tightens what the brush has suggested rather than adding new information. Work slowly at first — the ink is permanent — and gain confidence before going darker.
Pen marks on manmade structures look odd if the vegetation has none. Add a few strokes in the grass and a few branches or leaf marks in the trees so the pen is spread naturally through the painting.
The white gel pen catches sunlit edges: tops of the wall, upper edges of the stones, any bright details on the right-hand side (the lit side). Marks can be softened with a damp brush if they're too stark.
Write the name of the ermita along the bottom, using pencil guide lines to keep it level. Sign the painting.
Stand back, photograph it, or hold it up to a mirror — seeing it differently at the end often reveals any remaining gaps. When you find yourself fussing, stop.
Resources...
* Reference photo
* Drawing to trace
Join me on Patreon
Join my Adventures in Colour Tier for $16 to access this post and my full library of over 200 others including deep-dive videos and step-by-steps.