 Video on Patreon
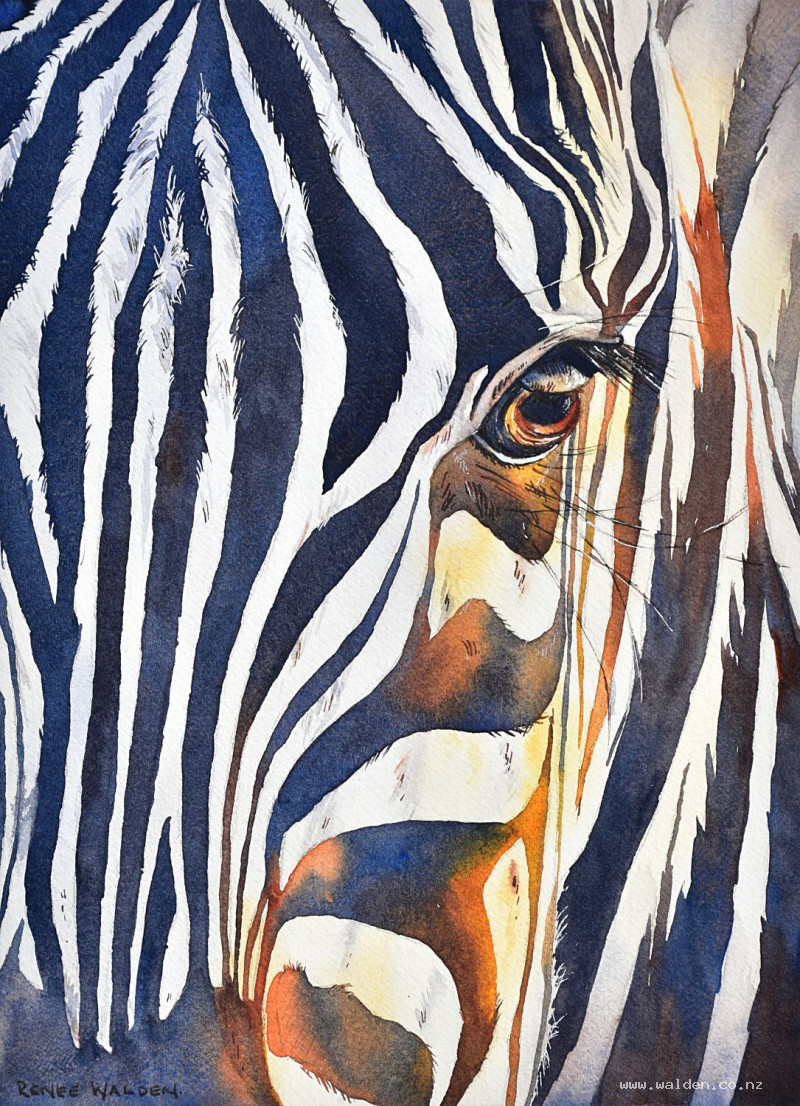
Zebra
24 August 2023
Video - Level ◆◆◆
By the time you watch this video I will be in South Africa visiting my parents and we'll be in the Kruger National Park, hopefully seeing zebras in the flesh. Of course I'll have my sketchbook with me and I'll be sketching memories of our holiday, but before I left for the trip I couldn't help getting a head start. And painting something with you of course!
This gorgeous photo on Unsplash caught my eye. Such an intimate view of the zebra and such beautiful lighting. I knew that it would just glow in watercolours.
This is a long lesson, because it takes a long time to paint all the stripes. But it's not a complicated lesson. It's really quite meditative and you can take your time, with breaks in between, so you don't see stripes in your sleep!
Happy painting!
Video run-through...
About This Painting
A close-up portrait of a zebra in early morning or late evening safari light — one side of the face cool and shadowed in blue-purple, the other side warm and glowing in golden light. The stripes are long and meditative to paint, and the real technical challenge is the eye, which gets careful, layered treatment and is where the viewer will look first. This painting was made in anticipation of a trip to Kruger National Park in South Africa.
A traceable drawing is available in the lesson description.
The Pencil Drawing
Getting the stripes right in the drawing is worth taking time over, because the stripes don't just decorate the surface — they create the form. The curve of stripes across the face defines the shape of the muzzle, the boundary between mane and body, the roundness of the neck. Mark the dark stripes with light hatching in the drawing so they're clearly distinguishable from the white stripes during painting. This hatching will be completely hidden by the dark paint on top.
Use a kneadable eraser to tidy any smudges, especially in the white areas that will receive the most delicate washes.
Step One: The White Stripes (Full Page Wet-on-Wet Wash)
The "white" stripes are not actually white. In this early or late light, the face has three distinct colour zones: a cool blue-purple on the shadowed front of the face, warm gold and natural sienna on the side catching the light, and a neutral gray-brown in the lower areas. These are all laid wet into wet across the whole page in a single pass, covering all the white stripe areas at once. The dark stripes will be painted on top once this dries.
Wet the entire page thoroughly — twice, letting the first pass sink into the paper fibres before wetting again to create a layer of water sitting on the surface. Leave the eye area dry for now so it can be handled with precision later.
Mix three colours separately before painting: a diluted cobalt blue with a touch of burnt sienna and permanent violet for the cool shadow side; natural sienna with a touch of quinacridone gold for the warm lit side; cobalt blue and burnt sienna for the gray-brown lower areas. All three should be well diluted — this wash is pale and luminous, not dark.
Apply the blue-purple mix to the shadow side of the face, the warm sienna-gold mix to the lit side, and the gray-brown to the lower areas. Place each colour into its area of the wet paper without scrubbing the colours into each other — particularly where the blue and yellow-gold meet, as mixing them too vigorously creates green. Let the water carry each colour naturally to its edges.
Exaggerate the warm golden glow around the eye slightly — this warmth draws the viewer's attention directly to the focal point.
Let dry naturally. Don't use a hairdryer at this stage; the colours continue to soften and blend at the edges while drying, and this natural movement is part of the effect.
Step Two: The Dark Stripes
The dark stripes vary considerably in colour. On the shadowed side, they are deep black. On the lit side, they range from near-black through to a warm, glossy golden-brown where the light catches the surface. This variation is what makes the coat look three-dimensional rather than flat.
Mix the dark black from indigo and burnt sienna — thick, saturated, almost no water. For the stripes on the lit side, shift the mix slightly toward the brown and add a little more water so it lifts slightly in value where the light is strongest.
Paint the stripes following the direction they flow across the body — along the neck they run roughly diagonally, across the face they curve around the muzzle. This directional quality helps the stripes create form. Use a medium-sized pointed brush and paint decisively; the stripes have a clean, confident character and tentative marks look wrong.
Keep the edges of the stripes clean on the shadowed side and very slightly softer on the lit side, where the light diffuses the edge slightly. Within large dark areas, vary the mix — a touch more brown here, a touch more blue there — so the dark masses don't read as completely flat.
Step Three: The Mane
The mane is painted with individual hair strokes using a rigger brush or a fine pointed round. Use a range of values — very dark at the base of each hair, lighter at the tips. Individual hairs on the lit side catch the warm light. Work from the base of the mane outward, not the other way around.
Step Four: The Eye
The eye is the most important element in any animal portrait — it's where the viewer will look first, and it demands proportionally more care than any other part of the painting. Work slowly, letting each layer dry before adding the next.
The eye has several distinct zones working from the outside in: a darker area at the outer corners; the surrounding skin folds, which have a gray-brown shadow; a warm golden ring at the iris; a rich deep brown in the iris itself; the near-black of the pupil; and a white highlight. The area above the eye is slightly blue-toned; below and to the sides is warm.
Build up these zones with a tiny brush (number zero or one), beginning with the lightest colours and working toward the darkest. Soften edges between zones with a clean damp brush immediately after placing each colour while still wet. Add the black of the pupil once the surrounding colours are fully dry. The eyelashes are among the most beautiful features of a zebra's face — long, fine, and slightly curved. They extend well beyond the eye, some appearing to begin in the middle of nowhere.
When adding the iris markings, use the quinacridone sienna and quinacridone gold for very fine radiating marks — these are placed with the tiniest brush available, and the hair dryer can be used between each stage here since precision matters more than soft blending.
Pen Work
Pen work is concentrated almost entirely on the eye and is kept to an absolute minimum everywhere else. The goal is that viewers don't notice the pen has been used — it should feel like an extension of the painting, not a separate drawing.
Dark brown ink in a fine pen (extra-fine nib) defines the darkest corners of the eye, deepens the pupil, adds the dark eyelash lines that emerge from the upper lid. A lighter brown ink (such as Lamy Crystal Topaz) draws the eyelashes that are catching the light — these require a slightly finer mark than the shadow eyelashes. Turning the pen upside down gives a finer line for very detailed work; a number zero brush works equally well with more practice.
A very small amount of dark pen work on the stripes themselves is acceptable — a few marks to sharpen a stripe edge or suggest individual hairs at the boundary between stripe and skin. Don't trace every stripe edge.
The white gel pen places the highlight in the eye and draws a few fine hairs at the forehead. Test the gel pen on a spare area first; if it stops flowing, dip the tip briefly in water and wipe clean.
Step back, photograph the painting to see it fresh, and resist the urge to add more. Sign in dark brown ink.
Resources...
* Reference photo
* Drawing to trace
Join me on Patreon
Join my Adventures in Colour Tier for $16 to access this post and my full library of over 200 others including deep-dive videos and step-by-steps.