 Video on Patreon
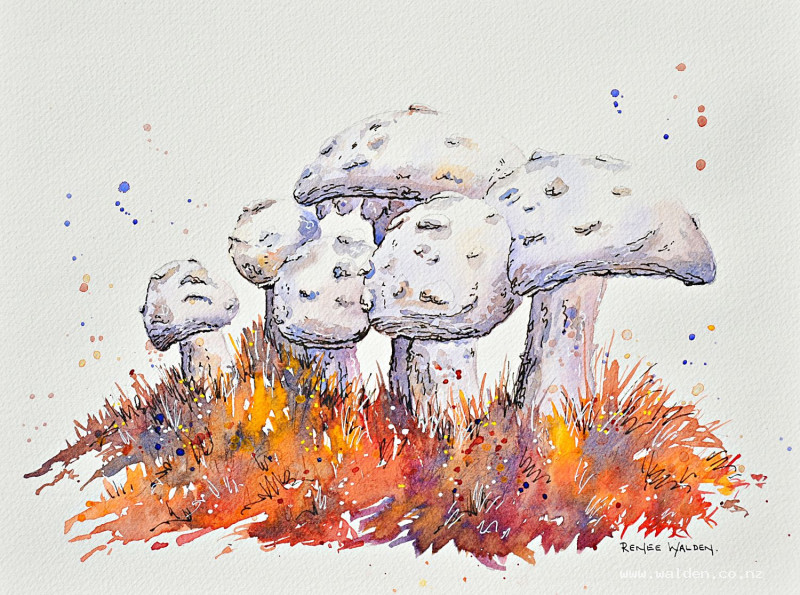
White mushrooms
28 September 2023
Video - Level ◆◆◆
Painting white things in watercolour can be a lot of fun. We have to reserve the white of the paper in some way, as we normally don't use white paint, and we have to make decisions about shadow colours.
Instead of just choosing a grey to paint the shadows and create form, we can look really carefully to see what colours are actually there. Then we can work with a lot of different pastel hues to create a very interesting painting.
After a big thunderstorm a few weeks ago we spotted this group of white mushrooms popping out of the ground. Of course I had to get some photos so we could paint them together.
Happy painting!
Video run-through...
About This Painting
A family of white mushrooms discovered after a thunderstorm, painted close-up with a rich, wet autumn foreground. White objects in watercolour are a particular kind of challenge and pleasure — because there's no white paint, the whole white surface has to be constructed from shadow, reflected colour, and the paper itself. This lesson is a detailed exploration of how to paint white things convincingly, using colour temperature, reflected light, and lost edges rather than a single gray shadow wash.
A traceable drawing is available in the lesson description.
Composition
The mushrooms are grouped closely together as they were found — one main tight clump plus a single smaller mushroom set apart to the side. The lone mushroom balances the weight of the group and tells a small story: the family together, and one on his own. Position the group slightly off-centre rather than in the middle of the page, and give the foreground generous space for the rich wet autumn ground.
Erase the pencil lightly with a kneadable eraser in the areas where the mushrooms are brightest — heavy pencil lines showing through white areas can muddy the light passages.
Lost Edges
Before painting, identify where the lost edges will be. A lost edge is a place where the contour of the object simply disappears — where the light is so bright that the boundary between mushroom and background cannot be seen. In this painting, the light comes from above and the right, so the lost edges are on the upper-right of each mushroom cap. Make a small mark in the drawing at these points to remind you not to paint colour into those areas.
How to Read White Objects
The key to painting white convincingly is to look at what the white is actually doing rather than treating it as a blank surface. White objects reflect their surroundings and respond to the direction of light. In this scene:
Shadow side (left and underneath): Cool — a bluish or slightly purple-tinted gray, because the sky and ambient light are cool.
Lit side (upper right): Warm — the direct sunlight is warm, and the mushroom surface glows slightly where it catches it.
Reflected light (underside of cap, along the lower edge): The ground and autumn vegetation surrounding the mushrooms are warm — golden, brown, orange. These warm colours bounce upward into the undersides of the mushroom caps, giving them a reflected warmth that is quite different from the cool of the shaded side.
This warm-cool-reflected-warm structure is what makes the mushrooms glow rather than simply look gray.
Mixing the Shadow Colours
Mix a range of shadow colours rather than reaching for a single ready-made gray:
- Cool shadow (shadow side of cap): ultramarine with a tiny touch of quinacridone rose for a slightly purple-blue gray. Very diluted — mostly water.
- Warm forming (between cool and warm areas): the same mix with quinacridone sienna added — a warm gray-brown.
- Reflected warm light (underside): quinacridone sienna dominant, with ultramarine and a very small touch of rose — a warm pinkish-brown.
- Greenish warm (where the surroundings are most green): the warm mix with a small amount of yellow added.
All should be well diluted. These colours are going to dry considerably lighter than they look when wet.
Painting the Mushroom Caps (One at a Time)
Paint each mushroom cap individually, wetting the whole cap first before adding any colour. This ensures all the colour transitions are soft rather than hard-edged, which is what creates the sense of a rounded, smooth surface.
Work with a large brush so you can cover the wet surface quickly before it starts to dry. Drop the cool shadow mix into the shadow side (left) and let the water carry it. Leave the lost-edge area clear. Add the warm forming colour on the other side while still wet, keeping the transition soft. Drop in the reflected warm colour at the underside. Vary the colours slightly from mushroom to mushroom — some may lean more brown, some more purple, some more yellow, as the reference shows.
The light side of each cap should have almost no colour at all — just the paper. Resist the urge to add colour to prove the painting is working; trust the white.
The Mushroom Gills and Stems
The gills under the cap are the most detailed texture in the painting. These radiate from the centre of the cap underside outward in fine lines. Use a small brush with a mix leaning toward the warm brown-purple. Some marks can be hard-edged; others should be softened immediately with a clean damp brush. The gills on the shadow side are darkest; they lighten as they approach the lit side.
The stems are cylindrical — light on the right, shadow on the left, with some reflected warmth at the base where the stem meets the ground. The base of each stem has small wart-like knobbles that can be suggested with small, varied marks.
The Foreground Ground
The wet, autumn ground is rich and dark: quinacridone sienna, burnt umber, some green, some purple. Work wet and freely with a large brush, allowing the colours to merge and separate. Once the paint is slightly damp, scratch in fine grass and debris marks with the back of a ruler edge. Vary the marks — some horizontal, some diagonal — and concentrate them more in the foreground.
Pine needles, if present in the reference, can be added with a fine brush or rigger, working quickly with a slightly darker version of the ground colour.
Stepping Back: Consistency Check
Once all the mushrooms are painted individually, look at them together. Any mushroom that has too little shadow compared to its neighbours will look wrong — add a little more dark to tie it in. Take a photograph or hold the painting to a mirror to see it freshly, which often reveals inconsistencies invisible when looking directly.
Splashes (Optional)
Rather than a painted background, a few splashes of colour around the mushrooms tie the scene together and suggest the wet, wild environment. Use the same colours already on the palette — a little of the purple mix, a little of the quinacridone sienna, a touch of yellow. Test on a scrap first; try different brushes to see which makes the splash marks you prefer. An old brush that has lost its point can make particularly good splashes.
Apply the splashes loosely, allowing some to fall over the mushrooms themselves. If a splash lands somewhere unwanted, lift it immediately with a dry corner of paper towel. Stop well before you think you've added enough — splashes are very easy to overdo.
Pen Work
Dark brown ink in a fine pen (extra-fine nib, or turned upside down for the finest line) defines shadow-side marks only: underneath the gills, on the left side of stems, along the shadow edge of the caps, and into the small knobbles at the base. Do not outline everything — use the pen to emphasise marks that are already there rather than adding new ones.
Avoid making the same mark repeatedly. As with the brush work, vary the length, thickness, and spacing of the pen marks.
White gel pen or white acrylic marker adds highlights on the upper-right surfaces and a little sparkle within the pine needles and foreground. A few yellow dots extend the warmth into the foreground scatter.
Any section of the painting where the colour has done something particularly beautiful should be left entirely alone by the pen.
Resources...
* Reference photo
* Drawing to trace
Join me on Patreon
Join my Adventures in Colour Tier for $16 to access this post and my full library of over 200 others including deep-dive videos and step-by-steps.