 Video on Patreon
Summer wildflowers
5 October 2023
Video - Level ◆◆◆
The summer wild flowers in Spain and France were absolutely wonderful this year. All along the roadsides there was always a tangle of wonderful colour. If you stopped and had a look, the variety of flowers in each little patch was just amazing. And, of course, each week there was something new flowering.
You may have seen a sketchbook spread of mine where I painted a number of little sketches capturing all this variety and the low evening light. Because each week there was something different, painting and photographing these scenes could almost become a bit of addiction!
In this lesson I invite you to let go with me and enjoy a riot of colour, splashes and free brush strokes in painting some pretty pink knapweed.
Happy painting!
Video run-through...
About This Painting
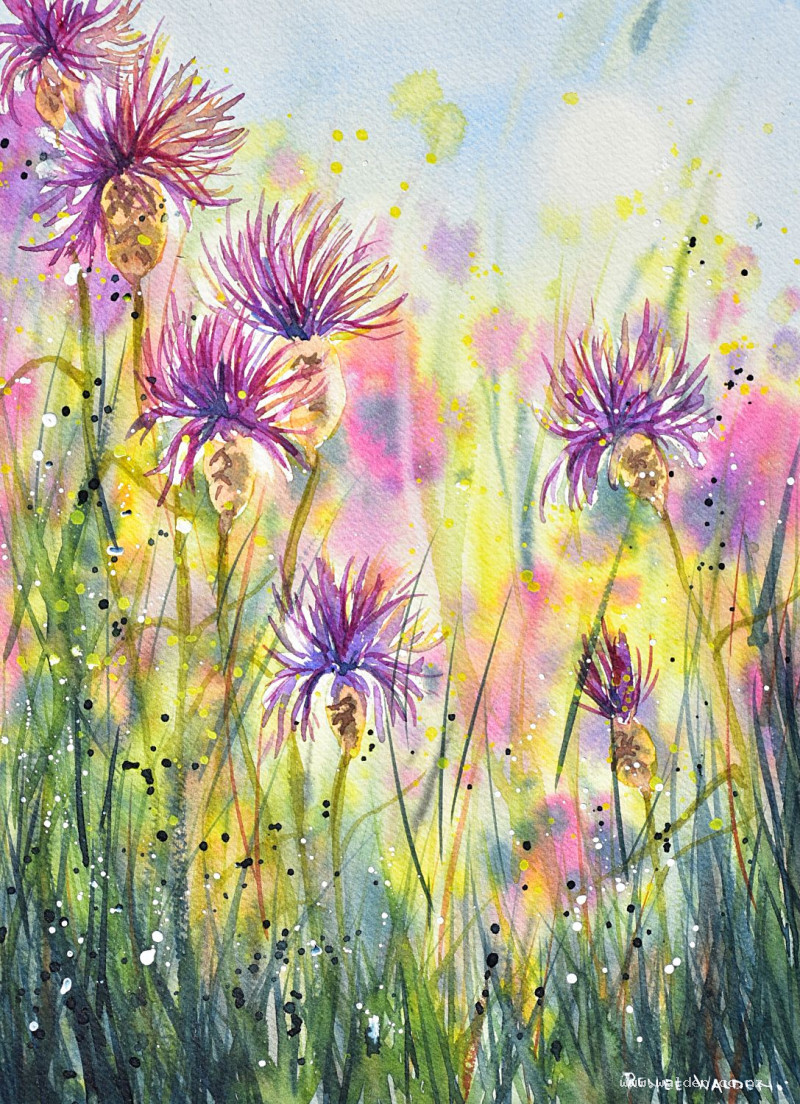
Knapweed flowers caught in late evening light along a Pyrenean roadside — backlit by the setting sun, tangled with grasses and stems, bursting with colour. This is a joyful, expansive painting that uses almost the full range of watercolour techniques: full-page wet-on-wet for the background, masking fluid for the sun, rigger brush work for stems and stalks, splattering, dry brushing, and white gouache for sparkle. No pen work is used — the whole painting is made entirely with paint and a little gouache.
The goal is a feeling rather than a faithful copy: the warmth of the evening light, the sense of depth between focused foreground flowers and blurry background, and the wildness of roadside growth in high summer.
A traceable drawing is available in the lesson description.
Materials Note
You'll need a few things beyond the usual brushes: a very large brush for wetting the whole page, several medium brushes (around size 12 and 16) for the wet-on-wet background work, a rigger brush for fine stalks and stem marks, a favourite brush for splattering, a small cheap brush reserved for gouache and masking fluid, and a firm old brush (or acrylic brush) for softening edges.
Tape the paper on all four sides or use a watercolour block — this painting uses very wet technique throughout and unrestrained paper will warp severely.
Masking Fluid: The Sun
Before anything else, mask out the sun with masking fluid applied using a cheap brush. Coat the bristles with ordinary hand soap first — this helps the masking fluid wash out cleanly afterward. The masked area will remain completely white; the glow and softness around it are achieved in the painting stage.
Let the masking fluid dry completely (an hour or two) before picking up any other brush. Wet masking fluid will destroy a brush immediately.
Mixing All Colours First
Because the entire background is painted in one wet-on-wet session without stopping, every colour needed must be mixed before the brush touches the paper. Mix large pools with plenty of water:
- Cobalt blue — for the sky (cobalt granulates less than ultramarine, giving a cleaner result)
- Hansa yellow medium — for the warm hazy light around the sun
- Quinacridone rose with a touch of blue — for the blurry background flowers
- Green gold and sap green — for the foliage
- Indigo — for the darkest corners and vignette
- Natural sienna and burnt sienna — for earthy, grounding tones in the foreground
Having multiple brushes loaded simultaneously — one per colour — means switching is fast and the wet surface doesn't dry while you search for paint.
Planning the Composition
Seven main flowers in focus (odd numbers always work better), arranged loosely with some overlapping. Background flowers and foliage are intentionally blurry — painted wet into wet. The flowers lean inward toward the sun, creating the feeling of the whole scene folding toward the light. A strong vignette of dark greens and indigo around the outer edges pushes the centre brightness forward.
Wet-on-Wet Background
Wet the whole page thoroughly with the large brush, working in all directions so water settles into every area including around the masking fluid edges. Allow the water to settle briefly — the goal is water inside the paper fibres and a layer of water sitting on top. The board should be at approximately twenty degrees.
Leave a generous unpainted halo around the masked sun. If paint runs right up to the sun edge, a hard line forms where the masking is removed — avoid this by keeping that area clear of colour.
Working quickly, drop in the colours zone by zone:
- Cobalt blue in the upper sky, staying away from the sun area
- Yellow in the warm zone around and below the sun
- Purple-pink for any blurry flower shapes in the background — these are just soft colour suggestions at this stage, not defined flowers
- Greens (green gold and sap green) in the middle and lower areas
- Indigo for the darkest corners, building the vignette
- Earthy sienna tones in the foreground
Work wet into wet throughout; don't overwork any area. Drop colour into the water on the paper and let it flow rather than scrubbing it in. The more you move the brush, the muddier the result.
Let dry naturally — don't use a hairdryer yet. The colours continue to settle and separate as they dry, and stopping this process early prevents the full granulation from developing.
Painting the Foreground Flowers
Once the background is dry, the seven main flowers are painted with more precision and definition. These are knapweed — round, thistle-like heads with a mass of fine, almost spiky petals radiating outward in a pinkish-purple. Paint each head with the quinacridone rose mix, varying the pressure and angle to suggest the radiating petals. Some petals curve forward (light side), some curl back (shadow side). While each head is still damp, drop in slightly darker marks to suggest depth within the flower.
The flowers in the foreground are more saturated and defined than those in the background, which should still be soft and suggestive from the first wet-on-wet pass.
Rigger Work: Stalks and Stems
With a rigger brush loaded with various greens, indigo, and browns, add the network of stalks that weaves through and around the flowers. Work with confident, single strokes — the rigger is designed for long, flowing marks and rewards a light, fast touch. Stems cross over the flowers and extend into the background; this integration is what makes the flowers feel embedded in the scene rather than placed on top of it. Dark strokes in the corners and edges reinforce the vignette. Make many more marks than you think you need.
Splattering
Splattering adds the wild, organic texture that suggests insects, seeds, pollen, and the random scatter of outdoor life. Two passes are useful: first with cadmium yellow light (opaque — it sits on top of other colours and shows up brightly, particularly near the sun area), and then with indigo (dark, for the corners and shadow areas). Use a large, well-loaded brush and tap or flick it to release the paint in irregular droplets.
Keep the cadmium yellow mostly in the light areas and the indigo mostly in the dark vignette zones. Some splatter falling over the flowers is fine — it integrates them with the scene.
White gouache adds the final layer of sparkle. Keep it on a separate area of the palette from the watercolours so it doesn't contaminate them with opacity. Splatter with a cheap brush and use it sparingly — a little goes a long way.
Softening the Sun Edge
After removing the masking fluid from the sun, the hard white circle will look stark. Use a clean, firm brush (an old acrylic brush is ideal) to gently rub around the edge, softening it into a natural halo. Work carefully — on good cotton paper you can push reasonably hard without damaging the surface. A very diluted touch of yellow or blue dropped into the softened area while still damp helps the sun integrate naturally with the surrounding sky.
Final Adjustments
Stand back and assess what the painting needs. Common finishing touches: a few extra dark stem marks in the foreground to ground the flowers, a little more definition in some flower heads, an additional pass of splattering if the first has dried lighter than expected. Some areas may benefit from further softening with a damp brush.
This is also the point at which the painting can be left to sit overnight — after a long painting session, fresh eyes in the morning will often reveal either that it's done or that a single small adjustment was all it needed.
Sign in white gouache (no pen was used). Remove the tape.
What Makes This Painting Work
The contrast between the soft, blurry background and the sharper foreground flowers creates the depth. The contrast between the lit central area and the dark vignette corners creates the glow. The splattering and rigger work create the wildness. All three are equally important.
Resources...
* Reference photo
* Drawing to trace
Join me on Patreon
Join my Adventures in Colour Tier for $16 to access this post and my full library of over 200 others including deep-dive videos and step-by-steps.