 Video on Patreon
Painting shadows
26 October 2023
Video - Level ◆◆◆
In this skills lesson we are going to look at how to improve painting shadows. When I look at student paintings, I often see that shadows let you down.
Shadows are so important for defining form. They create the illusion of 3-dimensions. They can also change what can be quite a bland painting, into something really special.
Usually we paint the shadows towards the end of a painting, over-laying them on top of the previous washes. I think this can make folks a little scared - you don't want to mess up what you've already painted and maybe you're a little tired as well.
We're going to paint something really simple today - a pot of flowers. It may be simple, but it has wonderful shadows! We'll start by analysing a painting I've already done, which has rather boring shadows. Then together we'll repaint the scene, improving the shadows and making a much more interesting painting.
There's a downloadable worksheet with notes attached for you to keep.
Happy painting!
Video run-through...
About This Lesson
Shadows are the element that most often lets down an otherwise good watercolour painting. This skills lesson identifies the most common shadow mistakes — then corrects them by repainting the same scene. The scene is a terracotta pot with flowers against a wall; the principles apply to any subject.
A downloadable worksheet is available in the lesson description.
Why Shadows Matter
Shadows do two things: they create the illusion of three dimensions, and they anchor objects to the surfaces they sit on. A box drawn in perspective already looks somewhat three-dimensional; add shadows on the dark faces and a cast shadow on the ground, and it becomes convincingly solid. The same principle applies to a ball: shade one side and it stops being a flat circle. Without shadows, painted objects float. Without well-painted shadows, a technically accomplished painting can still feel flat.
Because shadows are often large, dark areas, they are visually dominant — the eye goes straight to them. Getting them right matters disproportionately.
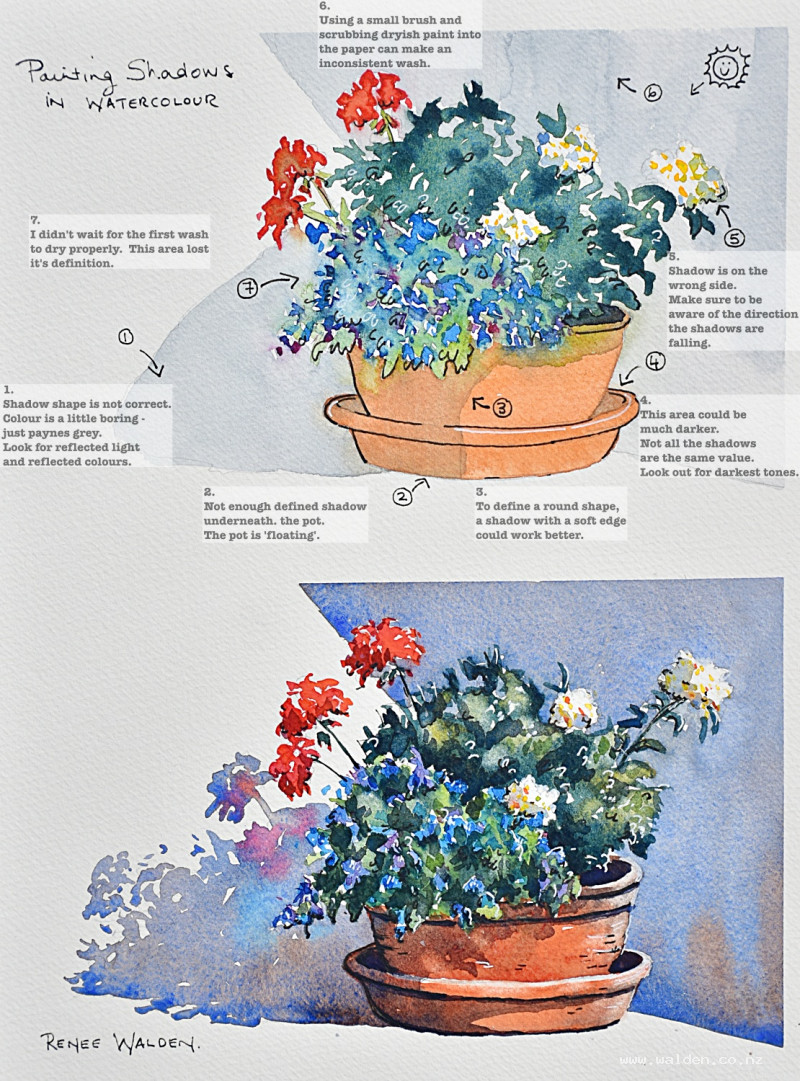
Common Mistakes (and Their Fixes)
Mistake 1: Using a ready-made gray
Shadows painted entirely in Payne's gray or a single mixed gray look flat and dead. Real shadows contain reflected colour from the sky (which makes them lean cool and blue), reflected colour from nearby objects (warm reflected tones from a terracotta pot, green from surrounding foliage), and variation that comes from the distance of different surfaces from the light source.
Fix: Mix the shadow colour from two pigments (ultramarine and quinacridone sienna is a versatile combination) and vary the proportions as you move through the shadow — more blue in the cooler areas, more brown where warm reflected colour from surroundings enters the shadow. Drop in additional colour (a touch of pink, a touch of indigo, a touch of brown) while the wash is still wet. The shadow will read as coherent but visually interesting.
Mistake 2: Using too small a brush
A shadow painted with a small brush requires many reloads, and each time the brush returns to a drying passage it creates hard lines, cauliflower blooms, and uneven patches.
Fix: Use the largest brush that fits the area — for a medium-sized shadow, this typically means a size 10 or larger. Load the brush fully (paint right up into the ferrule), and work from one edge of the shadow to the other in a single connected pass. Speed is more important than precision at this stage.
Mistake 3: All hard edges
Hard edges on every shadow make the scene look stiff and cut-out. In nature, wind moves foliage, light scatters, and rounded surfaces curve away from the shadow boundary.
Fix: Decide which edges should be hard (crisp cast shadow edges on flat surfaces in strong light) and which should be soft (the shadow edge on a round object, the edge where a shadow falls into moving foliage). Soften selected edges immediately after placing the colour by cleaning the brush, drying it on a paper towel, and drawing it along the wet edge. A mix of hard and soft edges reads as far more natural than either alone.
Mistake 4: Ignoring the shape of the shadow
A shadow's shape is determined by what's casting it and what surface it falls on. A shadow that lands on a flat ground is different from one that climbs up a wall or wraps around a rounded pot. Ignoring this and painting a generic blob loses all the visual information the shadow could carry.
Fix: Look carefully at the reference and trace the actual shadow shape before painting. Shadows that follow the form of the surface they fall on (curving around a cylinder, climbing steps, wrapping over a rim) reinforce the three-dimensionality of both the casting object and the receiving surface.
Mistake 5: Forgetting reflected light
Where an object sits close to a pale or warm surface, light bounces back from that surface into the underside of the shadow. A round pot sitting on a pale floor will have a subtle lighter area along its base inside the shadow — reflected light from the floor. A terracotta pot will cast a warm orange glow into the shadow near it.
Fix: Leave a very slightly lighter area along the base of round objects within the shadow, and drop a touch of the nearby colour (warm brown, orange, or whatever is correct for the scene) into the shadow while still wet. Don't overdo it — reflected light is subtle.
Mistake 6: Not going dark enough
This is the most common failure. Students paint shadows too pale because the underlying painting is attractive and they're reluctant to risk it. Shadows in strong sunlight are genuinely very dark, and a timid shadow wash makes the whole scene look weak.
Fix: Mix the shadow colour darker than feels comfortable, then test it on a scrap. Work transparently — a well-mixed transparent wash will let the underlying colour show through while still achieving strong tonal contrast. The shadow creates the light: without a convincingly dark shadow, the light areas lose their luminosity.
Mistake 7: Painting shadows before the underlying washes are dry
If the base paint is still wet when shadows are applied, the shadow colour bleeds into the base and both layers lose their integrity — the soft mess that results looks wrong and is very difficult to fix.
Fix: Use a hairdryer to ensure each layer is thoroughly dry before applying shadow washes. Shadows go on last.
Mistake 8: Inconsistent light direction
In a multi-element scene, every shadow must come from the same light source. Finding a shadow on the left side of one element and the right side of another immediately reads as wrong, even if the viewer can't identify what the problem is.
Fix: Identify the light direction at the start and mark it on the drawing. Check every shadow before painting it.
Applying the Principles: The Terracotta Pot
The demonstration painting shows a terracotta pot with flowers against a wall, repainted with all the above corrections applied.
Background foliage shadows: Use a large brush with ultramarine and quinacridone sienna. Mix mostly blue for the cool sky-lit areas; add brown where warm reflected colour enters. Hold the brush loosely and let the tip create an irregular, organic shadow edge — the foliage isn't a solid block and neither is its shadow. Add a little phthalo blue or indigo for the very darkest areas where overlapping leaves block all light.
Wall shadow: A large brush and the same two-colour mix, this time leaning slightly warm where the terracotta pot reflects its colour into the adjacent wall shadow. Vary the colour across the wash.
Pot shadow: Follow the actual shadow shape — it curves over the rim, follows the cylinder of the pot body, and anchors to the ground with a dark cast shadow. Drop in reflected warm colour (brown from the terracotta) while still wet. Slightly lighter along the base inside the shadow for reflected light. Soften the edge of the shadow on the rounded body; keep the cast shadow on the ground somewhat harder.
Darkest darks: Once the main shadow wash is dry, add the very darkest marks — underneath the pot, deep inside the foliage, the interior of flowers in shadow. These go on last, with a small brush, dark and transparent.
Pen Work (Optional)
Shadow-side edges on the pot benefit from a little dark brown ink to sharpen them. Keep this minimal — pen should tighten what the paint has done, not replace it. White gel pen or white marker on the lit side adds a last touch of sparkle. A few pen marks in the foliage prevent the pen work from sitting only on the pot.
The test of good pen work: a viewer looking at the painting shouldn't notice it was used.
Key Takeaways
Use a big enough brush and work fast across shadow areas in a single wet pass.
Mix shadow colours from at least two pigments and vary them as you go.
Include reflected colour from nearby objects — it's what makes shadows glow.
Be brave with the darks. A shadow that is too pale undermines everything around it.
Soft edges where things are round; hard edges where light is direct. Not all one or all the other.
Always go last. Every layer beneath must be completely dry before shadows are applied.
Resources...
* Reference photo
* Worksheet
* Drawing to trace
Join me on Patreon
Join my Adventures in Colour Tier for $16 to access this post and my full library of over 200 others including deep-dive videos and step-by-steps.