 Video on Patreon
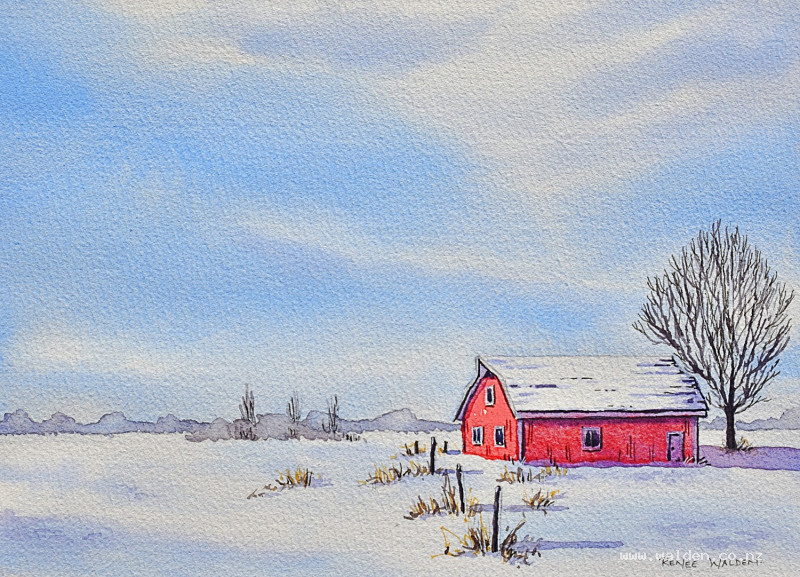
Red barn in the snow
4 January 2024
Video - Level ◆◆◆
There was something so evocative in this reference photo when I first saw it years ago. Something that said freezing cold, winter's day. But it was really the clarity of the colours that caught my imagination - so clear and vibrant.
It feels to me that watercolours are perfect for painting a scene like this. With minimal detail, big loose washes and a gentle touch, watercolours have a clarity all their own.
So in this lesson we focus on how to achieve beautiful washes. This scene may seem really simple, but when you've managed to make clear, unfussy washes, then you've really mastered one of the essential watercolour skills. We're going to leave detail behind and I'm going to show you how to concentrate on the painting process itself.
Happy painting!
Video run-through...
About This Painting
A red barn in winter snow — crisp, cold, luminous. This painting looks deceptively simple but it's built entirely on technique: there is no detail to hide behind. Everything depends on the quality of the washes. The lesson is structured around one central goal: keeping the luminosity of the white paper alive throughout, so the finished painting glows from within rather than looking flat or chalky.
A traceable drawing is available in the lesson description.
The Central Principle: Luminosity
Luminosity in watercolour comes from light passing through the paint layer, bouncing off the white paper underneath, and returning to the eye. When paint is scrubbed hard into the paper, the fibres are flattened and compressed — the light can no longer bounce back, and the painting looks dull. Working with large pools of paint, a fully loaded brush, and a gentle touch preserves the paper surface so the light can do its work.
This lesson comes back to this principle repeatedly: big pools of paint, load the brush fully, drop the colour into a layer of water rather than scrubbing it in, work with as few brush strokes as possible.
Mixing the Sky Colour
Mix a large pool of cobalt blue — genuinely large, more than seems necessary. Working with too little paint forces you to go back to the palette repeatedly, which means returning to paint that is already beginning to dry on the paper. Mix a second pool of the same cobalt blue with a touch of permanent violet and a small amount of burnt umber to create a slightly purple-gray for the cirrus streaks. Both pools should have plenty of water and strong pigment concentration. Tilt the palette to see the depth of the pool.
Painting the Sky
Wet the sky area twice — first pass settles into the paper fibres, second pass creates a working layer on the surface. Include the area over the winter tree and the distant bushes. Board at approximately twenty degrees.
Load the brush fully — paint all the way to the ferrule. Drop the cobalt blue into the wet sky with as few strokes as possible, working from one side across. Resist the urge to go back and rework. The paint will find its own level in the water layer. Leave the cirrus area unpainted.
With the brush cleaned and dried on a paper towel, add the purple-gray mix in the cirrus area with a few streaks. Then immediately clean and dry the brush again and use its tip to lift soft, feathery streaks from the wet colour — dragging the clean damp brush through the wet paint creates the characteristic wispy edge of cirrus cloud. These marks will continue to soften and move as the paint dries.
Pick up any beads at the edges with a paper towel corner. Let dry completely and naturally — don't use a hairdryer yet. The cirrus streaks continue to settle for several minutes and stopping them prematurely with forced drying produces stiff, artificial-looking edges.
Painting the Snow
The snow is painted with the same approach as the sky — wet first, drop the colour in, let it settle — but with significantly more white reserved. Mix the snow shadow colour from cobalt blue with a very small amount of the purple-gray used in the sky, keeping it very diluted. The snow is not pure white; it carries the reflected colour of the sky and the cool shadow of winter light. But most of it should remain the white of the paper.
Work from back to front, leaving large areas completely unpainted. Drop in colour for the gentle humps and dips of snow-covered ground — suggesting slightly raised areas, buried fence lines, a shallow drift. The snow need not be flat: even a few soft marks across the foreground suggest that the ground is not a simple plane.
Let the snow dry completely before painting anything on top of it.
The Red Barn
The barn is the focal point and the only warm colour in the painting. Mix the red carefully — it should be vibrant but not jarring against the cool blue-white snow. A pure cadmium red or pyrole red can be used, but warming it very slightly with a touch of orange gives it the sense of old-painted wood rather than a new coat.
Paint the barn in sections, keeping the sunlit face (this side in full light) and the shadow face (the other side, in shade) separate. For the sunlit face: strong, warm red, painted wet enough that the colour has some variation. For the shadow face: the same red with the shadow wash applied on top later. The roof, if corrugated iron, gets the usual treatment — strokes following the corrugations, occasional white gaps for reflected light.
Work gently. Any area where the paint is scrubbed into the already-dry snow risks lifting or disturbing the snow colour.
The Tree
The winter tree is leafless — just a network of dark branches against the sky. Use a rigger brush or fine round for this. Start from the trunk and work outward toward the tips, applying less pressure as the marks get finer. The outermost twigs should be barely visible. Vary the thickness and direction; no two branches fork at exactly the same angle.
Shadows
The shadows are what make this painting come alive. Without convincing shadows, the snow reads as flat white and the barn floats.
Mix the shadow colour from cobalt blue, a touch of permanent violet, and a small amount of burnt umber — consistent with the sky colour, which is intentional. Keep it diluted; winter shadows are not black. This shadow is being applied on top of dry layers, so being gentle is essential: hard pressure will drag and muddy the colour beneath.
Load the brush fully and apply shadow in a single continuous pass where possible. The shadow on the barn wall goes on with a large brush, moving quickly from one edge to the other without stopping. The cast shadow from the barn falls across the snow to the right, and the shadow from each fence post follows the same direction. Fence post shadows get longer and wider as they come toward the foreground (larger objects cast larger shadows).
Soften the shadow edge under the eaves immediately by cleaning the brush, drying it, and drawing it gently along the base of the shadow while still wet.
Second pass once dry: the very darkest shadows — inside windows, under eaves, inside doorways — with a thicker version of the same mix. Apply these with a small brush and soften some edges. A few small dimples and impressions in the snow near the barn suggest depth and footprints without becoming fussy detail.
Pen Work
Dark brown ink (or black for this particular scene) in a fine pen on shadow sides only: the right side of fence posts, the shadow edge of the barn walls, underneath eaves, around window and door frames. A few weather board marks on the barn face. The bare tree branches benefit from a light pass with the pen or the pen turned upside down for its finest mark — the very finest outer twigs can be more convincingly placed with ink than with a brush.
White gel pen or white gouache adds snow on branches and a few bright highlights on the lit edges of the barn.
Sign and remove the tape.
What This Scene Teaches
There is no complex subject matter here and almost no detail. Everything depends on the quality of the washes — the luminous sky, the glowing red barn against cold white snow. When these elements work, the painting has an immediate, powerful presence. When the technique falters — if the paint is scrubbed in, the pools are too small, or the brush is overworked — the painting looks tired and flat regardless of how carefully the subject is drawn. This is watercolour at its most essential.
Resources...
* Reference photo
* Drawing to trace
Join me on Patreon
Join my Adventures in Colour Tier for $16 to access this post and my full library of over 200 others including deep-dive videos and step-by-steps.