 Video on Patreon
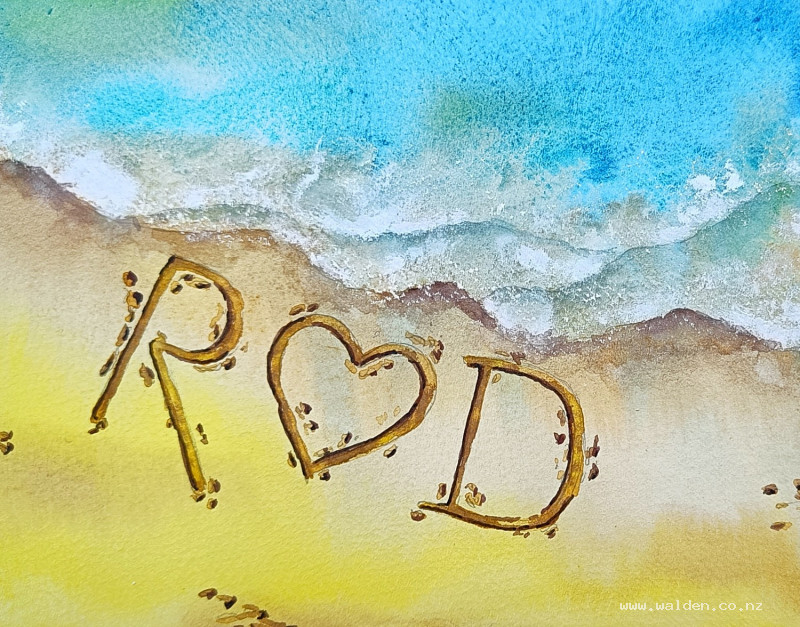
A valentine's message
8 February 2024
Video - Level ◆◆◆
It's the month of love! And I've been thinking about writing loving messages. Plus I've been dreaming about tropical beaches since it's the middle of winter here.
In today's lesson we write a message on a beach. Of course I wrote R loves D, but you can write any message you like. It doesn't even have to be a romantic one. I'm looking forward to seeing what your message is ;-)
You'll need a white wax candle and some white gouache for this lesson.
Happy painting!
Video run-through...
About This Painting
A message written in the sand on a tropical beach, with turquoise waves lapping at the edge of the composition. The scene uses a wax candle resist to create the foamy water effect and white gouache for the final foam details. The main technical challenge — and the most satisfying part of the painting — is rendering the carved lettering so it looks genuinely three-dimensional, with a sunlit lip on one side and a shadowed hollow on the other.
The message is entirely your own choice: a name, a date, a word, a heart. A reference image of a heart is provided in the lesson description as a compositional guide if you don't want to use letters.
You'll need a plain white dinner candle for the wax resist and white gouache on a separate small palette. These are the only materials beyond a standard watercolour setup.
The Wax Candle Resist: Practice First
The wax candle is used to block out the foam shapes before any paint goes down. Unlike masking fluid, it cannot be removed — wherever you press the candle, that mark is permanent. It's invisible once applied and its effect depends heavily on pressure, so practice on a scrap of the same paper before committing to the painting.
Try three variations: light pressure with dense marks, heavy pressure with dense marks, and heavy pressure with marks spaced further apart. Paint over the test area with a wash of phthalo blue to reveal the results. A combination of dense marks in some areas and more open marks in others works well for foam — dense where the wave breaks hardest, sparser toward the deeper water.
Apply the candle to the foam area of your painting before wetting the paper. Work the marks in the direction the foam moves, following the wave edge. Use the blunt end for broad marks and the tip (with the wick cut off) for finer lines at the foam edge. Flick off any loose wax fragments before moving on.
The Pencil Drawing
Indicate the incoming wave lines at a slight angle across the lower portion of the composition, and mark your message in the sand area below. The wave lines and the writing placement are the only elements that need to be drawn — the water itself is painted freely.
Colour Planning
The water moves from dark tropical blue at the back through a blue-green mid-zone to cobalt teal at the foam edge. Mix: phthalo blue for the deep water; phthalo blue plus green gold for the mid-green zone; cobalt teal for the shallow turquoise. Keep these on one brush. On a completely separate brush, mix the sand colours: natural sienna (or raw sienna) for the wet sand and foam shadow; Hansa yellow (or similar bright yellow) for the dry beach; burnt umber in reserve for darkening. The two brushes are kept separate throughout to prevent the blue and yellow from mixing into green on the page.
Painting the Water and Beach
Wet the entire page from top to bottom with clean water, including over the wax. The wax will visibly resist the water — this confirms it's working. Add enough water to allow plenty of working time.
Working quickly with the blue brush, lay in the dark phthalo blue across the upper water, transitioning to the blue-green mix and then the cobalt teal as you move forward toward the wave break. Let the colours blend into each other. Then pick up the sand brush and continue seamlessly down the page: wet sand tone (natural sienna) through the foam zone, shifting to the bright dry sand yellow at the bottom. The whole page should be painted as one continuous wet-in-wet pass. The wax resist will hold white paper through all of this.
Drop the board flat once the colours are placed where you want them. Allow to dry naturally at first, then finish with a hairdryer.
White Gouache Foam
Once dry, use white gouache on a separate palette to add foam details along the wave edge — the breaking crest and where earlier waves have spread across the sand. Use a brush and apply the gouache in loose, organic marks that follow the movement of the water. Don't overdo it; lift out any excess immediately with a clean damp brush. Keep the gouache brush water separate from your watercolour water, and clean it thoroughly when done — even small amounts of gouache contaminating your watercolour wells will make subsequent washes chalky.
Wave Shadows
Mix natural sienna with a little permanent violet for a warm purplish-brown shadow. Working with a small brush, paint a shadow line along the leading edge of the wave where it breaks onto the beach — the wave sits on top of the sand and casts a shadow beneath it. Paint a small area, then immediately clean the brush, dry it, and soften the shadow edge outward. The combination of hard inner edge and soft outer edge makes the wave look like it's moving. Where one layer of foam overlaps another in the water, add a touch of blue to the shadow mix to keep it feeling like water rather than sand.
The Writing: First Pass
The lettering is carved into the sand, so it needs to look three-dimensional — a sunlit lip on one side and a shadowed hollow inside. Decide on your light direction before starting; in this painting the light comes from the left, meaning the right-hand edges of the letters catch the sun and the left-hand interiors are in shadow.
With a small, sharp-pointed brush, paint all the letters first in natural sienna alone — this represents the overall sand tone. While still wet, drop in the dry sand yellow on the sunlit edges (right side) and the deeper shadow mix (natural sienna plus violet) into the hollow and left-facing surfaces. Let the colours blend wet-in-wet so the transition from light to shadow is smooth. Also paint the small clumps of wet sand thrown out from the letters — keep these random and vary the colour within each one by dropping in shadow mix while wet.
The Writing: Second Pass
Once dry, come back with a slightly thicker, less diluted mix of the shadow colour and sharpen the deepest shadow edges — inside the hollows and on the shadow side of the thrown sand clumps. These harder edges are what make the carving read as three-dimensional. Use as little water as possible in the mix so the marks stay sharp rather than spreading. A smaller brush (number 2 or 1) helps with precision here.
Pen Work (Optional)
A single pen — dark brown ink with an extra fine nib — can be used to sharpen a few of the letter edges and the shadow sides of the sand clumps if the painting needs tightening. Keep it minimal: a few broken lines, not a full outline. If the brushwork is reading clearly, the pen can be left out entirely.
Resources...
* Reference photo
* Reference photo
Join me on Patreon
Join my Adventures in Colour Tier for $16 to access this post and my full library of over 200 others including deep-dive videos and step-by-steps.