 Video on Patreon
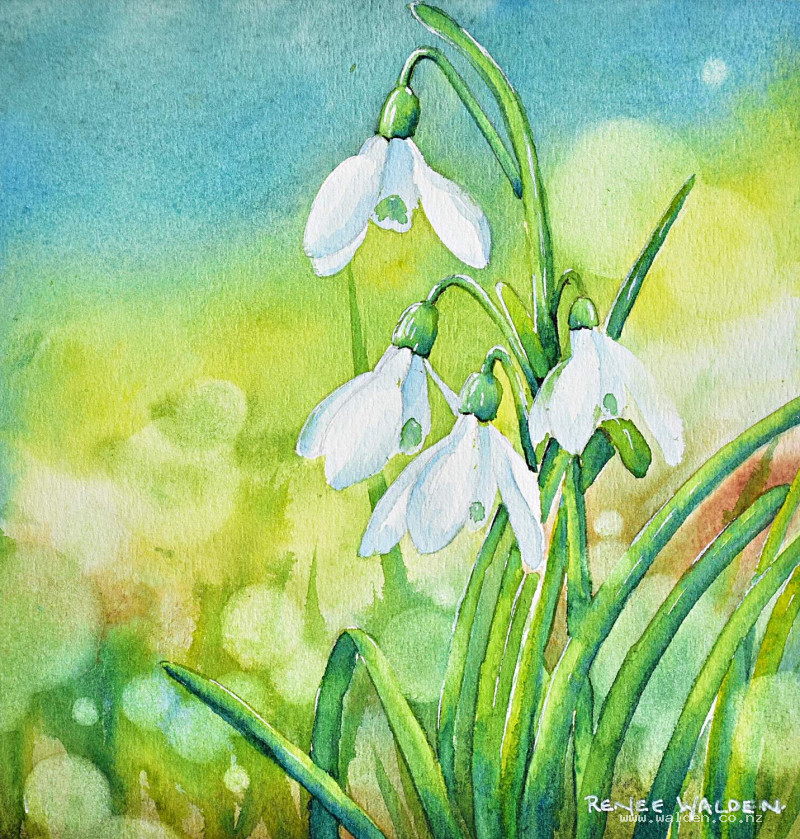
Snowdrops
25 April 2024
Video - Level ◆◆◆
A very iconic symbol of the first signs of spring - snowdrops! They're so delicate and pure and super lovely to paint.
In this lesson we also play with creating a bokeh effect - those circle highlights that create some interest in our soft green background. These are wonderfully addictive to create and I dare you not to do too many and overdo it ;-)
Happy painting!
Video run-through...
About This Painting
Four snowdrops in a soft, spring-green background — a beautifully harmonious colour scheme built from yellow-greens, blue-greens, and a touch of earthy red as a complement to make the greens sing. The white petals are preserved with masking fluid, which frees you to paint the background loosely and confidently. The lesson is particularly good practice for mixing and varying greens, and includes a fun session with a circle stencil to create a bokeh effect in the background.
You'll need masking fluid and an old cheap brush for applying it, a bar of soap to protect the bristles, a circle stencil (available cheaply online, or cut from a piece of plastic), and a white gel pen for final highlights. Three snowdrops are painted in sharp focus; the fourth is deliberately kept soft with a lost edge to add dynamism to the composition.
A traceable drawing is available in the lesson description.
The Pencil Drawing
The four snowdrops are placed off-centre, leaving the opposite side of the composition open and soft. Draw the flowers first, noting their characteristic shape: they narrow where the stem meets the back of the flower, then widen into rounded, bulbous petals. Once the flowers are placed, fill in foliage around them. Before applying masking fluid, use a kneadable eraser to clean up the drawing — roll it into a sausage to lift smudges, or knead it to a point to erase specific areas. Lightly lift the pencil line on the edge of the fourth (background) snowdrop — this is the one that will be lost into the background, and reducing the drawn edge helps reinforce that effect at the painting stage.
Applying Masking Fluid
Use a cheap brush — not a good one. Wet it and work bar soap thoroughly into the bristles before dipping into the masking fluid; this protects the brush and prevents the fluid from bonding permanently. Mask all four flowers and all the drawn foliage. Don't let the fluid dry on the brush — if it starts to get gummy, clean it immediately with soap and water.
Allow the masking fluid to dry completely before painting. It's ready when it loses its milky appearance and is no longer sticky to the touch — this can take a couple of hours depending on temperature.
The Background
Wet the entire background with clean water (not water that has had masking fluid or soap in it). Mix four colours ready before you start: green gold for the bright, fresh mid-green; sap green for the darker lower areas; Prussian blue dulled with a touch of burnt umber for the cool gray-blue upper area; and burnt umber on its own for an earthy streak across the middle.
Lay in a band of bright green gold across the centre — this is the focal point and should have the most colour. Add the earthy burnt umber as a warm stripe, then the darker sap green toward the lower edge to give the painting weight. Finish with the gray-blue across the top. Work the colours into each other so the bands merge rather than stripe. Where the lost-edge snowdrop sits, keep the background colour lighter and less saturated so the petal can blur into it.
Use a spritz bottle to keep areas moving if they start to dry too quickly. Lay the board flat and let it dry naturally until almost dry, then finish with a hairdryer — but don't use forced heat too early or you'll get hard edges. Take care not to overheat the masking fluid or it will bond to the paper and become impossible to remove.
Bokeh Effect: First Pass
Once the background is fully dry, use a circle stencil to add bokeh — soft, out-of-focus circular highlights that suggest blurred light in the background. Hold the stencil against the dry paper and use a slightly damp brush or a lifting technique to create soft-edged circles. These sit in the background and read as depth and atmosphere rather than solid shapes. Keep them varied in distribution and don't overdo it — subtle is better.
Removing the Masking Fluid
Once the background is completely dry, rub off the masking fluid with a clean finger or a rubber eraser. The white paper beneath is now exposed as the flower and leaf shapes.
The Petals
The snowdrops are growing in a sheltered, shaded spot, so the contrast between light and shadow on the petals is gentle — nothing too stark. Mix a very pale blue-gray from Prussian blue and a tiny touch of quinacridone sienna, keeping it extremely dilute. Use only non-granulating colours here (phthalo blues, quinacridones) so the shadows stay smooth and soft.
Look at the reference carefully and paint only the shadowed areas — the insides of the drooping petals, where one petal folds over another, and along the rounded lower edges. While each shadow is still wet, clean and dry the brush and soften the edge outward, leaving plenty of the white paper untouched. The fourth snowdrop (the lost-edge one) should have very little shadow and stay as pale and indistinct as possible.
Once the leaves are painted and the tonal contrast is established, reassess whether the petals need any more work.
The Leaves and Stalks
Paint each leaf individually rather than as a flat wash of one green. Start with green gold on one side, then drop sap green in while still wet so the two merge. Add a touch of Prussian blue at the base or shaded side for depth and to tie the leaves back to the cool background. Leave small gaps of highlight along the leaf edges where light catches the shiny surface. Dry between leaves if they are touching, to prevent colours running where they shouldn't.
Paint the calyx (the rounded green cap behind each flower head) and stalks in the same way — green gold for the light side, sap green and Prussian blue for the shadow. Lift a thin highlight along the length of each stalk with a clean dry brush to make them look rounded. There are also small green arrow-shaped markings within the white petals that are characteristic of snowdrops — add these with the same greens once the petals are dry.
Final Details
Remove the tape to see the painting without its border before deciding on final touches — the surrounding frame can make it harder to judge what the painting needs.
Add subtle highlights with a white gel pen on the shiniest parts of the leaves and the brightest petal edges. Rub some marks gently into the paper with a finger to reduce their intensity — the goal is sparkle, not bright white outlines. It can help to leave this step until the following day, when you're less likely to overwork it.
Do a second, more selective pass of the bokeh stencil, placing a few circles directly over leaves and flower edges to push some elements softly out of focus and reinforce the sense of depth.
Finally, add a very small amount of dark ink with a fine pen underneath the calyxes where they meet the stalks — just a few marks to tighten the focal point. Keep it minimal.
Resources...
* Reference photo
* Drawing to trace
Join me on Patreon
Join my Adventures in Colour Tier for $16 to access this post and my full library of over 200 others including deep-dive videos and step-by-steps.