 Video on Patreon
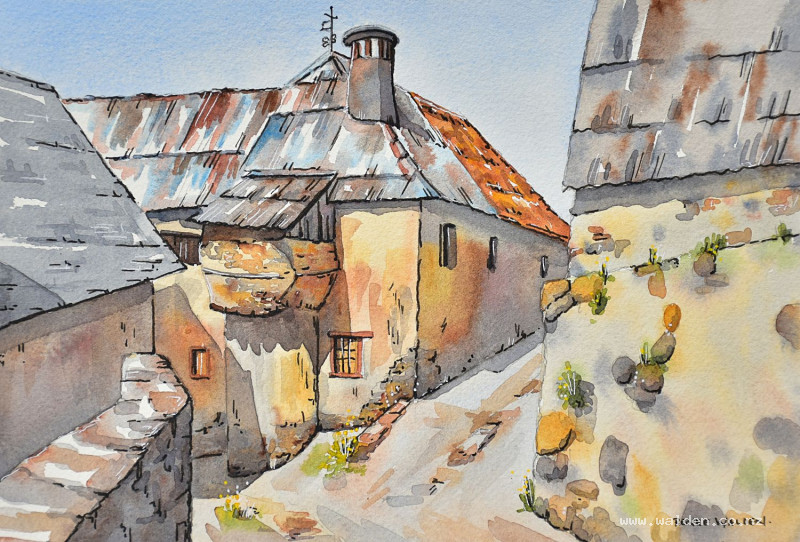
Light and shadows in Serveto, Spain
26 October 2022
Video - Level ◆◆◆
Here's an urban scene from the lovely little mountain village of Serveto in the Spanish Pyrenees. This little village is full of little alleyways that are wonderful to explore and sketch and I visit quite often.
What I loved about this scene was all the textures in the stonework and corrugated iron, and how the shadows and light create such beautiful form in the buildings.
Happy painting!
Video run-through...
About This Painting
This scene is set in the tiny village of Sorbas, right in the Spanish Pyrenees on the Camino de Santiago — all rustic textures, crumbling plaster, corrugated iron, and a massive historic bread oven that anchors the composition. What makes it particularly interesting to paint is the shadows: they create strong diagonals that lead the eye into the scene, describe the rounded form of the oven, and carry a surprising amount of colour from reflected light and the warm textures underneath. This is a painting where the shadows do a lot of the heavy lifting.
Materials
For colours you'll need cobalt blue, burnt umber (for mixing grays), natural sienna (or raw sienna), burnt sienna, sap green, and a warm red or orange for the roof tiles. Test your blue-brown gray mix on scrap paper first — some combinations read as green, which you'll want to avoid.
For pen work, a fine-nib pen with dark brown ink works better than black in a warm, sunny scene like this — black can feel harsh. A white gel pen and a white Posca marker are useful for highlights and sparkle. A yellow Posca marker is handy for adding small wildflowers at the end.
The Pencil Drawing
Draw the scene in reasonable detail, including the shapes of the shadows — sketching where the shadows fall before you start painting helps you place them confidently and quickly later, which matters when you're working wet. Simplify where needed: the lampposts in the reference photo, for example, are worth leaving out to keep the focus on the bread oven. A traceable version of the drawing is provided if you'd prefer to skip this step and go straight to painting.
Tape all four sides of your watercolour paper and prop your board at a slight angle — around fifteen degrees — to help water flow consistently and give you better control over wet washes.
Painting the Sky
Mix a generous pool of cobalt blue with plenty of water. Wet the sky area with clean water first, shaping carefully around the buildings. Check from the side that the paper is consistently damp with no dry patches — a bead of water along the bottom edge can be picked up with a dried brush. Then drop in the cobalt blue. Go slightly darker along the top of the sky, letting it flow down toward the horizon. Don't forget the sky visible through the chimney opening. This is a clear summer sky, so keep it simple and smooth.
The Alleyway
While the sky dries, move to the alleyway in the foreground — it isn't touching the sky, so you can work on it safely. Mix a range of grays and warm browns: mostly cobalt blue with a little burnt umber for the cooler gray, then shift the balance toward more burnt umber for a warmer tone, and use natural sienna and burnt sienna for the warmer areas. Paint with strokes that follow the direction the alleyway runs — downhill from right to left — and drop the different colours into each other wet. Leave gaps and vary the tone to suggest uneven paving rather than flat tarmac. Don't add brick or stone detail yet; that comes later, once you've established how much detail the focal point needs.
The Walls
With the alleyway drying, move to the supporting walls. The smooth plastered wall gets a wash of natural sienna with a little gray dropped in while still damp — this represents the wall colour without any shadow on it yet; the shadows come later as a separate layer. The stone wall on the other side gets the same base colours but with small dots and dashes of burnt sienna and thicker natural sienna dropped in while wet, creating soft blooms that suggest irregular stonework. The contrast between the two surfaces — smooth plaster versus textured stone — is part of what makes the scene interesting.
Let everything dry thoroughly before continuing. If you're using a hairdryer, now is a good time.
Painting the Roof and Corrugated Iron
The roof area takes a warm, rusty mix — burnt sienna and natural sienna — painted loosely to suggest aged corrugated iron and old tiles. For the slate section, indicate a few tiles with directional strokes, watching your perspective lines. Keep in mind that the colour here should read as what the surface looks like in direct sunlight, not yet in shadow.
The Bread Oven and Main Walls
This is the focal point and deserves the most attention. The oven has a distinctive rounded form, so take a little time establishing the base colours before the shadows go on. Keep the sunlit surfaces warm and relatively light.
Painting the Shadows
This is where the painting really comes alive. The shadows in this scene are not flat gray — they carry warmth and reflected colour from the surfaces they fall across. Mix your shadow colour from cobalt blue and a touch of your existing warm tones rather than using a neutral gray straight from the tube.
Work quickly and confidently, especially on large shadow areas — there is almost no time to breathe when covering a big wash, and hesitation will leave marks. Paint the shadows on the bread oven in a warm hue that follows and describes its rounded form. The cast shadow falling across the alleyway should be included as part of this pass. For the cooler shadow under the roof eaves, shift the mix toward a slightly cooler, bluer tone to reflect the colour of the roof above.
Once the large shadows are in, switch to a smaller brush for the finer shadow work: the cast shadow of the chimney, the overlapping corrugations on the iron, shadow lines between tiles, and the rounded shadows on individual stones to make them read as three-dimensional. Keep a good balance of pen and brush — not everything needs to be done in paint.
Allow the first shadow pass to dry, then assess. A second, slightly darker layer under the eaves will help them read as properly recessed. Add a little shaping to the grasses with sap green mixed into one of your shadow colours. Check windows — they often benefit from being a touch darker at the top.
Pen Work
Make sure the painting is completely dry before picking up a pen — working on damp paper will damage a felt-tip nib. Start tentatively in a less important area to warm up, using a light touch. The general rule is: pen work on the shadow side, restraint on the sunlit side. Let the paint shine where it already looks good, and use the pen to sharpen edges, exaggerate texture, and add definition rather than to outline everything uniformly.
Work across the painting gradually, spending the most time around the bread oven. Follow the shapes and marks already made by the paint and exaggerate them selectively. Stand back regularly to check you're not overdoing it — the goal is to sharpen the image, not cover it. For the finest marks (the weather vane, for example), try turning the pen upside down for a lighter, finer line.
Finish with the white gel pen for highlights along tops of edges and to add sparkle, and the white Posca marker for any bright white details. A few yellow or white wildflowers dotted in at ground level add a lovely finishing touch.
Finishing Up
Sign the painting — drawing a light pencil guideline first keeps the signature straight. Step back, take it in, and resist the urge to add more. The richness of this scene comes from layers of warm colour and well-placed shadow, and knowing when to stop is half the skill.
Happy painting!
Resources...
* Reference photo
* Reference photo
Join me on Patreon
Join my Adventures in Colour Tier for $16 to access this post and my full library of over 200 others including deep-dive videos and step-by-steps.