 Video on Patreon
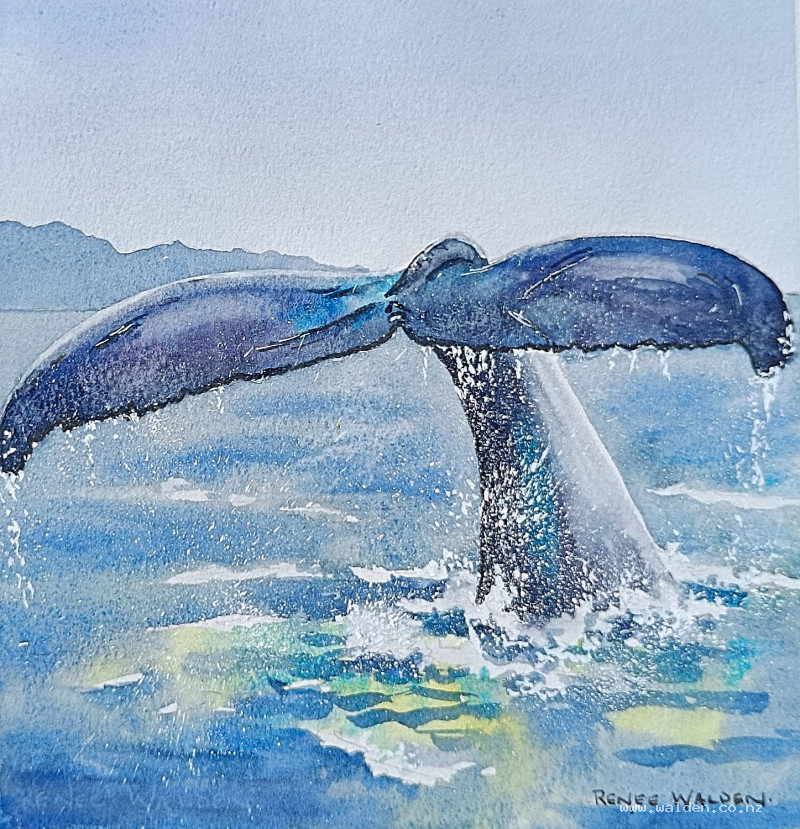
Whale tail
25 July 2024
Video - Level ◆◆◆
Who else has seeing whales up close on their bucket list? I'm sure it's not just me :-)
In this lesson we're going to paint a lovely humpback whale tail and you can choose all your favourite blues and greys. This is an easy lesson, and perfect for practising soft colour transitions in both the tail and in the sea.
Happy painting!
Video run-through...
About This Painting
A humpback whale tail (fluke) rising from the sea — dark, wet, and glistening — with a pale sky behind and a distant mountain creating a white-edge contrast. The colour of the whale is an invitation to experiment with the full range of blues on your palette rather than defaulting to a flat gray. The painting ends with a session of white gouache splattering and drip marks using a toothbrush, which is where most of the life and energy of the water comes from.
You'll need white gouache, an old clean toothbrush, a kneadable eraser, and a separate small palette for the gouache so it doesn't contaminate the watercolours.
A traceable drawing is available in the lesson description.
The Pencil Drawing
The horizon line is lowered slightly from the reference photo to give the tail more presence — the fluke appears to rise higher and the viewer feels closer to the whale. A small mountain is added in the background: it gives the whale's white edge something to contrast against (pale fluke against dark mountain on one side, dark fluke against pale sky on the other), and it anchors the scene near a coastline rather than in open ocean.
Before painting, use a kneadable or standard eraser to lighten the pencil lines in the brightest highlight areas — the glistening edge of the tail and the foamy splash areas. A hard pencil line showing through white paper looks wrong and is worth removing in advance.
Painting Order
Paint the whale tail first, then cut in with the sky and background afterward. For animals with light catching their edges, it's easier to paint the subject and then shape the background around it than to try to reserve the edge while painting the background first.
The Whale Tail: Colour
The tail looks gray in the reference, but that's not an invitation to use a flat mixed gray. The real surface varies from near-black in the darkest shadow areas and where the splashes need maximum contrast, through a range of cool blue-grays in the mid areas, to a brighter blue-turquoise along the very top edge, and silvery highlights where the light catches the wet surface.
Mix the main blue-gray from ultramarine and quinacridone sienna — the ultramarine is heavy and settles into the paper surface creating texture, while the sienna floats. Have additional colours ready: a bright blue (cerulean or phthalo), permanent violet for deepening the darks, Payne's gray as a backup for the very darkest areas, and a touch of turquoise or phthalo blue-green for the upper edge.
Painting the Tail
Work quickly with two brushes — a larger one for the main body and a smaller one for the edges and detail areas. Reserve the highlight edges unpainted. Change colour frequently as you move through the tail: bluer at the top, darkest purple-gray where the fluke turns in on itself and at the base, a little turquoise at the uppermost edge. Don't be timid with the darks — any area where white gouache splatters need to show up later must be genuinely dark, otherwise the white won't read against it.
While the paint is still wet, soft transitions between colours will happen naturally. For the sharp line where the tail rises against the sky, keep that edge clean.
Let dry. Stand back and check the tonal contrast: if the tail doesn't stand out clearly from the background, add a second transparent wash over the darkest areas, cleaning the brush and softening the edges before the wash dries. It's very common to need this second pass — the eye adjusts while painting and it's only when stepping back that insufficient darkness becomes obvious.
The Sky
Wet the sky area and drop in a pale, cool wash — cobalt blue lightened considerably with water, perhaps with a touch of the same violet used in the tail to create colour harmony. Keep the sky lighter than the water. Let it dry naturally.
The Water and Sea
The sea is painted with loose horizontal strokes, varying between the same blue-grays used in the tail and cooler, lighter versions for the distant water near the horizon. Keep a white edge along the waterline where foam and spray catch the light. A white strip where the tail meets the water surface helps anchor it.
As the sea gets closer to the foreground, add slightly darker marks for ripples and movement. The shadow cast by the tail on the water adds depth and confirms the direction of the light.
The Mountain
A simple, lightly coloured shape — not much detail, and intentionally lighter than the sea but slightly darker than the sky. Its role is purely compositional: to create a contrast where the pale fluke edge reads against a slightly darker background. Keep the edges soft and the tone restrained so it reads as distant.
Preparing the Splatters
Before splattering, complete any pen or ink work first — the gouache goes on last and will cover everything beneath it.
Dark brown ink in a fine pen on the shadow side only: a few marks to tighten the transition between whale skin and splash areas, any fine detail at the edge of the fluke. Keep this minimal. Soften any white areas that feel too hard by gently scrubbing with a clean damp brush — some edges should be soft (suggesting diffuse spray) and some sharp (the direct drips and drops).
White Gouache Splattering
Put the gouache on a completely separate palette. Even a tiny amount mixed into the watercolour wells will make every subsequent wash look chalky.
Load an old toothbrush with white gouache. More water makes larger splatter marks; less water makes smaller, finer ones. Test on a scrap first. Hold the loaded toothbrush over the painting and run your thumb across the bristles to flick paint in droplets. Cover the sky and upper areas with paper towel — the splatter should go mainly on the lower tail, the waterline, and the water surface where splash and foam are.
Splattering is difficult to correct. Work slowly and build up the marks rather than overdoing it in one pass. If gouache lands in an unwanted area, dab immediately with a slightly damp paper towel — you can reduce but probably not entirely remove it.
Once the random splatter is done, use a fine brush and slightly thicker gouache to paint the vertical drip lines that run down from the tips of the fluke. These appear as fine streaks directly below the edge of the tail where water runs off the whale's skin.
Final highlights with a white gel pen along the brightest edges of the tail and any white spots that need sharpening.
Remove the tape — the clean edge immediately improves the whole painting.
Resources...
* Reference photo
* Drawing to trace
Join me on Patreon
Join my Adventures in Colour Tier for $16 to access this post and my full library of over 200 others including deep-dive videos and step-by-steps.