 Video on Patreon
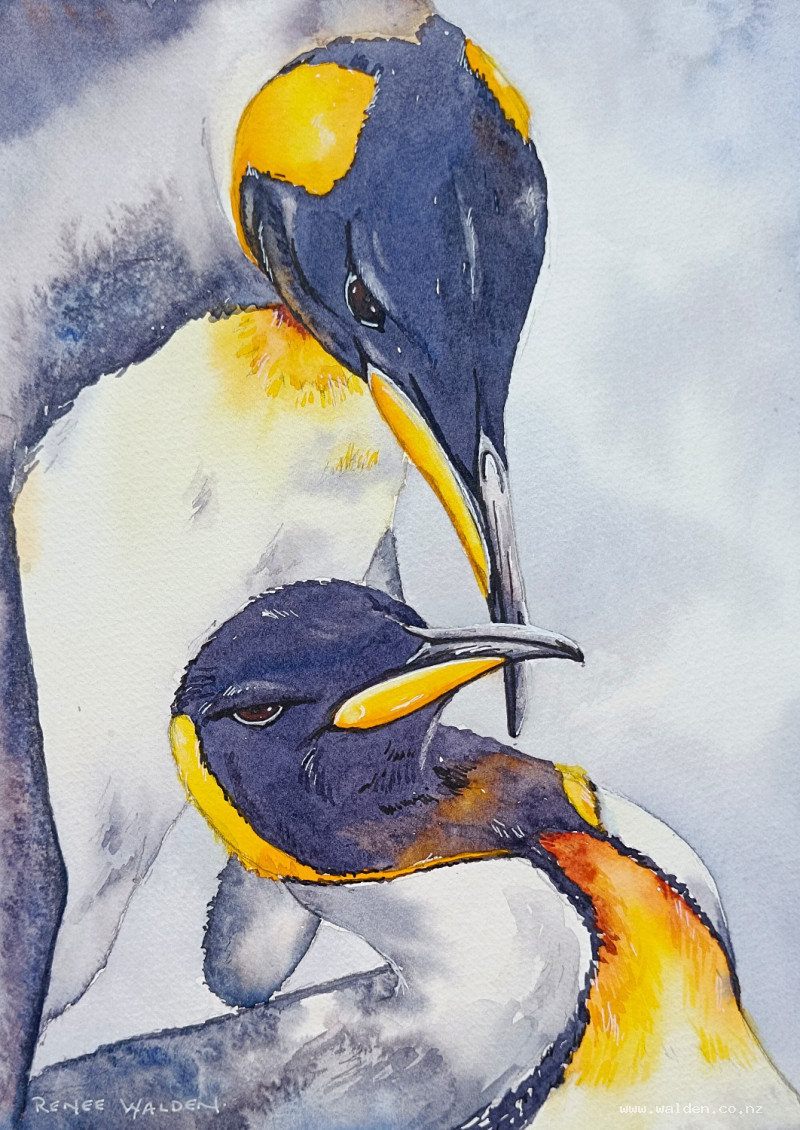
King penguins
1 August 2024
Video - Level ◆◆◆
Heading way, way south for this lesson - to South Georgia and South Sandwich Islands to paint some King Penguins. Aren't they beautiful?!
It's a lovely, close up view of 2 birds. The lesson is quite a long one, because there is a lot of detailing to do, but the painting process itself is quite simple being mostly wet-on-dry and just a few areas wet-in-wet.
If you haven't painted large before, then this is a good one to try. This painting would look very dynamic big.
Happy painting!
Video run-through...
About This Painting
Two king penguins from South Georgia, painted up close and personal — an intimate portrait with most of the detail concentrated around the heads, where the birds are looking at each other. The bodies are kept loose and simple, letting the faces do all the work. The palette leans on ultramarine, quinacridone sienna, permanent violet, and two yellows — a warm deep yellow and a cooler one — plus white gel pen and fine brown ink for the finishing touches.
A traceable drawing is available in the lesson description.
The Pencil Drawing
Spend a good amount of time on the drawing and get it accurate before you pick up a brush. The more confident you are in your drawing, the more you can relax and focus on the painting. Draw dark — with many layers of saturated colour to come, you'll want to be able to see your pencil lines through the paint, especially in the very dark areas around the head.
That said, there are a few places where white paper needs to stay clean: the bright white edges of the neck and the belly highlights. Use a kneadable eraser to lighten those areas before you start painting. A kneadable eraser is particularly handy here because you can shape it into a point and get into the tight spots around the bird's outline.
Painting Order
Paint the birds first, then add the background afterward. This is the same approach used for animals with backlighting or bright edges — it's much easier to paint the subject and then cut in around it than to try to reserve those edges while painting the background first.
Paint both birds at the same time so you can match the colours. While you have a dark mix loaded, do the dark areas on both heads; while you have yellow on the brush, hit both beaks and chest patches together.
Colour Palette
The heads look almost black in the reference, but avoid using black straight from the palette — it will look flat and dead. Instead, mix a very dark blue-gray from ultramarine blue, quinacridone sienna, and a touch of permanent violet. These three colours will separate slightly on a wet surface, creating subtle variation and life in what would otherwise be a dull uniform dark.
For the yellows, you'll need at least two: a warm deep yellow (such as Hansa yellow deep, almost orange) for the rich patches close to the head, and a cooler yellow further down the chest. Having a bright cadmium yellow light on hand as well gives you flexibility to adjust.
Painting the Heads
Mix up a generous pool of the dark blue-gray — more than you think you'll need, since you're painting both heads in the same session.
Work quickly with a well-loaded brush so the paint stays wet and the colours can move and merge on the surface. Keep this area smooth where the feathers are tight and close, particularly across the crown and around the beak. Where the dark area meets the yellow patch, you can let the edge go slightly rougher to suggest the texture where the feather types change.
Leave small highlights unpainted — these are what give the rounded shape of the head its form.
While the dark paint is still wet, drop in small touches of yellow where it bleeds into the dark area at the sides of the face. This creates a slightly greenish transition which is accurate to the reference and adds colour interest.
Remember: watercolour dries much lighter than it looks when wet. Aim to go as dark as you can in a single wash rather than having to glaze over it afterward.
The Yellow Areas
Use the warm deep yellow for the vivid orange-yellow patches on either side of the head, transitioning to the cooler yellow further down the chest. Work wet so the two yellows merge softly. Drop in a little of the dark blue-gray mix at the edges where the yellow meets the darker feathers — this knock-back helps integrate the colour and prevents the yellow from looking too isolated.
The White Areas
The white chest feathers and bright neck edges are simply reserved white paper — no paint goes there. Keep those areas clean. A few very pale cool shadows can be added later to give the white areas form, but keep them subtle; the contrast between clean white paper and the surrounding darks does most of the work.
The Beaks
The beaks have a distinctive orange-pink band. Treat this as its own colour area — mix a warm orange with a touch of your deep yellow and a hint of the permanent violet to knock it back slightly. The beak tip and the dark stripe are painted with the main dark mix.
The Background
Keep the background very soft and almost abstract — its job is purely to support the birds, not to compete with them. Use a large flat brush with plenty of water and the same grayish blue used throughout the painting.
The key contrast decisions are: keep it light behind the darkest head so that dark area has maximum contrast, and go slightly darker behind the white chest so the white reads clearly. Everywhere else, keep it pale and washy. Tilt your board slightly so the wet wash flows downward naturally and softens as it goes.
The birds should be the darkest elements in the whole composition — if anything in the background starts to approach the same value as the heads, lighten it immediately.
Final Details
Once everything is thoroughly dry, work around the focal point — the two faces — with a small brush (size 4 or smaller) and a concentrated mix of the dark colours with very little water. Start with the eyes, then work outward to the beak detailing and any feather definition in the head area.
Add a few feather marks in the yellow areas with a darker yellow, working in the direction the feathers grow. Soften each mark immediately with a damp brush so they read as texture rather than hard lines. Keep the detail sparse as you move away from the faces — the bodies should stay loose.
How do you know when to stop? If you're wondering what to do next, the answer is usually to put the brush down.
Pen and Ink Work
When the painting is completely dry, use a fine-nibbed pen with dark brown ink (black also works) to sharpen the focal point. Concentrate on the heads only — a few crisp marks around the eyes, the edge of the beak, and any feather definition that needs tightening. The goal is for it to be almost invisible; a viewer shouldn't be able to tell you've used ink at all.
Finish with a white gel pen: a small dot or arc of highlight in each eye immediately makes them come alive. Use the fine nib first, and follow up with the broad nib if the highlight needs to be more prominent.
Remove the tape — the clean edge transforms the whole painting and gives you a clear read of whether anything still needs attention.
Resources...
* Reference photo
* Drawing to trace
Join me on Patreon
Join my Adventures in Colour Tier for $16 to access this post and my full library of over 200 others including deep-dive videos and step-by-steps.