 Video on Patreon
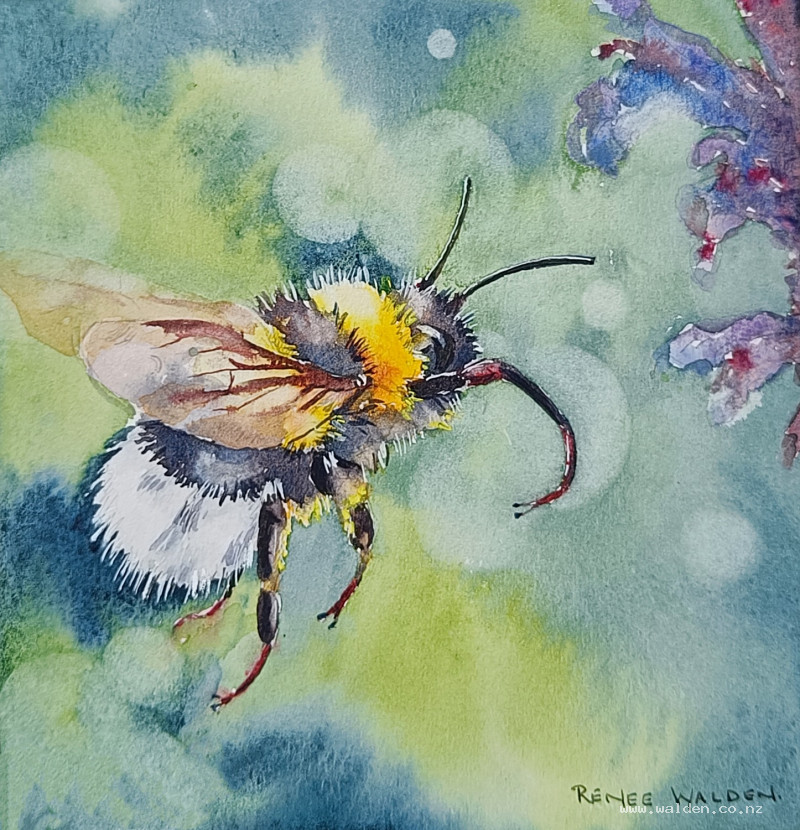
Bumblebee
22 August 2024
Video - Level ◆◆◆
A super, super cute fluffy bumblebee. What's not to love?!
The focus here is on the bee itself, with all the other elements in the scene soft and blurry. We have fun with painting the bright colours and the little hairs, with the transparent wings over the top. Paint the bee quite big, so that you don't have to use a very tiny brushes for the details.
Happy painting!
Video run-through...
About This Painting
A close-up bumblebee in gorgeous detail — fluffy striped body, translucent wings, shiny legs dusted with pollen — set against a soft bokeh background of out-of-focus flowers. Lots of different techniques in one lesson: varied darks for the bee's "black", transparent wings, wet-into-wet background, bokeh stencil lifting, and fine detail work with gouache or acrylic markers.
The bee is painted very large to make the detail manageable.
A traceable drawing is available in the lesson description.
Extra Materials for This Lesson
Stencil with cut-out circles: For lifting out the bokeh spots. Available cheaply from art or craft suppliers, or cut from thick plastic or card. A range of circle sizes gives more natural results.
Old stiff synthetic brush: For scrubbing inside the stencil circles to lift colour. Don't use a good brush.
Fluffy hair detail — choose one method:
- White and yellow gouache with a very fine brush (number one) — the method used in this lesson
- Masking fluid applied around the bee's edges before painting (remove after the background dries)
- White and yellow Posca markers, or a white gel pen
Brown ink (dark): For final detail work. Black also works given the blue tones in the scene.
Colour Notes
Natural things are never just one colour. The bee's "yellow" ranges from cool lemon yellow through warm Hansa yellow to orange-brown. The "black" shifts from brown to true black to blue-black. The wings are barely there — mostly transparent with raw sienna or natural sienna for the slightly opaque areas. Look closely at the reference photo before mixing.
Bee body (yellows): Lemon yellow, Hansa yellow medium, Hansa yellow deep, a dulled orange (orange mixed with brown).
Bee body (blacks): Ultramarine and quinacridone sienna — the heavy ultramarine creates texture, the fine quinacridone sienna sits on top. Keep both colours unmixed on the palette too so you can shift warmer (brown) or cooler (blue-black) as needed.
White/pale section: The same ultramarine-quinacridone sienna mix, very heavily diluted — barely a grey.
Wings: Natural sienna or raw sienna, very dilute. Wing veins: the dark mix, almost no water.
Background greens: Sap green (light areas), indigo (dark areas).
Flowers: Lavender, ultramarine violet, cobalt blue — two or three purples. Reddish-brown (pink mixed with sienna) at the base of the trumpet shapes.
Painting Order
- White section — light shadow marks
- Yellow stripes
- Black sections — merge into wet yellow
- Legs and antennae
- Wings — light glaze and veins
- Flowers — loose and simple
- Background — wet-into-wet, green and indigo
- Bokeh effect — stencil lifting
- Final details — gouache, ink, gel pen
Step 1: White Section (Tail)
Even white areas need some form. Apply a very dilute grey (ultramarine and quinacridone sienna, mostly water) in light directional marks following the direction the fur grows — downward along the belly. Some marks hard-edged, some softened with a clean dry brush. Subtlety is everything here; err on the side of too little.
Step 2: Yellow Stripes
Wet each yellow section before painting so the colours have time to merge and so the black can blend in at the edges. Start with lemon yellow for the brightest, coolest areas (usually the top/highlight side), shift to Hansa yellow medium and deep towards the shadow side, and add the dulled orange-brown at the darkest parts. Leave the highlight completely free of paint.
Paint into the wing area too — the wings are transparent and will show the body colour beneath them. Keep an eye on how wet the yellow is before starting the black, and work before it dries fully so the two merge at the edges.
Step 3: Black Sections
Mix a dark, saturated ultramarine and quinacridone sienna. Also keep each colour unmixed nearby to shift warmer or cooler as you go. Apply while the adjacent yellow is still slightly damp. Vary the colour — blue-black in cooler shadow areas, warm brown-black where reflected light from the ground bounces up. Paint the direction of the fur for a fluffy edge. Lift out highlights immediately with a clean dry brush.
Step 4: Legs and Antennae
Yellow first on any pollen-dusted legs, while still wet add the dark black. Legs are shiny — lift out a highlight while still damp. Antennae are slightly thicker at the base, tapering to a rounded (not sharp) tip. The eye is very dark at the edges with a blue highlight.
A small red area (burnt sienna and pink) appears near the head — add while other darks are still wet.
Step 5: Wings
The front wing needs only a very light glaze of natural sienna in the less-transparent areas — most of it should remain almost clear. While still slightly damp, paint the wing veins with the dark mix at near-zero water consistency — they should be fine and slightly blurry, not sharp, because the wings are moving.
The back wing is almost entirely out of focus — barely any colour at all. It will pick up more colour when the background is painted over it.
Dry thoroughly.
Step 6: Flowers
These are secondary to the bee — keep them loose and simple. Use a large brush held well back. Dab in the colours freely (lavender, ultramarine violet, cobalt blue) and let them bleed together. Leave white gaps for highlights. Reddish-brown at the base of the trumpet shapes. Enough detail to read as flowers, not enough to compete with the bee.
Step 7: Background — Wet-into-Wet
Wet the entire background area carefully with clean water, cutting around the bee with a flat brush (the flat edge gives control). Go over the back wing and some of the flowers — these should blur back into the background.
Contrast against the bee: Where the bee is pale (tail), make the background dark (indigo). Where the bee is dark, keep the background lighter. This pushing contrast is what makes the bee pop.
Drop in sap green for light areas and indigo for dark areas, letting them blend. Use a large brush for the broad areas and a smaller one for cutting in around the bee's edges. Work fast enough to keep the whole area wet. Don't hairdryer mid-stage — let it dry naturally so all the colours settle and merge without cauliflowers forming.
Step 8: Bokeh Effect
Once completely dry, place the stencil over a chosen spot. Wet the circle with clean water, scrub gently with the old stiff brush, then lift the colour with a paper towel. Work one circle at a time. Vary the sizes. Some circles bright, some more subtle. It's easy to overdo this — go slowly, step back after each one, and stop well before it feels like enough.
Step 9: Final Details
Watercolour first: Reinforce any darks that have faded, lift out any highlights that have been lost, and deepen the eye. The lost back wing may need a thin glaze of natural sienna to pull it just slightly forward from the background.
Yellow and white gouache (or Posca markers): Fine individual hairs around the edges of the bee's body and along the fluffy sections — working in the direction the fur grows. Dots and flicks, not solid coverage. Don't cover the beautiful washes underneath.
Brown ink or pen: Shadow sides of fine details, a few crisp edges where needed. Don't outline.
White gel pen: Highlights on the antennae, shiny spots on the legs, eye highlight.
Step back frequently. If wondering what to add next, stop — the painting is finished.
Resources...
* Reference photo
* Drawing to trace
Join me on Patreon
Join my Adventures in Colour Tier for $16 to access this post and my full library of over 200 others including deep-dive videos and step-by-steps.