 Video on Patreon
Still water
5 September 2024
Video - Level ◆◆◆
Thank you to all of you who dropped me an email with requests upcoming lessons. There were quite a few of you who asked for a skills lesson on painting still water. So here it is!
Water is a wonderfully interesting subject and there isn't just one way to paint it. My aim for this skills lesson is to give you some ideas on what to look out for before you pick up a brush, and then a set of steps you can follow. By the end of the lesson you'll have a worksheet you can keep to refer to later.
We'll paint more water and reflections in upcoming lessons.
Happy painting!
Video run-through...
About This Lesson
This is a skills lesson on painting still water — one of the most endlessly varied subjects in watercolour. Because every scene with water is different (different colours, reflections, ripples, light), the lesson begins by analysing a series of reference photos to identify what to look for before picking up a brush. From there, we work through a worksheet together and finish with a small painted scene putting all the principles into practice.
A downloadable worksheet is available in the lesson description so you can print it out and refer to it later.
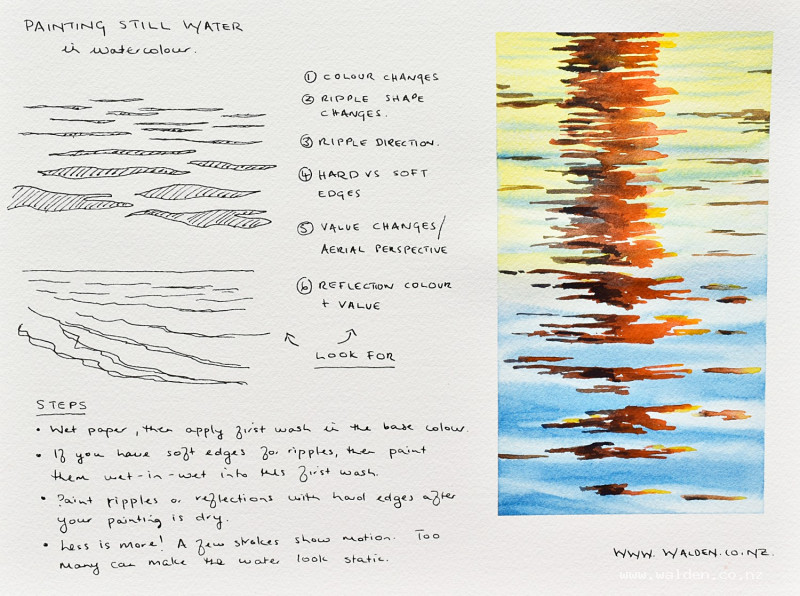
What to Look For: Six Key Observations
1. Colour
The first instinct — especially from childhood — is to paint water blue. But water is reflective and transparent, and often has suspended particles (mud, algae, floating matter) that affect its colour. The blue you see in water is a reflection of the sky. If there's no sky visible in your scene, there may be no blue in the water at all — for example, water in shadow under bridges or trees can have no blue whatsoever.
Before picking up your brush, look carefully at what colours are actually present. A single scene might contain blues, near-whites, yellows, and deep oranges. A sunset scene might have very dark blues alongside reflected yellows. Shallow water near a shoreline will often show the colour of the sandy or rocky bottom through it, especially as the depth changes. Urban water may carry mud or pollution that darkens and muddies the reflections. Look first, paint second.
2. Ripple Shape
Even in still water, there are usually some ripples. The key thing to observe is how their shape changes with distance. In the foreground, ripples appear three-dimensional and interesting. As they recede towards the horizon, they become progressively flattened and elongated — foreshortened — until at the horizon they appear as very thin, flat marks.
This happens because in the foreground you're effectively looking down at the top surface of each ripple, seeing its full shape. At the horizon, you're viewing them almost at eye level, so they compress into near-horizontal lines. Adjust your brushwork accordingly: start with a larger brush in the foreground for full, expressive marks, and shift to smaller, flatter strokes as you move towards the back.
3. Ripple Direction
Ripples are usually created by wind, and the wind may be coming from a particular angle rather than straight towards you — or ripples might be caused by a boat, or by rocks beneath the surface. Close to the shore, ripples can be at all kinds of angles. The common beginner mistake is to carry that angle all the way back to the horizon, which looks wrong.
What actually happens optically is that however angled the ripples are near you, by the time they reach the horizon they appear parallel to it — horizontal. Watch the water if you're painting on location; stand and observe for a while before you start painting.
4. Hard and Soft Edges
Look carefully at where edges in the water are hard (sharp and distinct) and where they're soft (diffuse and blurry). Water is rarely all one or the other — there's usually a combination. This applies both to ripples and to reflections. Paying attention to edge quality is one of the things that makes a water painting feel convincing.
5. Tone
Water can be very light (reflecting a pale sky) or very dark (reflecting trees, buildings, or shadow). Don't assume — look at the actual tonal range in your scene. In some scenes the water is the darkest area; in others it's the lightest.
6. Less Is More with Ripples
It can become addictive adding ripple marks, and it's tempting to keep going. But too many ripples can tip a painting from feeling dynamic to feeling static. Build up marks gradually and stop before you think you need to.
Painting the Water: Step by Step
The Underwash
Wet the paper and apply the base wash, keeping it lighter in the distance and varying the colour according to what you've observed in your reference. Let the colours merge wet-into-wet. Don't rush.
While the paint is still damp (not soaking wet — wait until the sheen is beginning to go), start adding the ripple marks. In the foreground, make full three-dimensional shapes; further back, shift to flatter, more horizontal strokes. Change to a smaller brush as you move towards the horizon.
To lift out highlights while the paint is still damp, clean your brush thoroughly, dry it on a paper towel, and press it gently onto the surface to pick up colour. Keep cleaning the brush between lifts or you'll just spread colour back onto areas you've already lightened. Extend a few ripples and highlights off the edge of the water area so the marks don't feel boxed in.
Watch the paper as you work. If the paint isn't moving, the paper is too dry — stop and let it dry fully rather than continuing and getting hard, unwanted marks.
Once dry, a clean scrubbing brush can lift out additional highlights with slightly harder edges. Work gently; this step is difficult to undo.
Painting the Reflections
Mix your colours before you start. For the scene in this lesson, that means three mixes: a bright orange for the highlights on the sunlit side, a more muted burnt orange for the mid-tones, and a darker brown for the shadow side. Keep the highlight consistently on one side and the shadow on the other across all the reflection shapes.
Because this stage is wet on dry, there's no need to rush. Start with interesting, three-dimensional shapes in the foreground, shifting to flatter zigzag marks as you move towards the back. Hold the brush further back along the handle for looser, more relaxed marks.
Work in from the edges with the darker tones, and drop in the highlight colour while the mid-tones are still wet so they merge softly. Leave some edges hard and blur others — refer back to what you observed in the reference about edge quality.
In the final pass, a few dark marks (darkening your brown further if needed) in the immediate foreground can add depth and anchor the scene. As always: less is more.
A Note on Composition
Even in a small study or skills exercise, it's worth thinking about composition. Placing the main column of reflection slightly off-centre rather than dead-centre will immediately make the painting more interesting.
Resources...
* Reference photo
* Worksheet
Join me on Patreon
Join my Adventures in Colour Tier for $16 to access this post and my full library of over 200 others including deep-dive videos and step-by-steps.