 Video on Patreon
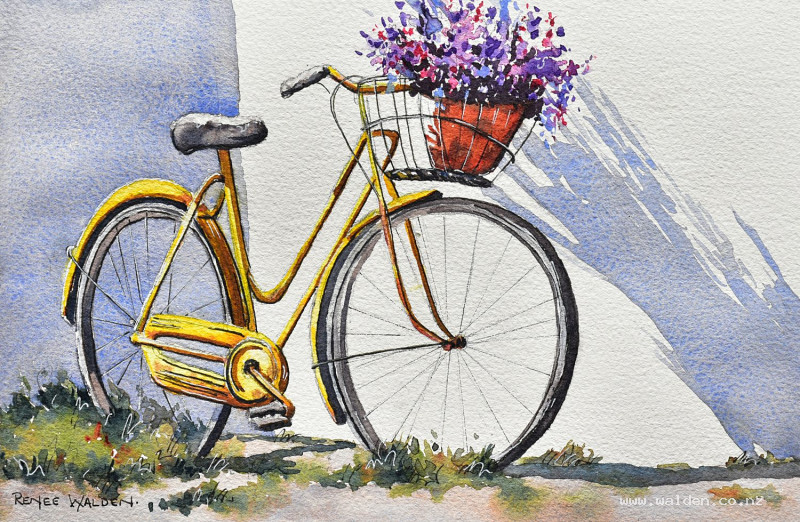
Yellow bicycle
3 October 2024
Video - Level ◆◆◆
This week we paint a very cheerful yellow bicycle. One that has been left to end its days in the garden and in the sun. I always find these so charming!
The bicycle itself is so pretty, but what really caught my eye were those wonderful shadows. You'll notice that in the reference photo the background wall was yellow too, but I chose to make the most of the shadows by leaving the wall white, giving us the chance to play with blue shadows against the yellow bike. Complimentaries!
You can paint this scene nice and slowly. Everything is done wet on dry, so there's no need to paint fast, just take your time and enjoy all the little details.
Happy painting!
Video run-through...
About This Painting
A cheerful old yellow bicycle leaning against a white wall, half swallowed by weeds and flowers, with a pot of purple blooms in the basket — and wonderful cast shadows that bring the whole scene to life. The bicycle itself is the main drawing challenge (plenty of detail), but the painting is built up methodically in stages so nothing feels overwhelming. The shadows at the end are what transform it from a bicycle illustration into a proper painting.
A traceable drawing is available in the lesson description. Work bigger rather than smaller for this one — detail is easier to handle at scale, and viewers naturally stand further back from larger paintings, which is forgiving of small imperfections.
Drawing Tips
The back wheel is an oval, not a circle — watch the perspective. Mark the shadow shapes in the drawing before painting. For complex detailed drawings, consider doing a rough on scrap paper first, correcting it freely, then tracing the final version onto your watercolour paper to avoid over-erasing.
Colour Palette
Bicycle frame (yellows): Lemon yellow (bright, sunlit), Hansa yellow medium, Hansa yellow deep. A reddish-brown (burnt umber with a touch of pink, or dragon's blood) for rust areas.
Dark parts — tyres, saddle, handles: Ultramarine and quinacridone sienna mixed for a varied blue-black-brown. Keep the two colours separate on the palette as well as mixed, so you can shift warmer or cooler as needed.
Rims: A very pale wash of ultramarine (silvery metal), or slightly warmer brown where chrome has aged.
Bicycle shadow (on yellow parts): Yellow mixed with burnt umber — a dirty yellow-brown. (Alternatively, test mixing yellow with its complementary purple; can work but risks going dull.)
Flowers: Ultramarine violet, lavender (opaque), quinacridone rose.
Flower pot: Quinacridone sienna, darkened with the blue-brown tyre mix.
Foreground weeds/gravel: The tyre mix heavily diluted, with a little sap green added for an olivey colour. Not too bright — save the saturated colour for the bicycle.
Wall shadows (large cast shadows): Ultramarine and a touch of brown, heavily diluted, with a hint of permanent violet. Blue-leaning and cool, contrasting with the warm bicycle. Mix more than you think you'll need — these are large areas.
Deepest shadow accents: Indigo.
Painting Order
- Yellow parts of the bicycle frame
- Dark parts — tyres, saddle, pedals, rims
- Flowers (two passes)
- Flower pot
- Foreground — gravel and weeds
- Bicycle shadows (shadows on yellow parts)
- Large cast shadows on the wall
- Ground shadows
- Pen work and final details
Step 1: Yellow Parts of the Bicycle
Work wet-on-dry (no rush). Start with the lemon yellow on every sunlit edge and bright surface. Drop in Hansa yellow medium and deep for darker areas while still wet. Add touches of rust colour (reddish-brown) to grunge it up — this is an old, weathered bike, not a new one. Leave small white gaps for shine highlights or lift them out with a clean dry brush while still damp.
Work systematically around the frame, ignoring shadow areas entirely at this stage. Keep water clean — yellows dirty quickly. The reference photo is essential for this step; it's easy to lose track of which parts are yellow.
Step 2: Dark Parts
Mix ultramarine and quinacridone sienna for a rich blue-black. Keep both colours unmixed on the palette too, so you can vary the tone — cooler (bluer) for deep shadow, warmer (browner) where reflected light hits. Go dark enough so the tyres read as proper black rubber against the yellow.
Apply to tyres, saddle, handlebar grips, and all other dark elements. Paint straight over any spokes or small wire details — these will be added with pen later. Give the rims a very thin pale wash of ultramarine to suggest silver metal.
Step 3: Flowers (Two Passes)
First pass: Use a larger brush, held well back, to loosely dab in the flower colours (ultramarine violet, quinacridone rose, lavender). Splatter into the wet paint to soften some marks and create a sense of movement and depth. Don't overwork — some flowers should be blurry.
Second pass (once dry): A smaller brush with slightly thicker paint, adding a few more defined flower shapes on top. Use negative painting with a very dark purple-green mix (ultramarine violet plus sap green, or add Payne's grey/indigo) in the shadow areas between flowers. This pushes the front flowers forward. Work with very little water for strong darks here.
Step 4: Flower Pot
Block in with quinacridone sienna, shaping around the flowers. While wet, drop in the dark blue-brown tyre mix in a few places to age the terracotta. Leave a highlight on the sunlit side.
Step 5: Foreground Weeds and Gravel
Dilute the tyre mix heavily for the gravel — very pale grey. Leave some dry gaps. Add a little sap green to make an olivey colour for the weeds. Keep everything muted and dark at the base — save the bright colour for the bicycle. Use indigo to darken any areas that need to feel heavy and grounded.
Step 6: Bicycle Shadows
Shadows on the yellow parts of the frame: mix burnt umber into the yellow for a dirty warm shadow colour. Apply carefully to shadow sides, reserving highlights. Go very dark underneath mudguards and other overhangs with the blue-brown mix.
Step 7 and 8: Cast Shadows on Wall and Ground
These are the most transformative step. Mix a generous amount of the shadow colour (ultramarine, a touch of brown, a hint of permanent violet — blue-leaning, not grey). Use two brushes: a large one for blocking in the broad shadow areas quickly, and a small one for navigating around the bicycle details. Work with the board at a slight angle so the wash flows.
Start with one shadow area at a time. Block in the bulk of the shape with the large brush, then immediately use the small brush to tease into the gaps around spokes, saddle struts, basket, and wherever the shadow wraps around the bicycle. Keep the wash clean — don't scrub. A small white gap along the edge of a yellow part reads as shiny metal catching the light, which is actually desirable.
For the ground shadow, add a touch more indigo for the darkest areas.
Step 9: Pen Work
Dark brown ink: Spokes, brake cables, basket wires, and any dark edges that need sharpening. A credit card or ruler helps with the spokes if freehand feels risky. Don't go too dark — spokes especially should stay subtle so any inaccuracies don't read as obvious. Tidy shadow edges and any structural lines that have gone soft.
White gel pen: Highlights on metal rims, shiny rubber, and handlebar grips. Used alongside the brown ink on spokes (draw the spoke in dark, then a white highlight line alongside) to suggest shine and also optically slim any lines that came out too thick.
Yellow Posca marker or yellow gouache: Anywhere a shadow wash has crossed into a yellow area and left a soft or muddied edge. Apply a small amount and smudge gently with a finger to blend it into the paper rather than leaving a hard edge.
Resources...
* Drawing to trace
Join me on Patreon
Join my Adventures in Colour Tier for $16 to access this post and my full library of over 200 others including deep-dive videos and step-by-steps.