 Video on Patreon
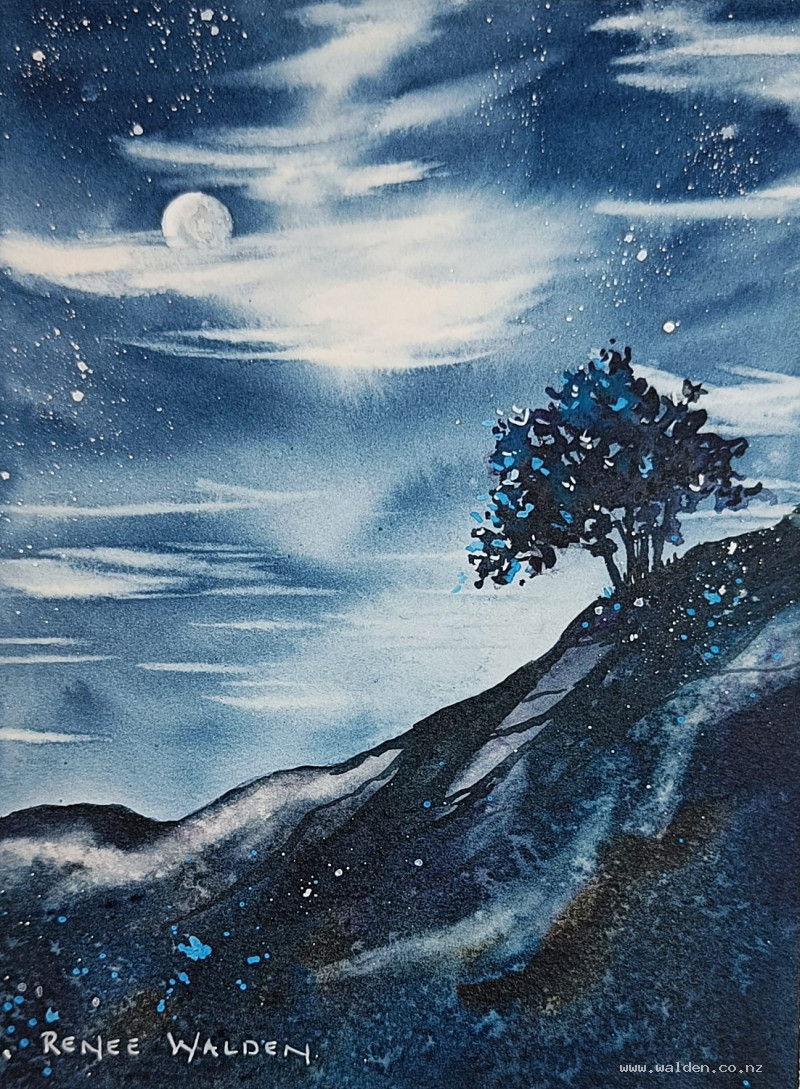
Nightscape
10 October 2024
Video - Level ◆◆◆
In this lesson we paint an imaginary nightscape - a moonlit scene with a dark foreground and silhouetted tree. This is an easy, relaxing painting to do and there's lots of different ideas you can experiment with.
Happy painting!
Video run-through...
About This Painting
An imaginary nightscape — a dark, cloud-filled sky, a moon rising through the clouds, stars, and a bare silhouette tree on a hillside. There is no reference photo for this one; it comes entirely from imagination. That makes it a great painting to make your own: change the colours, move the moon, change the tree shape. Every version will come out differently.
The Moon — Choose Your Method
Three options, each with trade-offs:
Lift out later (recommended): Paint the whole sky freely, then lift out a circle once dry using a stencil and a clean, slightly damp brush. The advantage is you can choose the moon's position after seeing how the sky develops. The disadvantage is you may not lift the colour completely and will need white gouache to finish.
Masking tape circle: Cut a circle from masking tape and stick it down before painting. The white circle is fully protected. The disadvantage is the position is fixed before you start, and the edge may need softening afterwards.
Masking fluid circle: Apply a circle of masking fluid before painting. Same trade-offs as tape.
Whichever method, avoid drawing a pencil circle for the moon — pencil under white gouache or lifted colour creates a visible halo.
Colour Palette
Sky and silhouettes: Indigo, Prussian blue, and permanent violet — a rich, deep, warm-dark mix using three colours so they separate on the paper and create visual interest. A pure black or grey would look flat. Add quinacridone sienna to darken further for the foreground (a brown-darkened near-black). Payne's grey can be added if the mix isn't reaching dark enough.
Alternatives: ultramarine, phthalo blue, and permanent violet also work well.
Accent colour on tree: Cobalt teal (or any colour not used elsewhere) for the moon-lit side of the tree.
Moon and stars: White gouache on a completely separate palette.
Optional star accent: Blue gouache or the teal colour mixed with white gouache — opaque but slightly coloured rather than pure white.
Painting Order
- Sky — very dark wet-into-wet with cloud lifting
- Foreground hill and ground
- Tree silhouette
- Moon — lifted or unmasked
- Stars and splatters
- Final details
Step 1: The Sky
Wet the sky thoroughly with clean water, painting right over where the tree will be (it will be a very dark silhouette and doesn't need any reserved white). Let the water settle into the paper.
Mix a large pool of the three dark colours together — this is a big sky and you'll need plenty. The mix should be very rich and dark; it will dry much lighter than it looks.
Apply the mix with a large brush, going heaviest and thickest at the very top of the sky and letting the brush run progressively lighter as it approaches the horizon. Go back with almost-dry paint and reinforce the top again — night skies need to be very dark for the stars to read.
While still wet, lift out clouds with a clean, well-dried flat brush. Twist and drag the brush into the damp paint to remove colour in soft, irregular shapes. Keep the brush dry by wiping it on a paper towel between each lift. Clouds near the top can have more interesting, varied shapes; clouds nearer the horizon should be flatter and more horizontal to suggest depth. Leave generous areas of dark sky between the clouds for stars.
If any accidental cauliflowers form, work them into cloud shapes rather than fighting them.
Let dry naturally — don't hairdryer while cloud edges are still softening.
Step 2: The Foreground Hill
Add quinacridone sienna to the sky mix to warm and darken it further. Apply in directional brushstrokes that follow the slope of the hillside — this helps the land read as land rather than a flat shape. Give the horizon an irregular, interesting edge. Vary the colours as you go (drops of indigo, violet, Prussian blue, sienna separately).
While still wet, flick clean water across the foreground with a nearly-dry brush — this creates controlled blooms and subtle texture. Then lift out a few directional streaks with a thirsty brush to suggest rocks, gullies, or patches catching the moonlight. Think about where the moon will be and let the lifted marks radiate from that general direction.
Step 3: The Tree
Still using the same dark mix. Hold the brush at the back of the handle throughout.
Build the tree shape loosely, starting with the general mass and then dropping the individual colours in separately while still wet (violet, Prussian blue, sienna) so they separate on the paper. Aim for something branching and bonsai-like rather than a solid round lollipop. Leave gaps — the sky showing through is part of the design.
Flick clean water into the tree while still wet to soften some edges, as if wind is blurring the leaves.
On the moon-lit side, lift out some highlights with a clean thirsty brush. Then drop in the accent colour (cobalt teal or your chosen colour) along that same lit edge.
Switch to a rigger or very fine brush to tease out trunks and major branches while still damp. Aim for an odd number of trunks. Ground the tree with a few gestural marks at the base — diagonal roots, shadow marks, or craggy shapes that anchor it to the hillside and point the eye towards the focal point.
Dry thoroughly with a hairdryer.
Step 4: The Moon
If lifting out: Place a circular stencil over the chosen spot (cutting into a dark area, partly overlapping a cloud, so it reads as rising). Scrub gently with a clean, slightly damp brush, repeatedly cleaning the brush. It won't lift perfectly — some gouache will be needed to finish.
Soften the moon's edge so it feels embedded in the scene rather than cut out — use a clean damp brush to blur the transition into the surrounding cloud.
White gouache details: Catch one bright highlight edge. Add a few irregular marks across the face of the moon for craters. Keep the overall shape round.
Important: Make sure clouds pass in front of the moon, not behind it. The moon is far above the clouds; if your clouds appear to be in front of the moon, use a clean brush to cut back into the lower edge of the moon circle, letting cloud colour bleed through. A moon that sits in front of clouds is a small thing that reads as a big mistake.
Step 5: Stars and Splatters
Load a clean splattering brush with white gouache (well-diluted to a flowing consistency — too thick and it won't splatter). Concentrate the stars in the darkest parts of the sky near the top. Stars should feel slightly clumped in places, not evenly distributed like polka dots.
Add a few slightly larger stars individually with the tip of a fine brush, nestled among the splatter clusters.
A few white gouache flicks across the foreground add sparkle and imply moonlight catching surfaces.
A second round of splattering with the teal colour (or teal mixed with white gouache) can add variety — slightly coloured highlights rather than pure white.
Avoid splattering stars in front of the moon.
Optional: Pen Work
No pen was used in this lesson, but if the tree branches came out too thick or not fine enough, black ink with a fine nib works well for adding delicate branches and twigs. It can also be used for a few fine grass marks at the base of the tree.
Join me on Patreon
Join my Adventures in Colour Tier for $16 to access this post and my full library of over 200 others including deep-dive videos and step-by-steps.