 Video on Patreon
Snowman
28 November 2024
Video - Level ◆◆◆
It's time to start thinking about Christmas cards and I spotted this super cute reference photo with 4 little snowmen. Perfect! That means we can paint several different ones. And then once you've got the idea you could even make up your own.
Happy painting!
Video run-through...
About This Painting
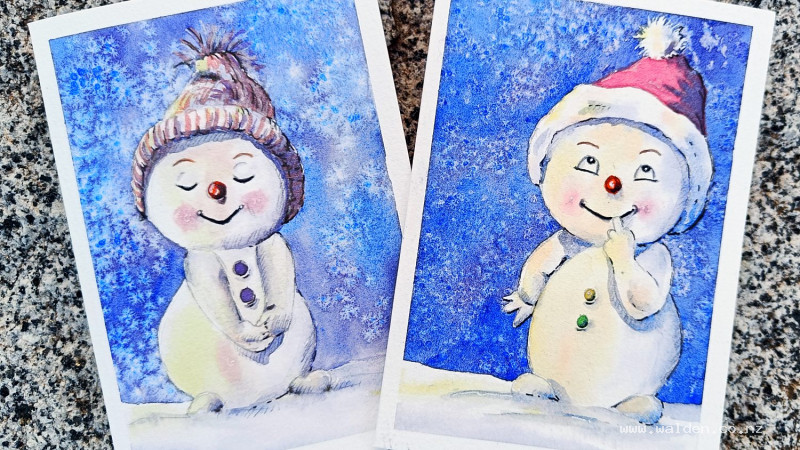
A charming watercolour Christmas card featuring a single snowman — painted with a warm golden glow on the sunlit side, cool purples in the shadow, and a sparkly salt-textured background. Pearlescent or metallic watercolours add a little shimmer to the buttons and hat if you have them. This is a lovely project for painting multiple cards; the reference photo has four snowmen to choose from.
A traceable drawing is available in the lesson description.
The Pencil Drawing
The snowman is placed slightly off-centre for a more dynamic composition, and the hat has been changed to a Santa hat — red top, white trim, and white pompom. The drawing is kept simple since most of the detail comes from the painting process itself.
Painting Order
- Snowman body and head — soft wet-into-wet wash to establish form
- Snow on the ground — same approach
- Hat — form wash, keeping the trim and pompom white
- Background — dark purple wash with salt dropped in for snowflakes
- Details — nose, cheeks, eyes, mouth, buttons, hat colour
- Cast shadows — darker, more defined pass over the whole figure
- Pen work and white gel pen highlights
Step 1: The Snowman's Form
This first pass is all about giving the body and head a rounded, three-dimensional feel — not about the cast shadows, which come later.
Mix two colours for the warm, sunlit side: a yellow (such as Hansa yellow medium) and a peachy pink made by adding a touch of pink to the yellow. For the shadow side: ultramarine blue with a touch of permanent violet, well diluted with plenty of water — keep it light.
Wet the entire body and head area, including the eyes. Drop in the warm yellow on the sunlit side and let it bleed into the peachy pink. Then bring in the purple from the shadow side, letting the colours meet and merge softly on the wet paper. Don't scrub the warm and cool colours together — if yellow and purple mix on the brush they'll produce a dull grey-brown. Place them separately and let the paper do the blending. Leave some areas completely unpainted for the brightest white highlights.
A clean dry brush can lift out any highlights you may have accidentally covered. Paper towel on hand is useful if paint spreads further than intended.
Step 2: The Snow on the Ground
Wet the ground area and repeat the same process — a touch of warm colour where the sun catches it, and soft purple in the shadowed areas. Leave plenty of white.
Step 3: The Hat
Wet the entire hat including the white trim and pompom. These areas are white like the snowman itself, so treat them the same way — a hint of warm glow on the light side and soft purple shadow on the other. The red of the hat top comes later; for now you're just establishing the form.
Step 4: The Background
The background is painted in a deep purple — the same ultramarine and permanent violet mix used for the shadows — dark enough that the snowman pops clearly against it. Using two pigments rather than one gives the salt a more varied and interesting effect as the granules work differently on each pigment.
Work with a large brush to keep the wash even and avoid streakiness. Have salt ready in your other hand as you go, because the salt needs to go in while the paint is still very wet — you'll see a clear sheen on the surface. Shape carefully around the snowman as you work. Vary the colour slightly as you go, sometimes a touch more blue, sometimes more purple. Around the pompom, work the negative painting loosely so it looks soft and fluffy rather than perfectly round.
Drop salt granules in as you paint each section — don't wait until the whole background is done. Use a generous amount for plenty of texture.
Let the salt dry naturally — don't use a hairdryer, as it can blow the granules onto the snowman and streak colour. You can continue working on other parts of the painting while it dries. Once completely dry, brush the salt off gently with a soft brush or clean paper towel.
Step 5: Details
Nose: Paint a bright orange carrot shape, leaving a small highlight at the top.
Cheeks: Wet a generous area around each cheek — larger than you think you need. Drop in a tiny amount of almost-dry pink or red paint in the centre and let it spread outward softly. You want a diffuse blush, not hard circles.
Eyes and mouth: Mix ultramarine with a dark brown or reddish brown to make a near-black. Paint dark rings around the eyes with dark pupils, and add the mouth. If you're not confident with a tiny brush, save this for the pen stage.
Buttons and hat: This is a good opportunity to use pearlescent or metallic watercolours if you have them. Choose fun colours for the buttons — the lesson uses green and yellow. The hat top is painted in red.
Step 6: Cast Shadows
This is the pass that really brings the snowman to life, so take your time. Use the same ultramarine and permanent violet mix, slightly darker than the form washes but still not too heavy.
Some shadows have hard edges — the shadow cast by the hat brim, under the chin, and under the arm. Others are soft — within the eye sockets, around the back of the body, along the sides. For each shadow, lay the colour down first and then decide which edges to soften with a clean damp brush.
Key areas to address: under the hat brim, under the chin, the side of the arm, inside the eye sockets (snowman eyes are typically punched in, so there's a small sunken shadow), under the nose, under the mouth, around the buttons (to make them look three-dimensional), on the pompom, and at the feet — paint the foot shadows and carry straight into a shadow on the snow so the snowman looks settled into it rather than sitting on top.
Vary the colour slightly throughout — sometimes a little more blue, sometimes more purple — and vary the strength so it feels natural. Step back from the painting to check whether any areas need to go a touch darker before finishing this stage.
Step 7: Pen Work and Highlights
The painting should feel soft and fresh at this point, so use the pen sparingly. A fountain pen held upside down gives a fine, delicate line. Work only on the shadow side, using a broken line rather than a solid outline — just enough to sharpen a few edges without losing the softness. Add a little definition around the facial features.
Finish with a white gel pen on the sunlit side for the brightest highlights.
If you're not confident with a pen or only have a thick nib, a sharp pencil works just as well for tightening things up gently.
Resources...
* Drawing to trace
Join me on Patreon
Join my Adventures in Colour Tier for $16 to access this post and my full library of over 200 others including deep-dive videos and step-by-steps.