 Video on Patreon
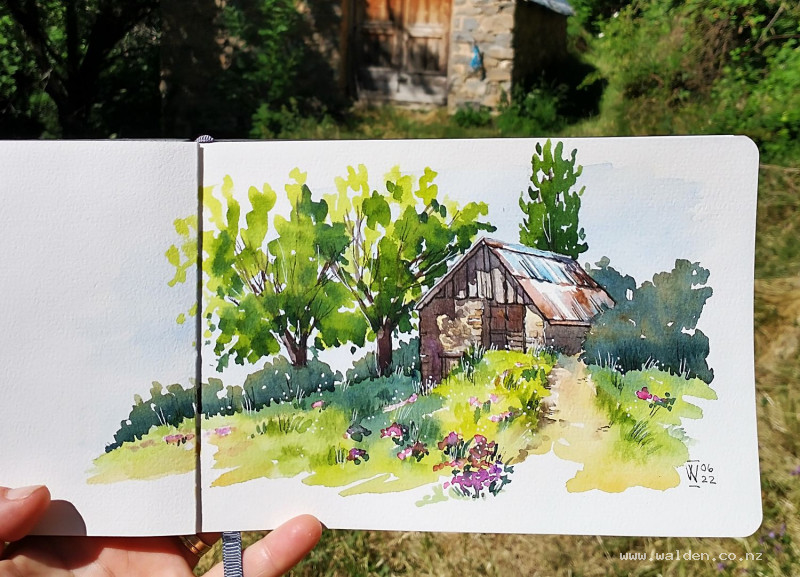
Rustic barn in Señes
2 November 2022
Video - Level ◆◆◆
Join me painting plein air in the Pyrenees in Spain as I paint an old barn in the abandoned town of Señes.
Happy painting!
Video run-through...
About This Painting
This scene is from Sennes, a mostly abandoned village in the foothills of the Spanish Pyrenees on the Camino de Santiago. An old barn sits on the edge of a hillside, partly shaded by a large overhanging tree, with wild overgrown grasses and purple wildflowers in the foreground. The composition spans a double-page spread in a sketchbook — the barn on the right-hand page, with the tree and sloping valley carrying over to the left. The real magic of this scene is the dappled shadow the trees cast across the building, which gives it atmosphere and a sense of a warm, still afternoon.
Materials
For colours you'll need cobalt blue, burnt umber (for mixing grays), natural sienna, burnt sienna, sap green, permanent violet, and a warm red for any rusty tones. For pen work: a fine-nib fountain pen or fineliner with dark brown ink (not black — it suits the warmth of the scene better), a white gel pen, and a white Posca or Molotow marker. A yellow or pink Posca marker is handy for wildflowers if your scene includes them.
The Pencil Drawing
Start with light, ruler-assisted marks to establish the construction, proportions and perspective before committing to anything darker. Key things to check: the angle of the steep roof (steeper than you might expect — it's designed to shed snow), the relative heights of the two sides of the barn, and the position and size of the door. Confirm that the bottom of the door sits at roughly the right height on the wall before inking in details.
Once the structure is correct, go back in with looser, more confident freehand lines. The stonework is irregular with close-set stones and not much mortar, so draw it freely rather than precisely — a few well-placed stones are enough to suggest the texture. The wooden slats on the barn have gaps between them and are not all perfectly straight, so exaggerate that slightly. Leave space for the large tree, which will extend well off the top of the page, and indicate the main branches.
Exaggerate the slope of the hillside to convey the sense that the barn sits right on the edge of a drop into the valley below — the reference photo alone won't fully communicate that feeling.
Painting the Sky
Mix a generous, well-watered pool of cobalt blue. Wet the sky area with clean water first, shaping around the buildings and tree canopy. Drop the cobalt in gently and go slightly darker at the top, letting it flow toward the horizon. Keep it simple and fresh — this is a clear day, no clouds needed.
The Trees and Foliage
Work the trees wet on wet for soft, airy canopies. Mix greens from your yellows and blues, varying the temperature — some warmer, some cooler — to avoid a flat, uniform look. Leave gaps in the foliage: these are important not just for realism, but because they create the spaces where birds can appear later and where light breaks through. The large poplar is mostly upright in structure; the overhanging tree has more character in its branches, so take a little time indicating those.
Keep the background greens lighter and cooler than the foreground. For the meadow and overgrown grasses in the foreground, use a mix of greens with some burnt sienna dropped in to suggest dry, sun-baked grass. A touch of permanent violet for the wildflowers adds a lovely note of colour.
The Barn Walls and Roof
Paint the sunlit stone walls with a warm, dilute wash of natural sienna, with a touch of gray dropped in while still damp to suggest age and variation in the stonework. The corrugated iron roof has its own rusty warmth — burnt sienna and natural sienna work well here, applied loosely. Leave some light areas on the roof where the metal catches the sun; you can recover these with a white gel pen later if needed.
Paint the wooden slats on the barn in the direction they run, varying the tone slightly between boards. The darker gaps between the slats can be suggested loosely at this stage — the pen work will sharpen these up later.
Painting the Shadows
This is what gives the painting its three-dimensionality and atmosphere, so take your time and be brave with it. The shadows here are not flat gray — they carry warmth from the surfaces they fall across, and the dappled quality of tree shadow adds movement and life.
Mix a warm shadow colour from burnt umber and cobalt blue, leaning toward more burnt umber so it reads as warm rather than cold. Have a little permanent violet ready to drop in for interest. For the cast shadow of the poplar tree on the roof, shift the mix toward more cobalt blue — this shadow is cooler, reflecting the sky.
For the dappled tree shadow on the barn walls, put marks in but then soften some of them: clean your brush, dry it on a paper towel, and dab at some of the edges so they blur slightly. Not all of them — a mix of soft and hard edges creates the sense that the tree is moving in a light breeze. The shadows between the wooden slats and under the eaves can be darker and sharper.
Add cast shadows from the grasses onto the path, painted in directional strokes that follow the angle of the light, then softened slightly. The goal throughout is shadow that describes form and suggests warmth rather than just darkening areas.
Let the painting dry completely before moving to pen work.
Pen Work
Start in a less important area — the shadow sides of the tree trunks — to warm up and build confidence before moving to the focal point. The general principle: pen work on the shadow side, restraint on the sunlit side. If you accidentally add a mark on a highlight, a white gel pen can cover it.
For the trees, fine branches are easily added with a pen, and this is where those gaps left in the foliage pay off — give the birds something to sit on. For the barn, work selectively: not every stone, not every slat, just enough to sharpen the building and bring it into focus. Follow the pencil marks loosely, keeping lines slightly wonky to suit the character of the old stonework. The darkest, most confident marks should concentrate on the focal point.
Step back regularly. Most people don't look at paintings as closely as the person who painted them, so check from a distance that it reads well before adding more. When you're unsure where the next mark should go, that's usually the sign to put the pen down.
Finish with the white gel pen for highlights along the top of the roof and to catch any branches in direct sunlight. The white Posca or Molotow marker adds sparkle and can pull out the shiny quality of the corrugated iron beautifully. Shake it with the lid firmly on before use.
Finishing Up
Add your signature or initials, and the month and year. If you're working in a sketchbook spread, the left-hand page is a natural place for a written note about the location, the smell of elderflower, the sound of cowbells — the context that makes a location sketch more than just a picture.
Happy painting!
Resources...
* Reference photo
Join me on Patreon
Join my Adventures in Colour Tier for $16 to access this post and my full library of over 200 others including deep-dive videos and step-by-steps.